
-
Apr, Tue, 2021

How to setup multiple website and multistore in Magento 2 on localhost
Table of Contents
Hey, How are you? Hope you are doing well.
Welcome to the magento2 world.
Let’s understand how can we crate multiple website and multiple store in magento2 on localhost Xampp Windows.
So if you are looking for exact steps to perform above mentioned, then you are in the right page.
Introduction
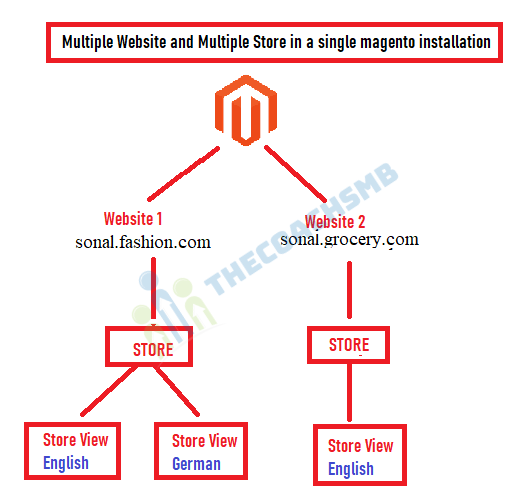
Lets understand the requirement:
- Website sonal.fashion.com with two store views — English and German
- Website sonal.grocery.com with one store view – English
Are you clear with the requirement?
In this process you will learn how to create multiple store for a single website and also how to create multiple website with multistore in localhost.
Follow the steps:-
Step 1: Create a Root Category
Step 2: Create a new website
Step 3: Create a new store
Step 4: Create store views
Step 5: Configure the Store URL
Step 6: Map the vhost to work with Magento 2
Step 1: Create a Root Category
We need to create root categories and its sub-categories for our stores as shown below.
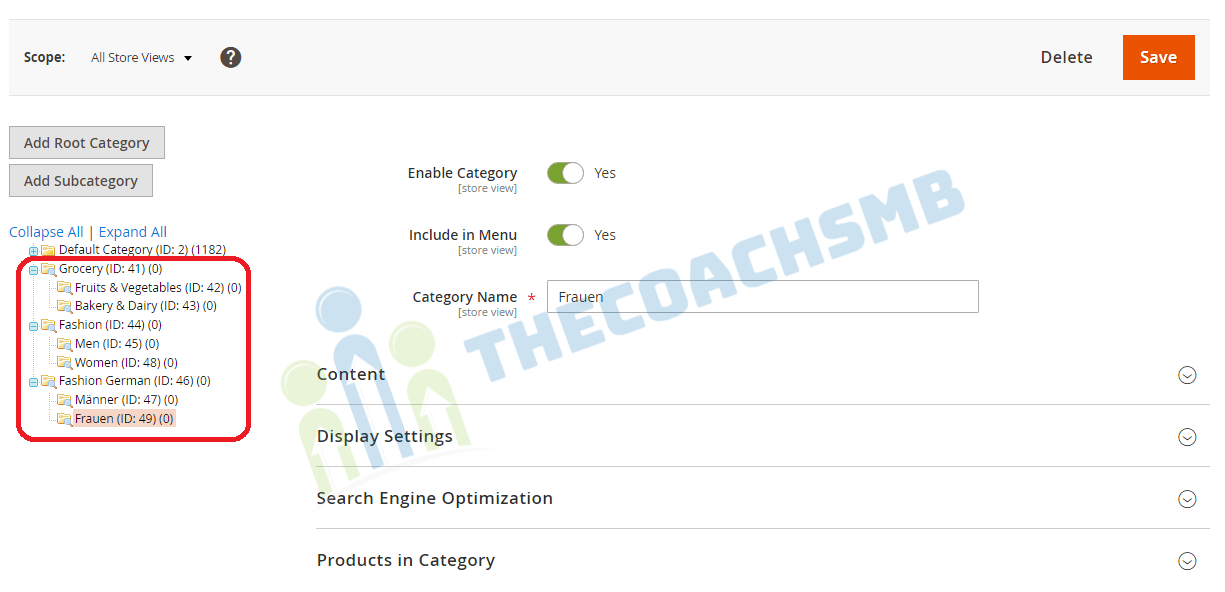
We created
For sonal.grocery.com : –
- Grocery,
- Grocery->Fruits & Vegetables, and
- Grocery->Bakery & Dairy.
For sonal.fashion.com (English Default store view) :-
- Fashion
- Fashion->Men
- Fashion->Women
For sonal.fashion.com (German store view):-
- Fashion German,
- Fashion German->Männer
- Fashion German->Frauen
If you are not sure how to create these categories then follow categories creation video on youtube .
You can create categories as per your requirement.
Step 2: Create a new website
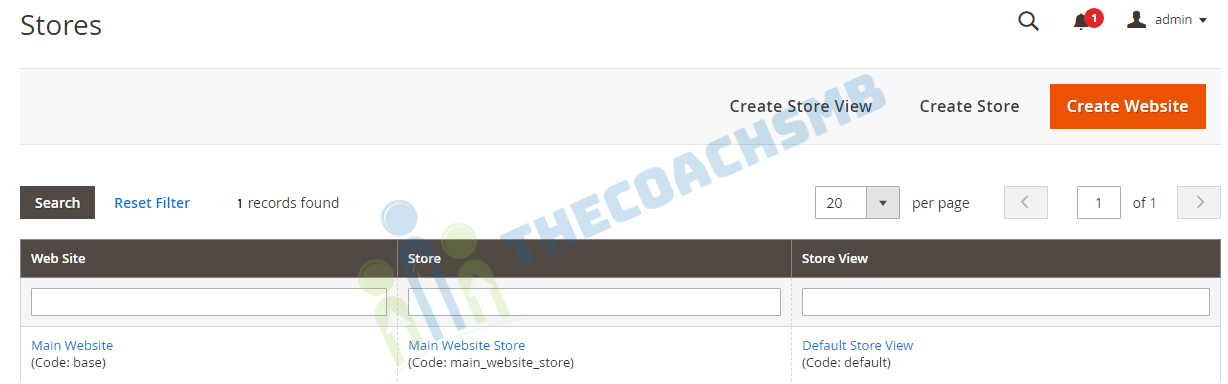
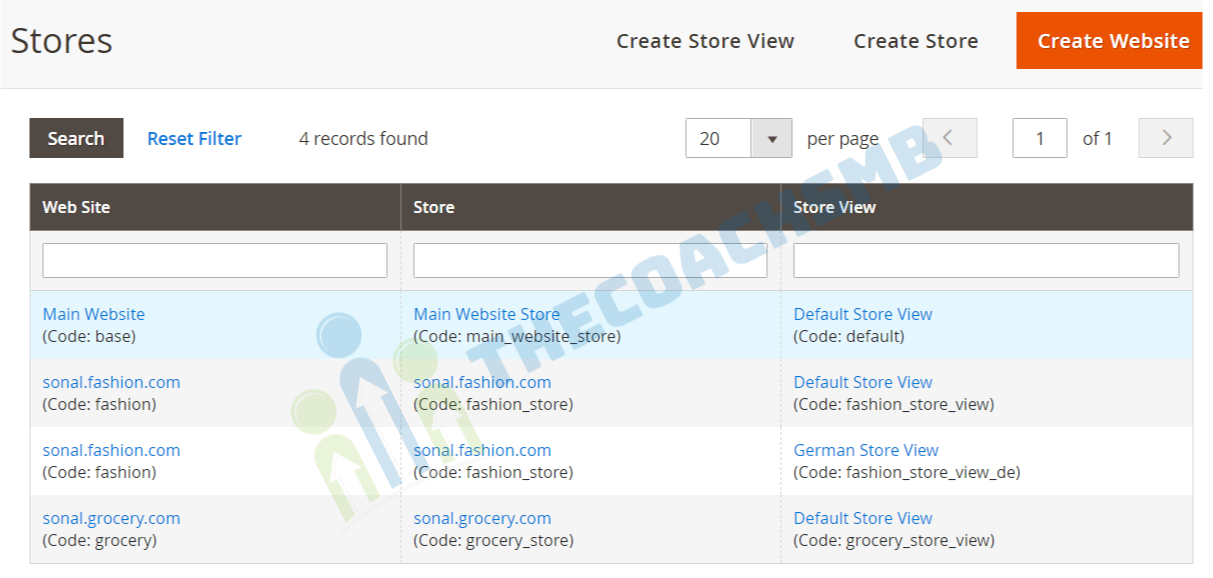
Login into Magento 2 admin, and go to Stores | All Stores. If you install a fresh Magento 2 instance that doesn’t have a store yet, you will see just one row on the Stores grid including Main Website, Main Store and The Main Store View which are default in Magento 2.
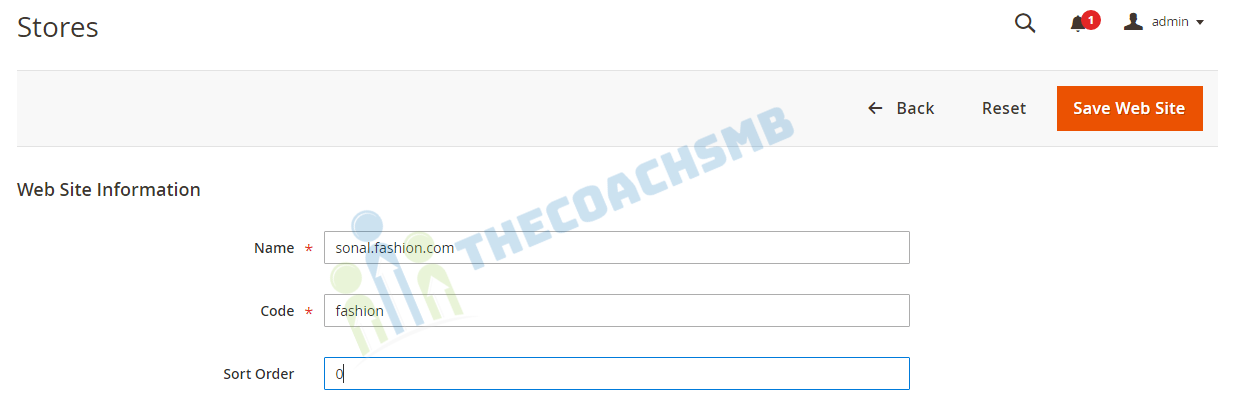
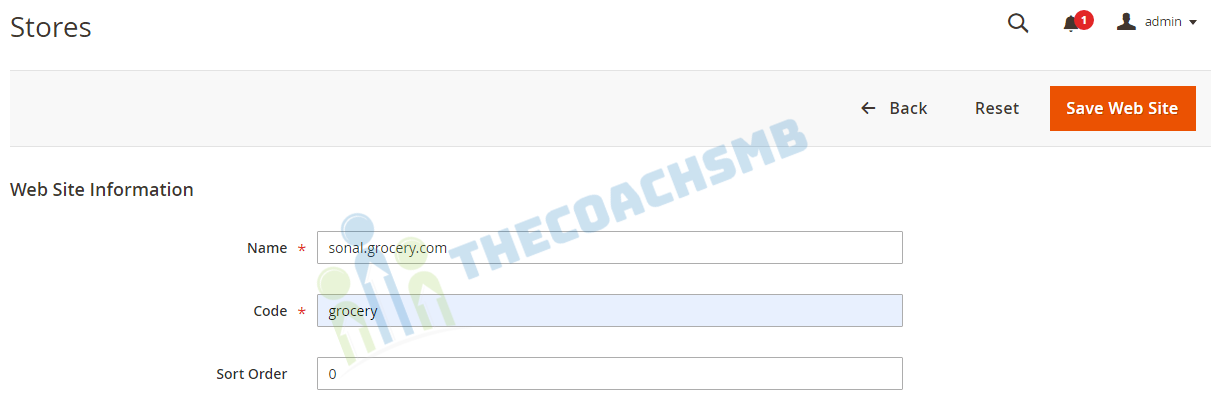
Now, we need to create websites, click on “Create Website” button and fill the information as shown below for sonal.fashion.com and Click “Save Web Site”.
- Name: Enter your website name (eg. the domain of the new website)
- Code: Enter a unique (lowercase) code for the website. The code will be used on the server to point to the domain.
- (Optional) Sort Order: determine the sequence in which the site is listed with other sites. Enter a zero to make the site appear at the top of the list.
Now, its time to create other website that is sonal.grocery.com. Click on “Create Website” button and fill the information as shown below then Click “Save Web Site”.
Our websites has been created. Lets go to next step.
Step 3: Create a new store
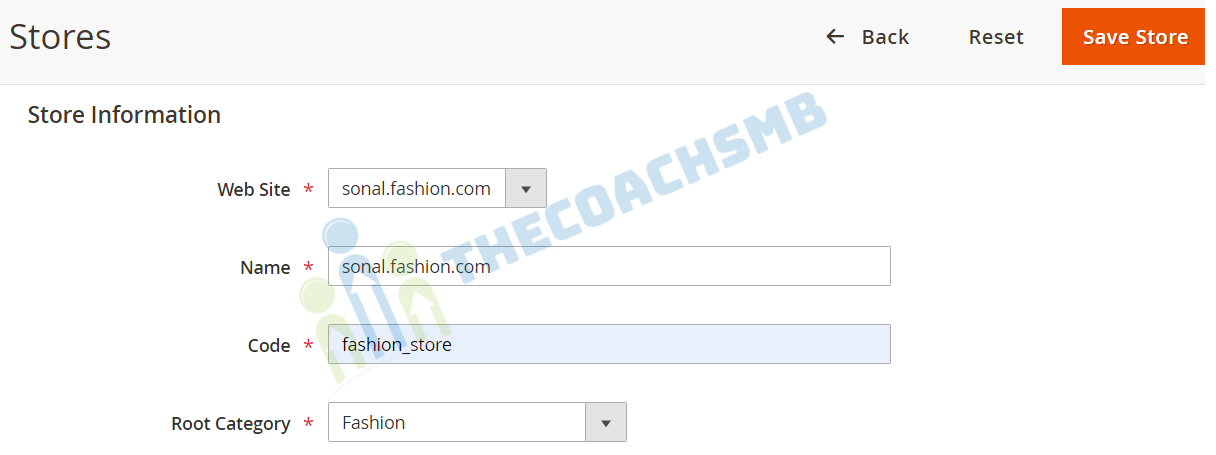
On the Stores page (Stores | Settings | All Stores), click on Create Store and fill the following information as per your requirement:
- Web Site: Assign the name of the website we just created above that is the parent of the new store.
- Name: Enter a name to identify the store. The name is for internal reference only.
- Code: Enter a unique code to identify the store.
- Root Category: Set the root category for this store. The root category defines the category structure for the main menu of the store. You can come back and change the Root category later.
Default Store for sonal.fashion.com –
Select Root Category – Fashion
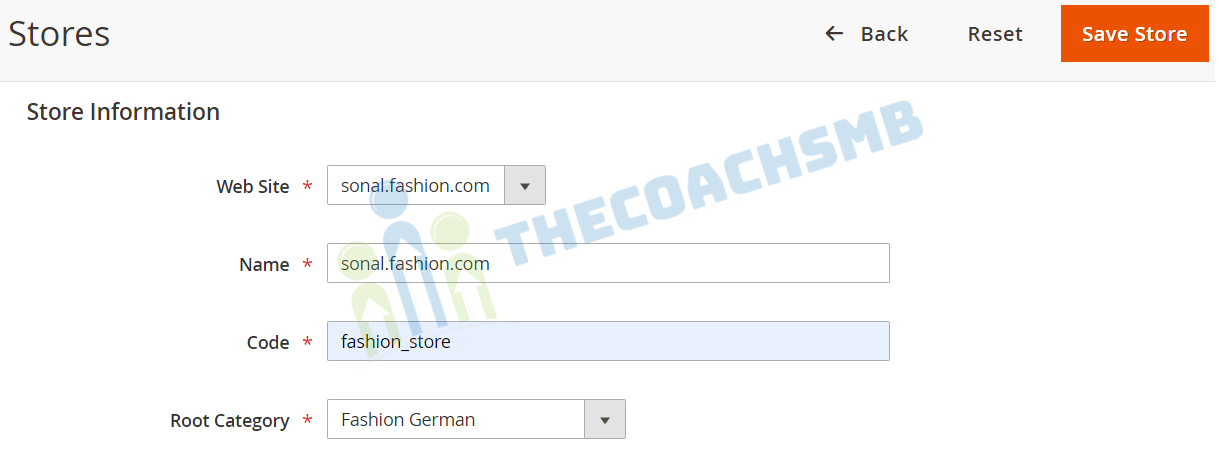
German Store for sonal.fashion.com –
Select Root Category – Fashion German
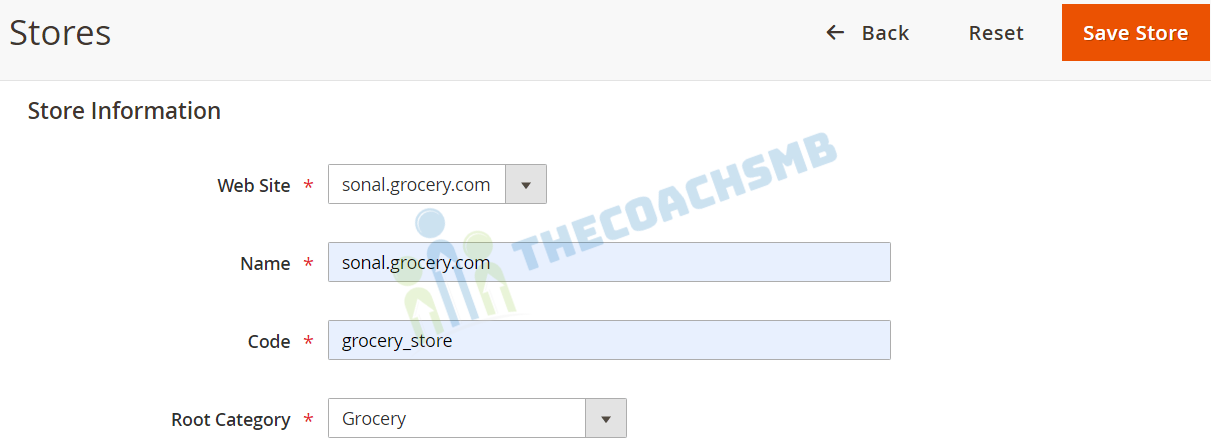
Default Store for sonal.grocery.com –
Select Root Category – Grocery
Done. Awesome we created all stores. Follow the next step.
Step 4: Create store views
On the Stores page (Stores | Settings | All Stores), click on Create Store View and understand the following details:
- Store: Set Store to the parent store of this view.
- Name: Enter a name to identify this store view. This name will appear in the language chooser in the store header.
- Code: Enter a unique (lowercase) name to identify this store view.
- Status: set to Enabled option
- (Optional) Sort Order: to determine the sequence in which this view is listed with other views
- You can repeat the same steps to create new websites, stores or store views. Here are the sample multi-stores we’ve just created above:
sonal.fashion.com – default store view
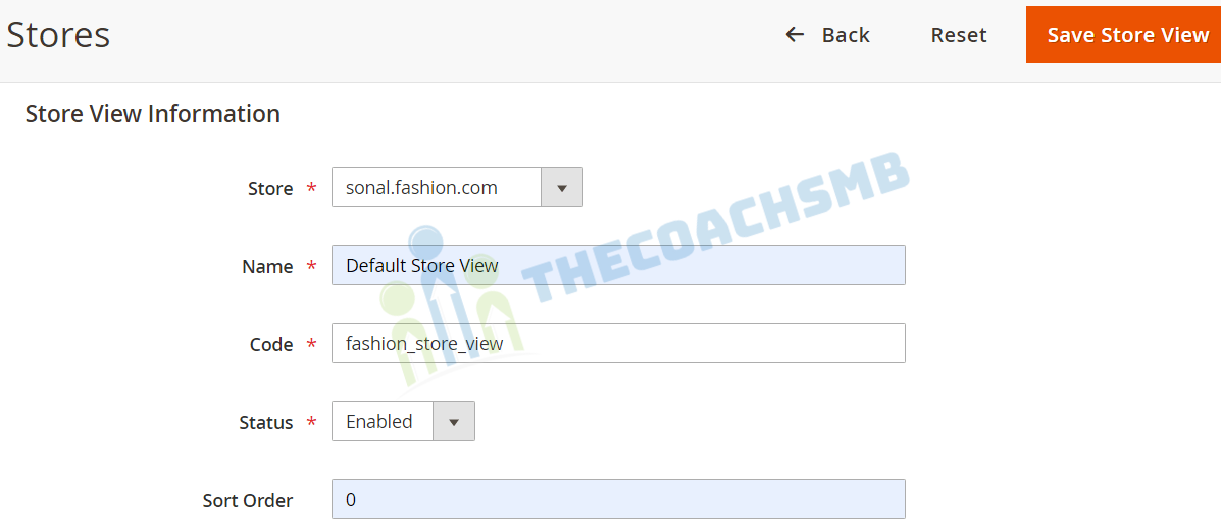
sonal.fashion.com – german store view
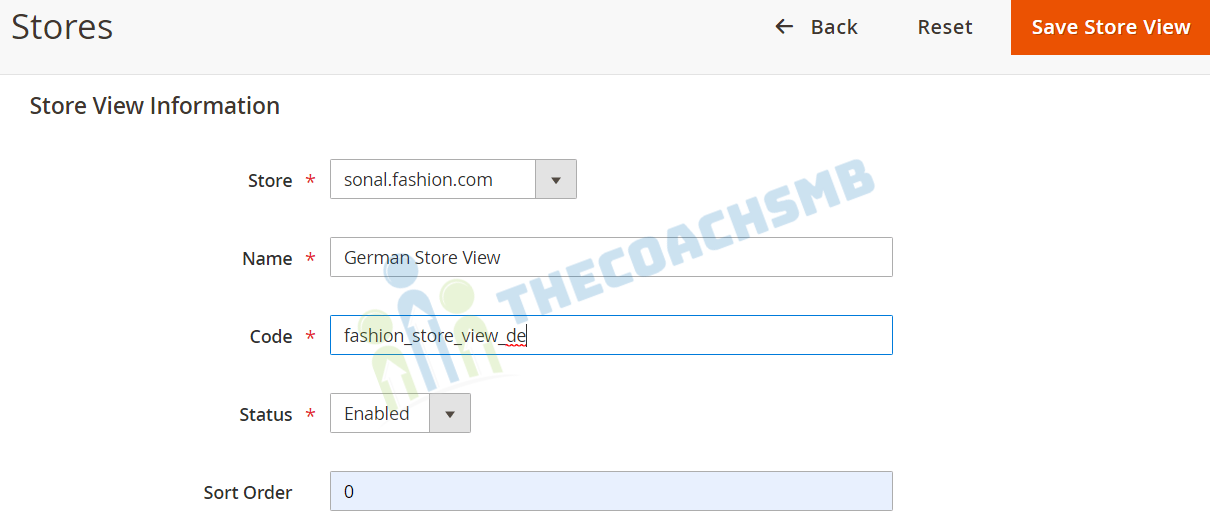
sonal.grocery.com – default store view

Here are our stores ready to launch.
Step 5: Configure the Store URL
Now its time to map the websites with the domain name.
Here’re the steps:
- Configure the base URL
In this tutorial, we still keep the default Magento 2 Stores including Main Website, Main Store and The Main Store View unchanged.
Now let’s configure the Store URL for the two websites — sonal.fashion.com and sonal.grocery.com — that we just created for testing above:
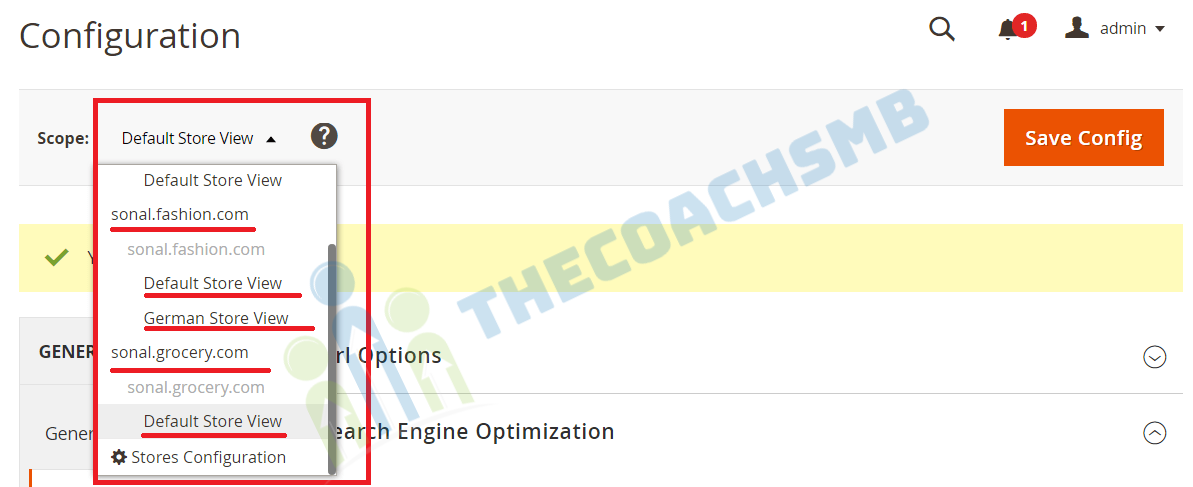
Magento 2 multi stores’ scope
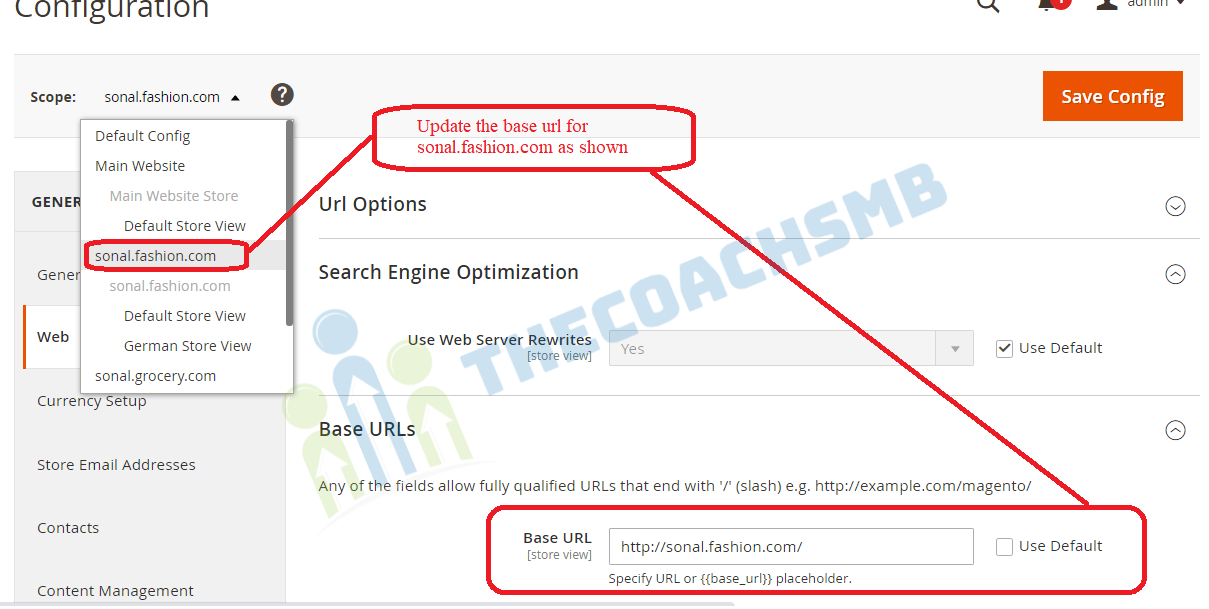
Go to Stores | Configuration | (General) Web | Base URLs. Change the Store View scope at the top to the sonal.fashion.com Website that we created above. You will be prompted when switching; press OK to continue.
Now uncheck the checkbox called Use system value from the Base URL and Base Link URL fields and commit your domain name. Now click Save Config and continue the same procedure for the other website. The output should look like this:
Apply the same steps to configure the base URL for the sonal.grocery.com default store view.
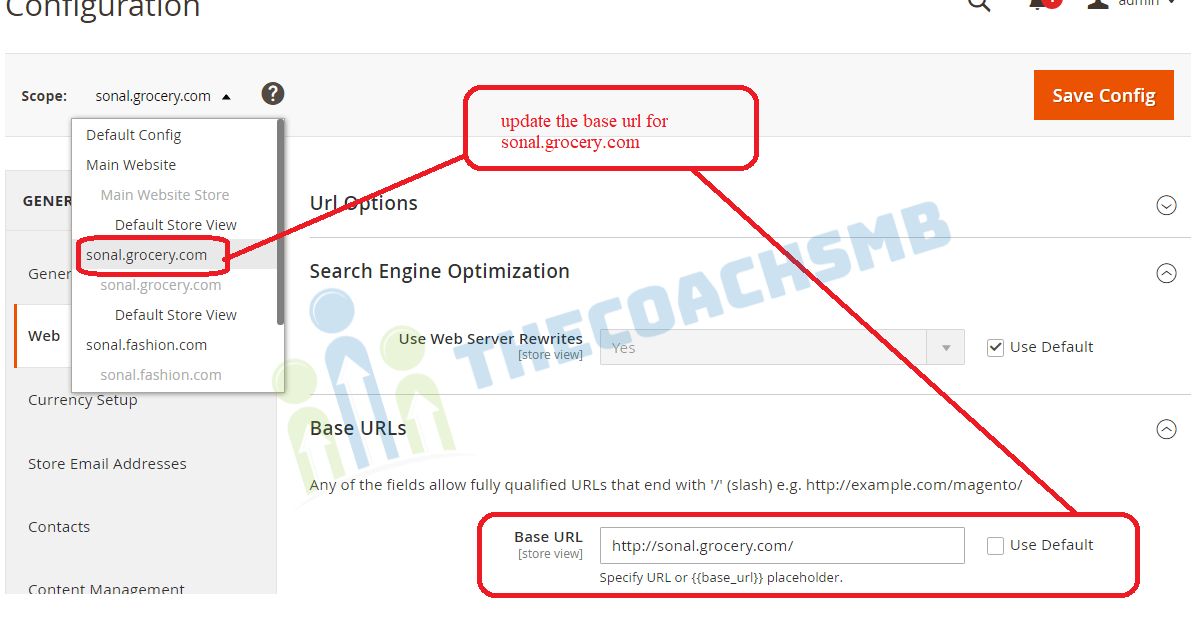
Once done, save your entire configuration
- Configure a Virtual Host (vhost)
For Window OS:
Open up the hosts file as an administrator (Go to C:\Windows\System32\drivers\etc). Add the following (change the IP and domain name accordingly)
127.0.0.1 sonal.fashion.com

127.0.0.1 sonal.grocery.com
For Mac OS:
Open up the hosts file as a superuser (Go to /etc/ directory). Add the following (change the IP and domain name accordingly)
127.0.0.1 sonal.fashion.com

127.0.0.1 sonal.grocery.com
Save the file and run the following command on the terminal:
Depending on your Mac version, you might need to check the commands accordingly.
Map the vhost to work with Magento 2
Depending on your set up preferences, you can follow one of the following options:
Option 1: Editing the index.php file
(This option works for both NGINX and Apache server)
Open up the file index.php in your pub directory of Magento 2 root folder (Make sure you backup this file before editing), and add below code before “$bootstrap = Bootstrap::create(BP, $_SERVER);” line.
$params = $_SERVER;

$domainName = $_SERVER['SERVER_NAME'];
switch ($domainName) {
case 'sonal.fashion.com':
$runType = 'website';
$runCode = 'fashion';
break;
case 'sonal.grocery.com':
$runType = 'website';
$runCode = 'grocery';
break;
default:
$runType = 'website';
$runCode = 'base';
}
$params[\Magento\Store\Model\StoreManager::PARAM_RUN_CODE] = $runCode;
$params[\Magento\Store\Model\StoreManager::PARAM_RUN_TYPE] = $runType;
NOTE:
- Case ‘’: refers to your custom testing domain
- $runType: The sample setup above uses the $runType ‘website’ variable. You may change website to ‘store’, at your discretion.
- $runCode: refers to the unique code for the website that you specify when creating your Website. This code will be used on the server to point to the domain.
- If you set $runType ‘website’, the $runCode should be your Website code
- If you set $runType ‘store’, the $runCode should be your Store View code
Option 2: Editing the .htaccess file:
(NOTE: this option applies for Apache server only)
Add the following code to the bottom of your .htaccess file:
<IfModule mod_rewrite.c>

Options +FollowSymLinksSetEnvIf Host .*sonal.fashion.com.* MAGE_RUN_CODE=fashion

SetEnvIf Host .*sonal.fashion.com.* MAGE_RUN_TYPE=website

SetEnvIf Host .*sonal.grocery.com.* MAGE_RUN_CODE=grocery

SetEnvIf Host .*sonal.grocery.com.* MAGE_RUN_TYPE=website

RewriteEngine on

RewriteRule .* -- [E=HTTP_AUTHORIZATION:%{HTTP:Authorization}]

RewriteCond %{REQUEST_METHOD} ^TRAC[EK]

RewriteRule .* -- [L,R=405]

RewriteCond %{REQUEST_FILENAME} !-f

RewriteCond %{REQUEST_FILENAME} !-d

RewriteCond %{REQUEST_FILENAME} !-l

RewriteRule .* index.php [L]

</IfModule>
You can replace the SetEnvlf Host and MAGE_RUN_CODE variables with your own value accordingly.
- SetEnvlf Host: refers to your custom testing domain
- MAGE_RUN_CODE: refers to the unique code for the website that you specify when creating your Website. This code will be used on the server to point to the domain.
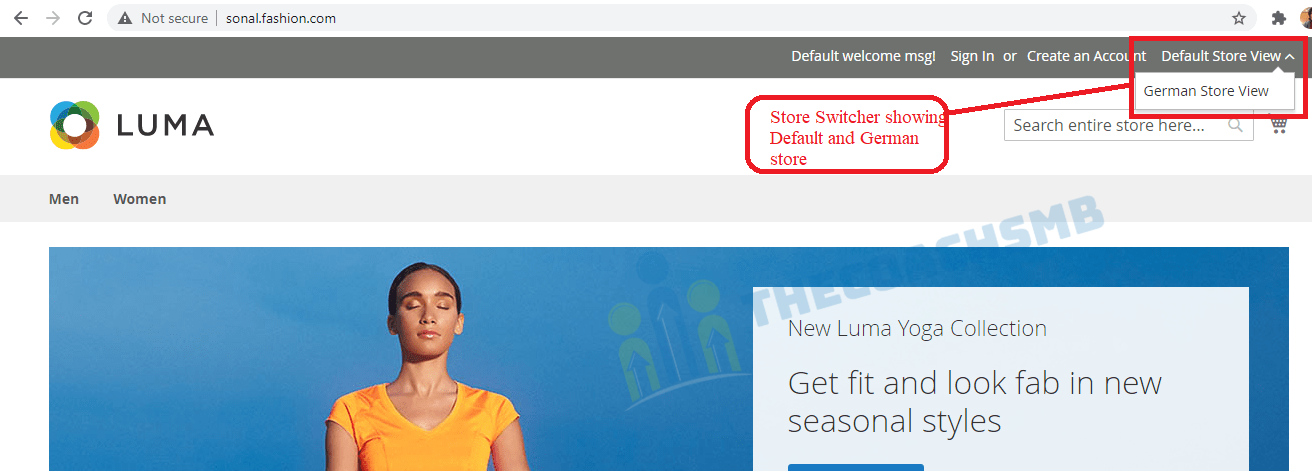
Clear your Magento and browser cache. Then you should be able to see to the custom domains from your storefront.
Access sonal.fashion.com-
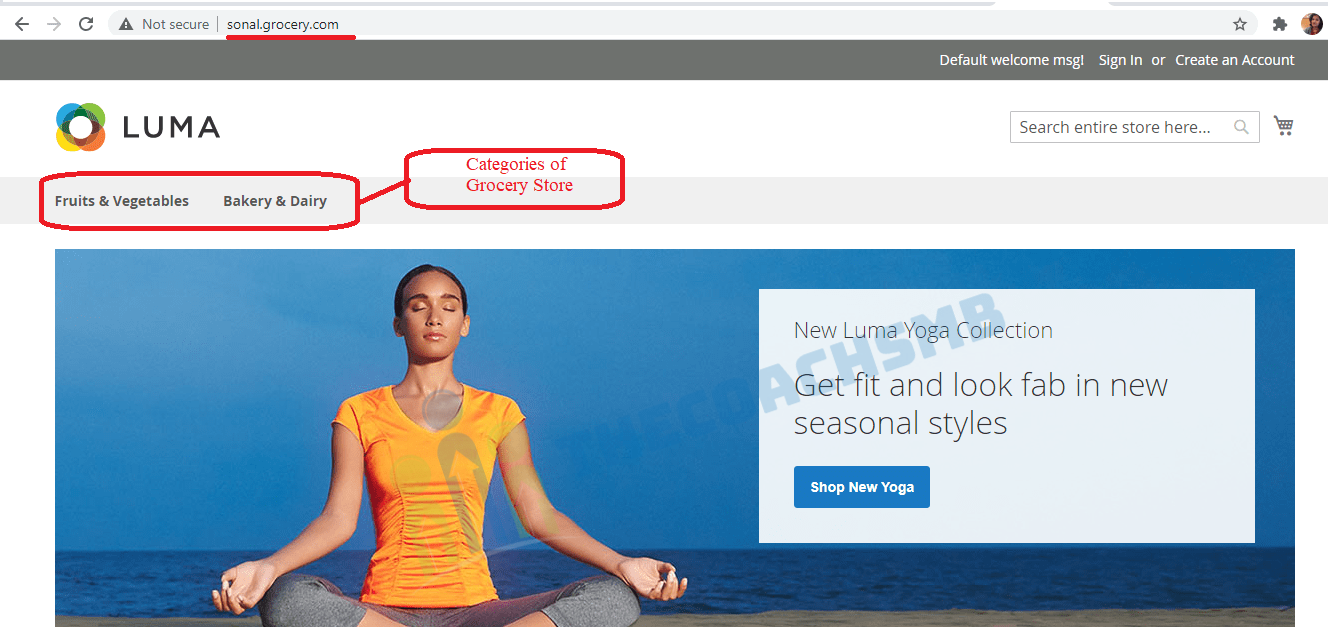
sonal.grocery.com
Summary
In this tutorial, you have got the knowledge of websites, stores, and store views. You have got multi-stores within a single Magento 2 installation and map those websites to custom domains.
Feel free to comment below and let me know your feedback on this.
You can also reach out to this below video to setup multistore and multiple website on the magento2.
Hi Sonal. Hope you fine and good. I follow the above document you provided for setup multiple website and multi-store. But when i run any of them it shows the Apache2 Ubuntu Default Page. whats the problem. I follow all of your guidelines and commands. Please help to solve the issue i am facing.
Thanks for connecting me. I am happy that I could help you.
Thank you so much for your efforts.
Instead of creating a sub-domain for each website can we call it by a subfolder name?
e.g.
sonal.com/fashion
sonal.com/grocery
local in not work multi website
Please follow below steps:
1. Mention the project path in the virtual host file
2. Also mention the domain in the etc/hosts file
3. Restart Apache
Thanks,
Sonal
This was a nice post. Please let me know what code level changes is needed if I want to have different design for different stores. Thanks 🙂
Create or Install different designs. Then in the Admin Panel Content->Configuration, apply the theme as per the store