
-
Feb, Sat, 2026

Magento2 Theme Development Tutorial Step by Step
To customize our website styles means look of the website, you need to create a custom design theme.
By default, there are 2 Magento themes – Luma and Blank – that you can see after successfully installing Magento 2.
Luma is a demonstration theme, while Blank acts as a basis for custom Magento theme customization.
Magento 2 has no restrictions on using the Luma theme for your live store. However, if you want to customize the default design, or if you need to create your own theme, Magento strongly recommends not to change or edit the default Luma and Blank theme files. Because changes or edits to the default files can be overwritten by the latest version of the default files during your Magento 2 upgrades.
In this Magento 2 theme development article, we are going to understand the process of theme creation.
If you want to learn Magento 2 theme development practically with real projects and hands-on implementation, check our
Magento 2 Theme Development Course.
Requirements for Theme Development
Before you begin work on developing your own theme for Magento 2-
- Make sure Magento 2 is installed on your localhost and running smoothly, and
- You have access to the frontend & backend.
If you haven’t installed Magento2, click here for Magento2 Installation on Windows and Magento2 Installtion on Ubuntu/Linux
The following are the steps for theme development:-
Steps of Theme Development:
- Step 1: Create a Theme Directory
- Step 2: Declare Your Theme
- Step 3: Make Your Theme a Composer Package
- Step 4: Add Registration.php to Register Your Custom Theme
- Step 5: Apply and Configure your Custom Theme in Admin
- Step 6: Changing styles Using LESS
Step1: Create a Theme Directory
Start with creating your theme at the following location:
<magento_root>/app/design/frontend/<vendor>/<theme>
vendor: Your Organization Name / Any Unique Name.
theme: Your Theme Name.
 app/design/frontend/
 ├── <Vendor>/
 │   │   ├──...<theme>/
 │   │   │   ├── ...
 │   │   │   ├── ...
To create a directory for your Magento 2 theme, you need to go to: <magento_root>/app/design/frontend.
Under the frontend directory, create a new directory according to your theme vendor name: <magento_root>/app/design/frontend/Thecoachsmb.
Under your theme vendor directory, create a directory for your Magento 2 theme: <magento_root>/app/design/frontend/Thecoachsmb/mytheme.
After creating this structure, you need to declare your Magento 2 theme so that Magento knows it exists.
Step 2: Declare Your Theme
Now you need to create the theme.xml file under <magento_root>/app/design/frontend/Thecoachsmb/mytheme and
use the code below:
<theme xmlns:xsi="http://www.w3.org/2001/XMLSchema-instance" xsi:noNamespaceSchemaLocation="urn:magento:framework:Config/etc/theme.xsd">
     <title>Thecoachsmb Mytheme</title> <!-- your theme's name -->
     <parent>Magento/luma</parent> <!-- the parent theme, in case your theme inherits from an existing theme -->
     <media>
         <preview_image>media/preview.jpg</preview_image> <!-- the path to your theme's preview image -->
     </media>
 </theme>
Where,
<title> tag –> write the name of your theme.
<parent> tag –> you can specify the parent theme for fallback purposes. I am using the Luma theme.
<preview_image> tag –> you can declare a theme image. The theme image is located in app/design/frontend/Thecoachsmb/mytheme/media/preview.jpg. This is a theme image which shows up in the Magento 2 admin on our theme page for preview purposes.
This theme imageshould be in the correct location. If you don’t have this file in the correct location, you will get an error when you visit your theme page through Magento 2 admin. If you don’t have preview image, then don’t mention that tag.
Important Note:-
If you change the theme title or parent theme information in theme.xml after while a theme was already registered, you need to open or reload any Magento Admin page for your changes to be saved in the database.
Step3: Make Your Theme a Composer Package
Composer is a tool for dependency management in PHP. It allows you to declare the libraries your project depends on and it will manage (install/update) them for you.
To distribute your theme as a package, add a composer.json file to the theme directory <magento_root>/app/design/frontend/Thecoachsmb/mytheme/ and register the package on a packaging server.
composer.json example:
Use the following code:
{
    "name": "thecoachsmb/mytheme",
    "description": "Custom Theme TheCoachSMB Mytheme",
    "type": "magento2-theme",
    "license": [
         "OSL-3.0",
         "AFL-3.0"
    ],
    "config": {
        "sort-packages": true
    },
    "version": "100.4.2",
    "require": {
        "php": "~7.3.0||~7.4.0",
        "magento/framework": "103.0.*",
        "magento/theme-frontend-blank": "100.4.*"
    },
    "autoload": {
        "files": [
        "registration.php"
        ]
    }
}
Step 4: Add Registration.php to Register Your Custom Theme
To register your theme in the Magento system, you need to create a registration.php file in your theme directory: and <magento_root>/app/design/frontend/Thecoachsmb/mytheme/registration.php
content would be in your registration.php:
<?php
/**
 * Copyright © 2015 Magento. All rights reserved.
 * See COPYING.txt for license details.
 */
\Magento\Framework\Component\ComponentRegistrar::register(
    \Magento\Framework\Component\ComponentRegistrar::THEME,
    'frontend/Thecoachsmb/mytheme',
    __DIR__
);
Step 5: Upload Logo & Preview Image
For now, copy the logo.svg from parent theme located at vendor/magento/theme-frontend-luma/web/images/ and put it in your theme /app/design/frontend/Thecoachsmb/mytheme/web/images directory.
Upload Preview Image
For now, copy the preview.jpg from parent theme located at vendor/magento/theme-frontend-luma/media/ and put it in your theme /app/design/frontend/Thecoachsmb/mytheme/media/ directory.
Step 6. Deploy Changes:
After changes we need to :-
- remove directories present inside pub/static/frontend/ and
- remove directories present inside var/view_preprocessed.
- Run below query
php bin/magento se:up && php bin/magento se:s:d -f && php bin/magento c:f Go to the Magento 2 backend, then go to Content > Design > Themes. Make sure your theme appears on this list.
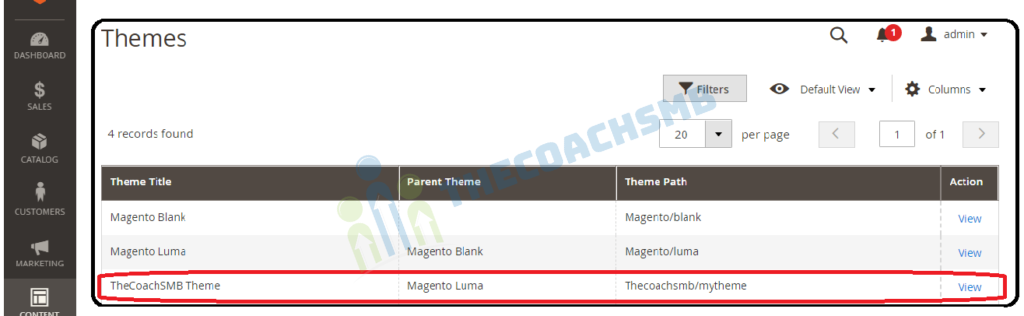
Step 7: Apply and Configure your Custom Theme in Admin
Once you’ve added your theme to the file system, everything is in place for you to activate your theme and apply it to your store.
When you can see your theme in this list, go to Content > Configuration, select your newly created theme from those shown in the image below.
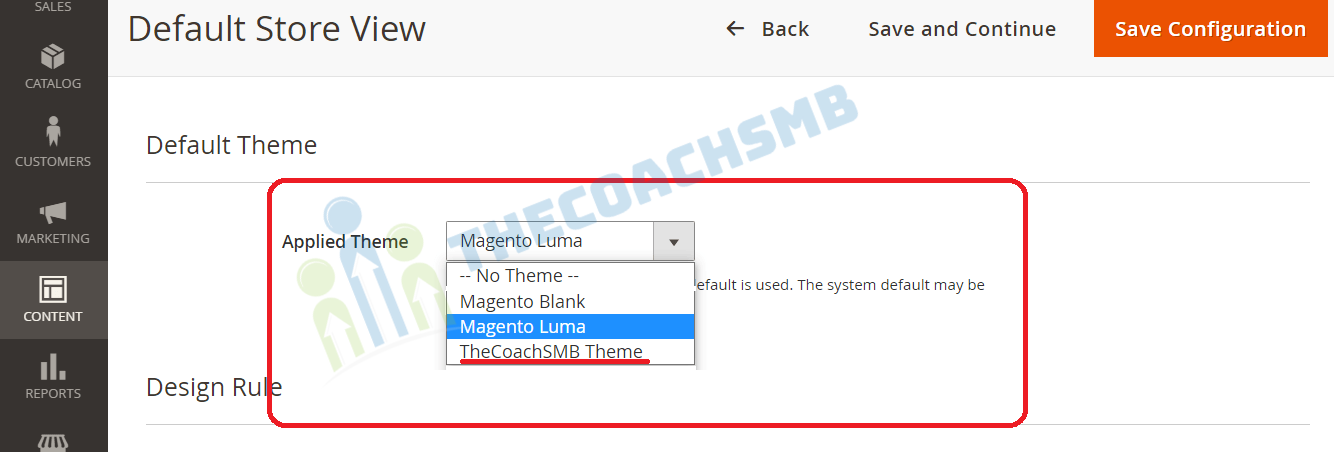
Select our theme form dropdown and click on “Save Configuration”. This will apply our theme on the site, you can see your new theme on the frontend.
Preview image for custom theme is not showing on the admin Magento2
Comment below for the feedback and any help.
Watch below video for theme development-
Happy Learning !
Thank You !
{
“name”: “randheervender/mytheme”,
“description”: “N/A”,
“type”: “magento2-theme”,
“license”: [
“OSL-3.0”,
“AFL-3.0”
],
“config”: {
“sort-packages”: true
},
“version”: “100.4.2”,
“require”: {
“php”: “~7.3.0||~7.4.0”,
“magento/framework”: “103.0.*”,
“magento/theme-frontend-blank”: “100.4.*”
},
“autoload”: {
“files”: [
“registration.php”
]
}
}
hello maam this code right or wrong becose my problem is
1 exception(s):
Exception #0 (Magento\Framework\Exception\ValidatorException): Invalid template file: ‘Vendor_Module::custom_jquery.phtml’ in module: ” block’s name: ‘custom_jquery’
please reply me myself randher prajapati & am beginer
Hello randher prajapati,
The problem is in the path Vendor_Module::custom_jquery.phtml
theme.xml
Thecoachsmb Mytheme
Magento/luma
Hello Professor Sonal,
Followed perfectly on youtube video at until 10:23 .
I did not get the results shown.
I lost css and images on homepage flushed cache refreshed page .
Thsi is the second time through.
composer.json
{
“name”: “thecoachsmb/mytheme”,
“description”: “N/A”,
“type”: “magento2-theme”,
“license”: [
“OSL-3.0”,
“AFL-3.0”
],
“config”: {
“sort-packages”: true
},
“version”: “100.4.5”,
“require”: {
“php”: “~7.4.0||~8.1.0”,
“magento/framework”: “103.0.*”,
“magento/theme-frontend-blank”: “100.4.*”
},
“autoload”: {
“files”: [
“registration.php”
]
}
}
registration.php
<?php
/**
* Copyright © Magento, Inc. All rights reserved.
* See COPYING.txt for license details.
*/
use Magento\Framework\Component\ComponentRegistrar;
ComponentRegistrar::register(ComponentRegistrar::THEME, 'frontend/Thecoachsmb/mytheme', __DIR__);
theme.xml
Thecoachsmb Mytheme
Magento/luma
What’s New
Women
Tops
Jackets
Hoodies & Sweatshirts
Tees
Bras & Tanks
Bottoms
Pants
Shorts
Men
Tops
Jackets
Hoodies & Sweatshirts
Tees
Tanks
Bottoms
Pants
Shorts
Gear
Bags
above is an example , of course the link text is underlined and in blue.
Hello Craig,
please run
php bin/magento se:s:d -f
command in the magento2 directory