-
Jun, Wed, 2022

Magento 2 : How to add additional fields to newsletter
Table of Contents
The newsletter subscription module in Magento has only one field (email) by default. If you want to add an extra field to the form (like the name), perform the following steps:
-
- Register your Module
- Display new fields on the frontend
- Create New Fields in the table of Newsletter
- Save the DAta in the new fields in table
- Display that field in the admin panel
Let’s get started with the first step:-
Step 1: Register your Module
- Create file registration.php at app/code/Thecoachsmb/Newsletter/
<?php

\Magento\Framework\Component\ComponentRegistrar::register(
    \Magento\Framework\Component\ComponentRegistrar::MODULE,
    'Thecoachsmb_Newsletter',
    __DIR__
);
2. Create module.xml file at app/code/Thecoachsmb/Newsletter/etc/
<?xml version="1.0"?>
<config xmlns:xsi="http://www.w3.org/2001/XMLSchema-instance" xsi:noNamespaceSchemaLocation="urn:magento:framework:Module/etc/module.xsd">
    <module name="Thecoachsmb_Newsletter" setup_version="0.0.1">
        <sequence>
            <module name="Magento_Newsletter" />
        </sequence>
    </module>
</config>
3. Run the below commands to activate the module:
php bin/magento se:up && php bin/magento se:s:d -f && php bin/magento c:f
Step 2: Display new fields on the frontend
- Create your own layout with the same handle
app/code/Thecoachsmb/Newsletter/view/frontend/layout/default.xml
Put there code with <referenceBlock> tag and original “name” of this block where you can redefine path to your custom template (be carefull with paths, they starts from view/frontend/templates in declared module) like
<?xml version="1.0"?>
<!--
/**
 * Copyright © Magento, Inc. All rights reserved.
 * See COPYING.txt for license details.
 */
-->
<page xmlns:xsi="http://www.w3.org/2001/XMLSchema-instance" xsi:noNamespaceSchemaLocation="urn:magento:framework:View/Layout/etc/page_configuration.xsd">
    <body>
        <referenceBlock name="form.subscribe" template="Thecoachsmb_Newsletter::subscribe.phtml" />
    </body>
</page>
<?php
/**
 * Copyright © Magento, Inc. All rights reserved.
 * See COPYING.txt for license details.
 */

/** @var \Magento\Newsletter\Block\Subscribe $block */
?>
<div class="block newsletter">
    <div class="title"><strong><?= $block->escapeHtml(__('Newsletter')) ?></strong></div>
    <div class="content">
        <form class="form subscribe"
              novalidate
              action="<?= $block->escapeUrl($block->getFormActionUrl()) ?>"
              method="post"
              data-mage-init='{"validation": {"errorClass": "mage-error"}}'
              id="newsletter-validate-detail">
            <div class="field newsletter">
                <div class="control">
                    <label for="newsletter">
                        <span class="label">
                            <?= $block->escapeHtml(__('Sign Up for Our Newsletter:')) ?>
                        </span>
                        <input name="email" type="email" id="newsletter"
                               placeholder="<?= $block->escapeHtml(__('Enter your email address')) ?>"
                               data-mage-init='{"mage/trim-input":{}}'
                               data-validate="{required:true, 'validate-email':true}"
                        />
                    </label>
                </div>
            </div>
            <div class="field newsletter">
                <div class="control">
                    <label for="subscriber_name">
                        <span class="label">
                            <?= $block->escapeHtml(__('Enter Your Name:')) ?>
                        </span>
                        <input name="subscriber_name" type="text" id="subscriber_name"
                               placeholder="<?= $block->escapeHtml(__('Enter Your Name')) ?>"
                               data-mage-init='{"mage/trim-input":{}}'
                               data-validate="{required:true}"
                        />
                    </label>
                </div>
            </div>
            <div class="actions">
                <button class="action subscribe primary"
                        title="<?= $block->escapeHtmlAttr(__('Subscribe')) ?>"
                        type="submit"
                        aria-label="Subscribe">
                    <span><?= $block->escapeHtml(__('Subscribe')) ?></span>
                </button>
            </div>
        </form>
    </div>
</div>
<script type="text/x-magento-init">
    {
        "*": {
            "Magento_Customer/js/block-submit-on-send": {
                "formId": "newsletter-validate-detail"
            }
        }
    }
</script>
Then clear cache –
php bin/magento c:f
Extra one field got added in the newsletter as shown below:-

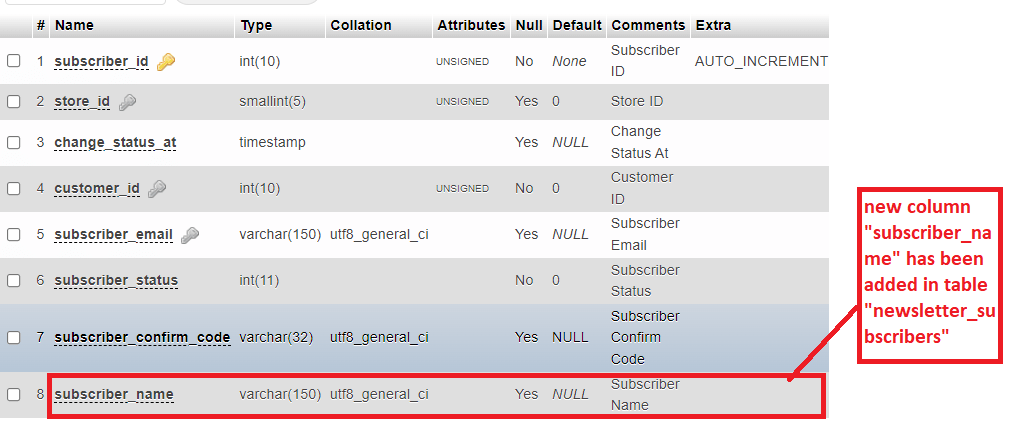
Step 3: Create New Fields in the table of Newsletter
1. Thecoachsmb/Newsletter/etc/db_schema.xml
<schema xmlns:xsi="http://www.w3.org/2001/XMLSchema-instance" xsi:noNamespaceSchemaLocation="urn:magento:framework:Setup/Declaration/Schema/etc/schema.xsd">
    <table name="newsletter_subscriber" resource="default" engine="innodb" comment="Newsletter Subscriber">
        <column xsi:type="varchar" name="subscriber_name" nullable="false" comment="Subscriber Name"/>
    </table>
</schema>
Run the below commands to see your table:
php bin/magento se:up && php bin/magento se:s:d -f && php bin/magento c:f
Step 4: Save the DAta in the new fields in table
For saving value in the table, we are going to use Plugins here. Let’s declare the plugin in di.xml
- Thecoachsmb/Newsletter/etc/di.xml
<?xml version="1.0"?>
<config xmlns:xsi="http://www.w3.org/2001/XMLSchema-instance" xsi:noNamespaceSchemaLocation="../../../../../lib/internal/Magento/Framework/ObjectManager/etc/config.xsd">
    <type name="Magento\Newsletter\Model\SubscriptionManager">
        <plugin name="thecoachsmb_newsletter_model_subscriber" type="\Thecoachsmb\Newsletter\Plugin\Newsletter\SubscriptionManager"/>
    </type>
</config>
<?php

namespace Thecoachsmb\Newsletter\Plugin\Newsletter;

use Magento\Framework\App\Request\Http;
use Magento\Newsletter\Model\SubscriberFactory;
use Magento\Store\Model\StoreManagerInterface;

class SubscriptionManager
{
    protected $request;
   protected $subscriberFactory;
    protected $storeManager;

    public function __construct(Http $request, SubscriberFactory $subscriberFactory, StoreManagerInterface $storeManager)
    {
        $this->request = $request;
      $this->subscriberFactory = $subscriberFactory;
        $this->storeManager = $storeManager;
    }

    public function aroundSubscribe(\Magento\Newsletter\Model\SubscriptionManager $subject, callable $proceed, $email, $storeId)
    {
        if ($this->request->isPost() && $this->request->getPost('subscriber_name')) {

            $result = $proceed($email, $storeId);

            $subscriber_name = $this->request->getPost('subscriber_name');
            $websiteId = (int)$this->storeManager->getStore($storeId)->getWebsiteId();
            $subscriber = $this->subscriberFactory->create()->loadBySubscriberEmail($email, $websiteId);

            if ($subscriber->getId()) {
                $subscriber->setSubscriberName($subscriber_name);
                $subscriber->save();
            }
        }
        return $result;
    }
}
3. Then clear cache –
php bin/magento c:f

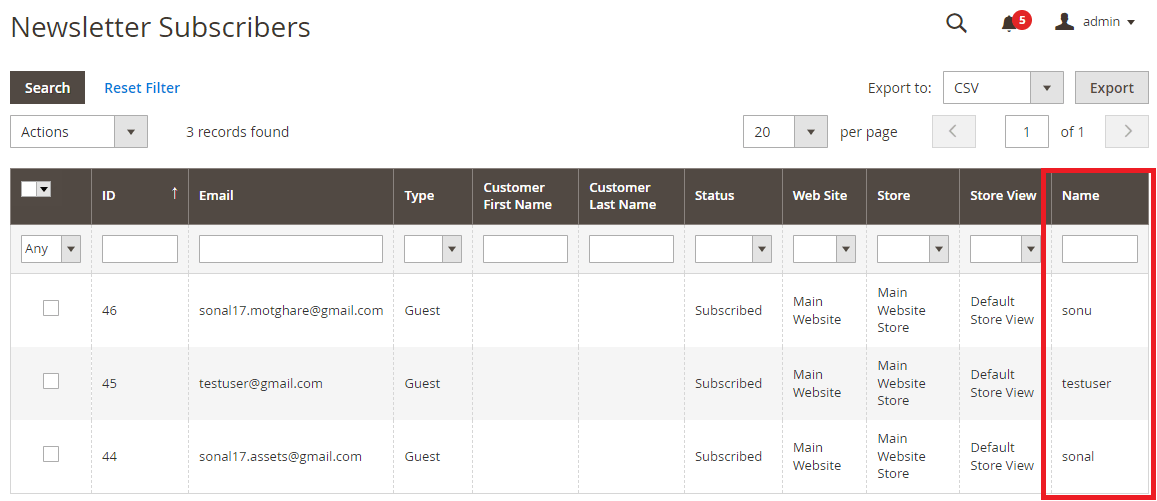
Step 5: Display New Fields in the Admin Panel
To display new fields in the admin panel -> MARKETING -> Newsletter Subscribers
we need to declare it in xml file as shown below:
Create file – Thecoachsmb/Newsletter/view/adminhtml/layout/newsletter_subscriber_block.xml
<?xml version="1.0"?>
<!--
/**
 * Copyright © Magento, Inc. All rights reserved.
 * See COPYING.txt for license details.
 */
-->
<page xmlns:xsi="http://www.w3.org/2001/XMLSchema-instance" xsi:noNamespaceSchemaLocation="urn:magento:framework:View/Layout/etc/page_configuration.xsd">
    <body>
        <referenceBlock name="adminhtml.newslettrer.subscriber.grid.columnSet">
            <block class="Magento\Backend\Block\Widget\Grid\Column" name="adminhtml.newslettrer.subscriber.grid.columnSet.subscriber_name" as="subscriber_name">
                <arguments>
                    <argument name="header" xsi:type="string" translate="true">Name</argument>
                    <argument name="index" xsi:type="string">subscriber_name</argument>
                    <argument name="header_css_class" xsi:type="string">col-name</argument>
                    <argument name="column_css_class" xsi:type="string">col-name</argument>
                </arguments>
            </block>
        </referenceBlock>
    </body>
</page>
Then clear cache –
php bin/magento c:f