-
Jan, Sun, 2021

6 Steps to Install Magento 2 on XAMPP Windows Using Composer
Table of Contents
💡 Need Expert Help?
Don’t want to install Magento manually? Let our team install Magento 2.4.x for you — fast, secure, and hassle-free.
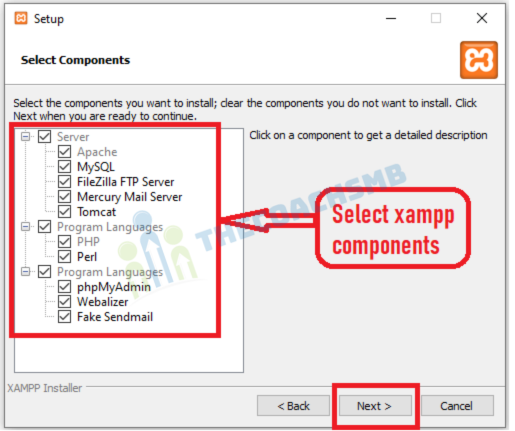
Now open XAMPP and start Apache and Mysql

COMPOSER
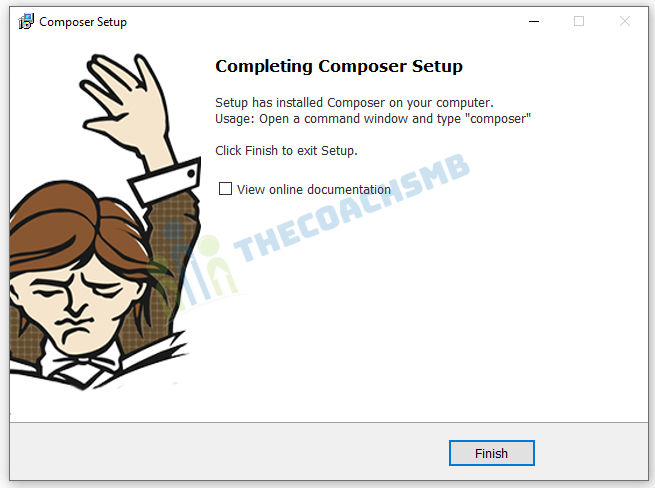
Now we will install Composer on localhost.
Composer is a library management tool in PHP (Dependency Management), this tool saves us a lot of time with the necessary packages that your project needs to use, you just need to declare it, Composer will automatically download the code of the libraries through a community server.
>Download Composer Windows version here: Click Here To Download Composer
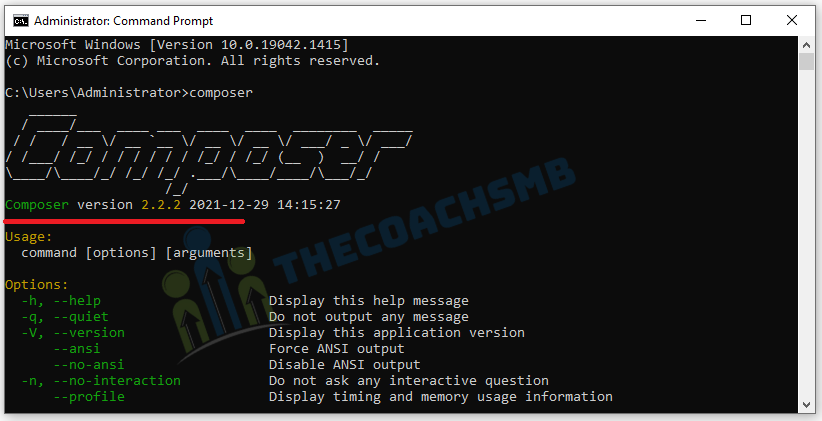
Now we will verify if Composer was successfully installed by opening Windows Command Promp and type composer . If the command prompt screen returns this outcome > Composer was installed properly
Magento 2.4.2 and 2.4.3 and 2.4.4 and 2.4.5 supports Composer Version 2 but Magento 2.4.1 installation does not support Composer version 2.
So for Magento2.4.2, we can use Composer 2 but for Magento2.4.1, we need to downgrade Composer.
By default, the version of composer for windows is the latest version 2.2.2.
For Magento2.4.2, 2.4.3 and 2.3.7,
you can use Composer version 2.x so go to next step.
This is Magento official website data for checking composer version suitable for magento versions.
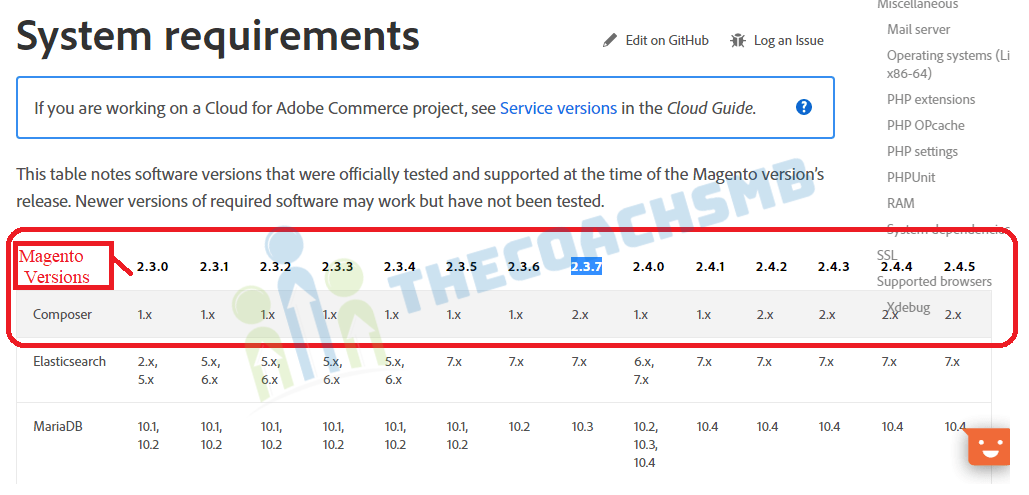
For other Magento versions:-
To downgrade the composer version, issue this command:
composer selfupdate --1
Sample output:

Step 2: Install elasticsearch on windows
Elasticsearch is now a required application to install Magento 2.4. During installation process, the system will verify if Eleasticsearch was installed and configured properly. If there’s something wrong with Elasticsearch verification, the installation process will stop.
Download Elasticsearch for Windows here: Click Here To Download Elasticsearch here
Next, unzip archived file at the “C:\xampp\htdocs\” as shown below and go to \elasticsearch-7.16.2\bin
Right click on elasticsearch.bat and select run as administrator

Leave this window running on background

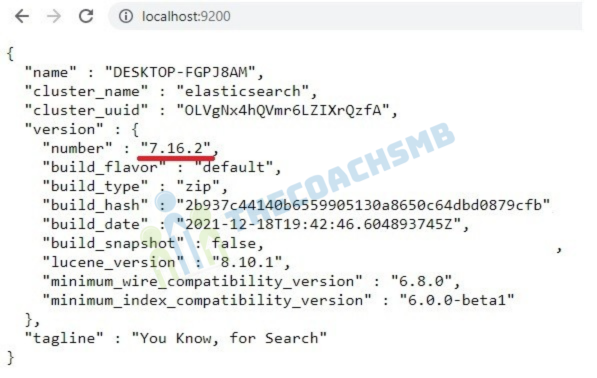
To check if Elasticsearch is running on your system, in your browser type: localhost:9200
If you see this result page => Elasticsearch is running properly
👨💻 Overwhelmed?
Let our certified Magento team handle the install so you don’t have to worry about setup, bugs, or configs.
Step 3: Config php.ini
Before we will install Magento 2, make sure to install and enable all required PHP extensions and configure some PHP values to make the installation go smoothly
Enable required php extensions
As stated in Magento 2.4 system requirement, we need to install and enable the following php extension
| bcmath | ctype | curl | dom |
| gd | hash | iconv | intl |
| mbstring | openssl | pdo_mysql | simplexml |
| soap | xsl | zip | ext-sockets |
On windows OS, all the extensions are automatically and periodically compiled by the PHP Group. You just need to enable these required extensions in php.ini
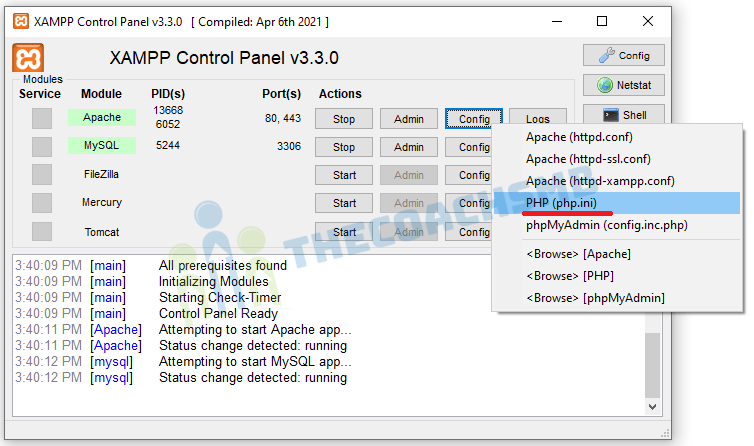
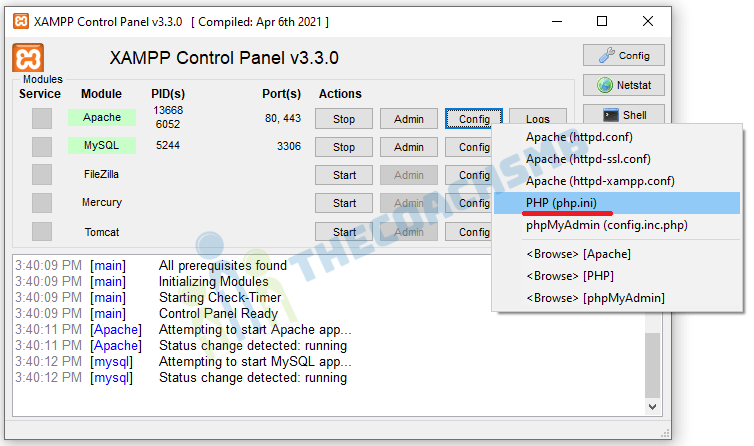
Go to C:\xampp\php\php.ini
Quick tip: You can quickly open php.ini on Xampp interface with this button
The other extensions are enabled by default after we install Xampp, so we don’t need to include them here. Remember to save files before exiting.
Configure php settings
In php.ini file, search and change the following values as below
max_execution_time=18000
max_input_time=1800
memory_limit=4G
These values will keep the installation go properly without interuption.
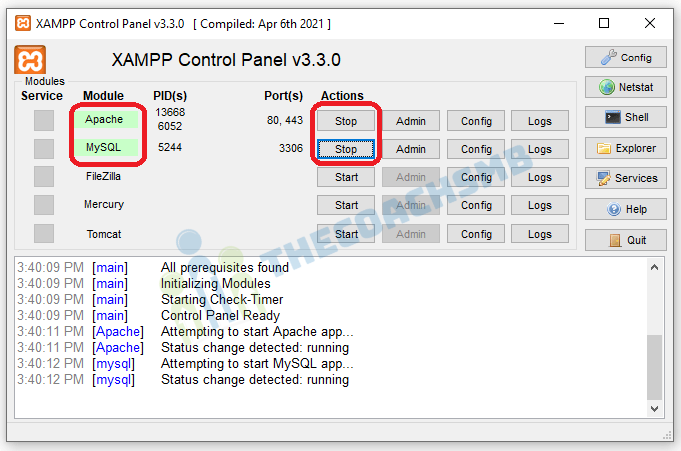
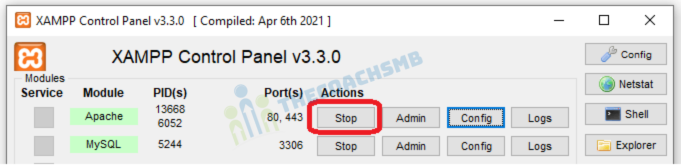
Finally, restart apache to apply php settings by click on apache Stop and Start button on XAMPP
Quick tip: You can quickly open php.ini on Xampp interface with this button
Step 4: Create database for Magento 2 website
Before we process the installation, we have to create a database for Magento 2 website to store all settings related to products, catalog, users, store configuration….
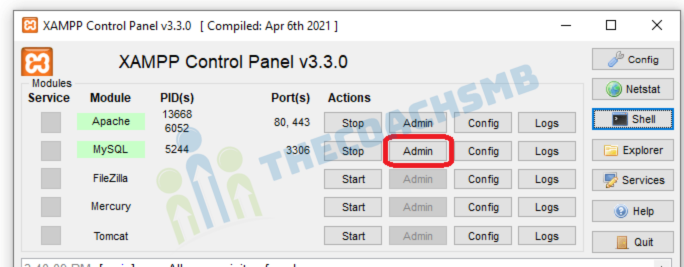
In Xampp interface, open PHPmyadmin by clicking on Admin button to open phpmyadmin (you can also type: localhost/phpmyadmin/ in browser to access phpmyadmin)
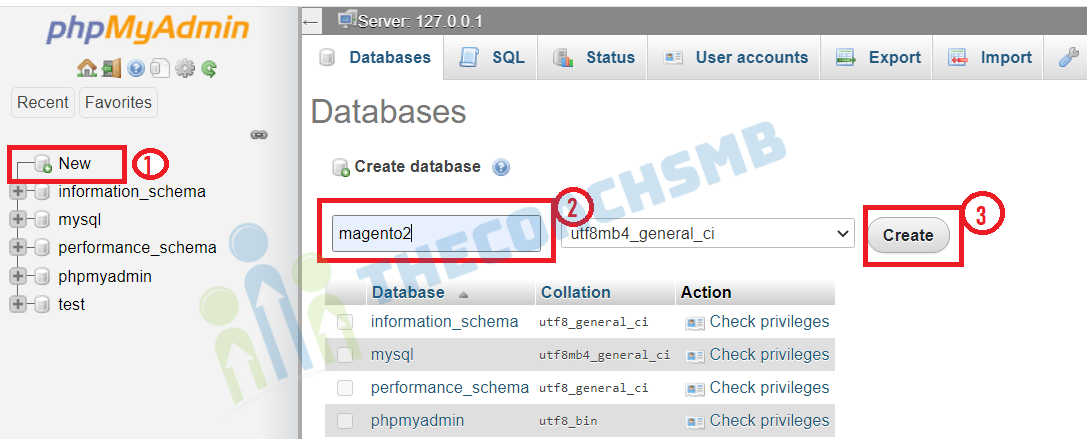
On phpmyadmin page, click on New => type database name => click on Create to create a new database. For example, I create magento2 database here
By default, Xampp does not set a password for MYSQL, so we will need to create a new root password for mysql.
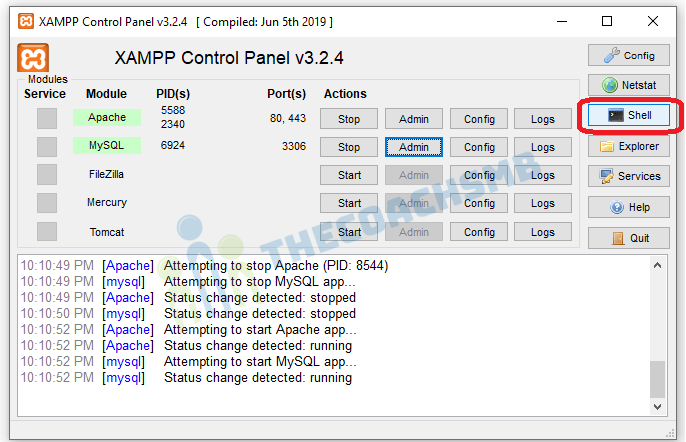
On Xampp, click on Shell button to open command interface
Next, input the following command to change mysql root password
mysqladmin.exe -u root password yourpassword
Peplace yourpassword with your desired password. I put root as password.
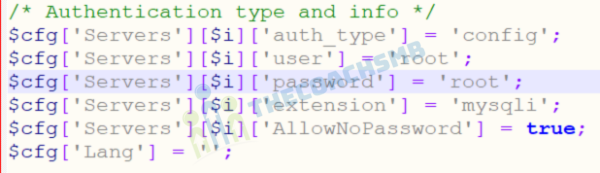
Now, to use phpmyadmin, you will also need to enter the new password. To make phpmyadmin automatically login with your new password, go to C:\xampp\phpMyAdmin\config.inc.php and insert your new password here
Step 5: Install Magento 2
Now every preparation steps are done and we can start installing Magento 2 on Localhost.
In command prompt, cd D:\xampp8.1\htdocs,
Run below command for Magento 2.4.2
composer create-project --repository-url=https://repo.magento.com/ magento/project-community-edition=2.4.2 magento2
Run below command for Magento 2.4.3
composer create-project --repository-url=https://repo.magento.com/ magento/project-community-edition=2.4.3 magento2
Run below command for Magento 2.4.4
composer create-project --repository-url=https://repo.magento.com/ magento/project-community-edition=2.4.4 magento2
Run below command for Magento 2.4.5
composer create-project --repository-url=https://repo.magento.com/ magento/project-community-edition=2.4.5 magento2
magento2 – is the folder name
Create an account on Magento marketplace and go to https://marketplace.magento.com/customer/accessKeys/ to get private and public access key,
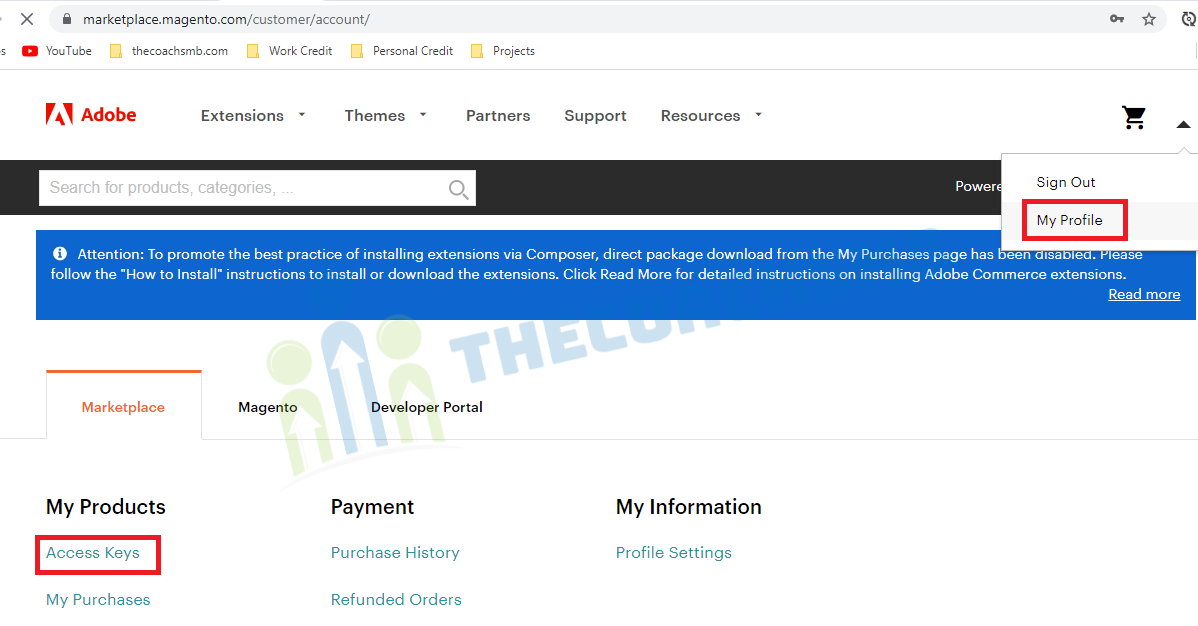
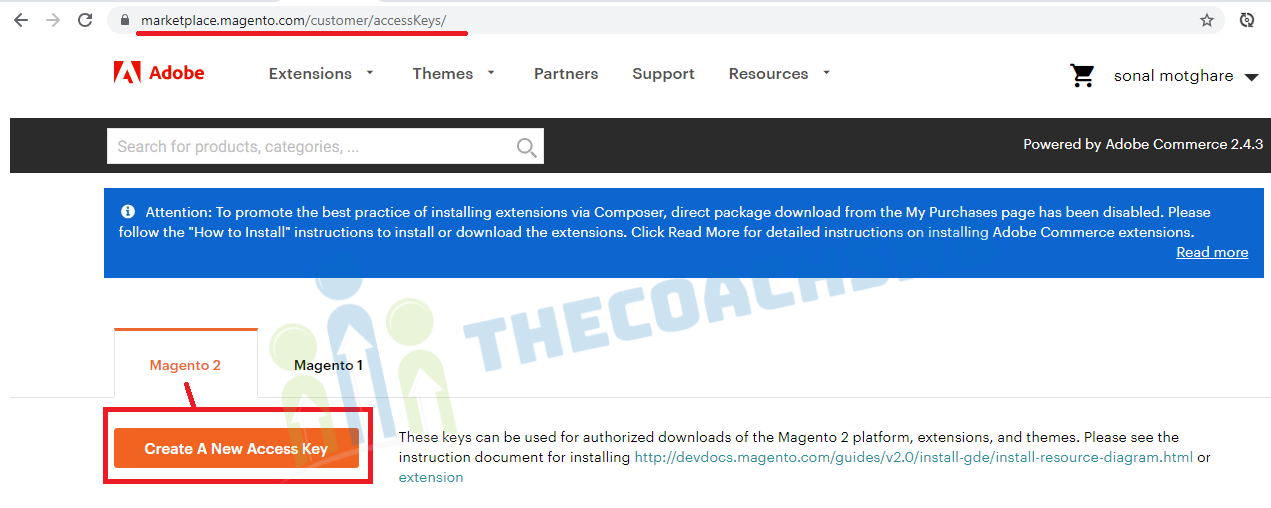
Create Access keys here. If you have access keys, you can use those. Or you can use below keys
Now enter Username and password to start downloading
- Username: Your public Key 2fc966a913d4e83b28041eeb3c3b72e5
- Password: Your private key. 48e05400d17ca1bcb4e693825c45416e
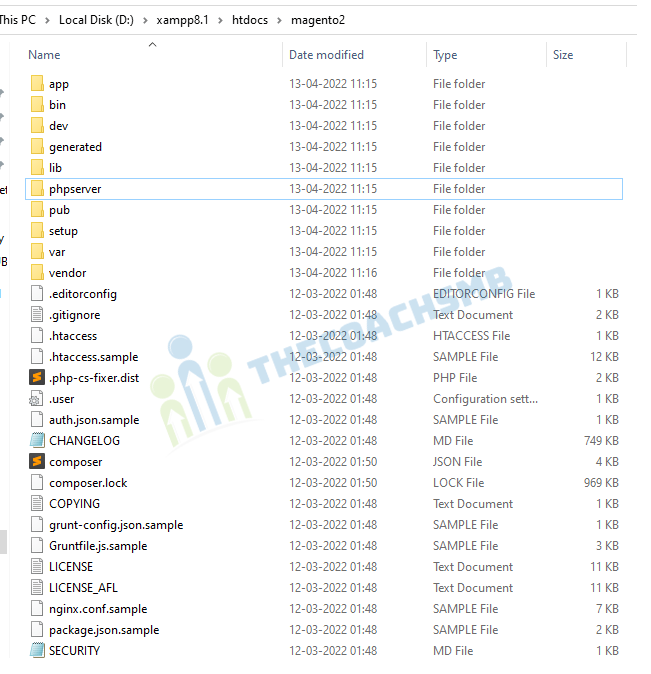
Now, see the magento2 folder with all files and folders.
Once done with extraction, now see the magento241 folder with all files and folders.
Add this content in the bottom of the file.

<VirtualHost *:80>
    DocumentRoot "C:/xampp/htdocs/magento2/pub"
    ServerName yourname.magento.com
</VirtualHost>
<VirtualHost *:80>
    DocumentRoot "C:/xampp/htdocs"
    ServerName localhost
</VirtualHost>
Where,
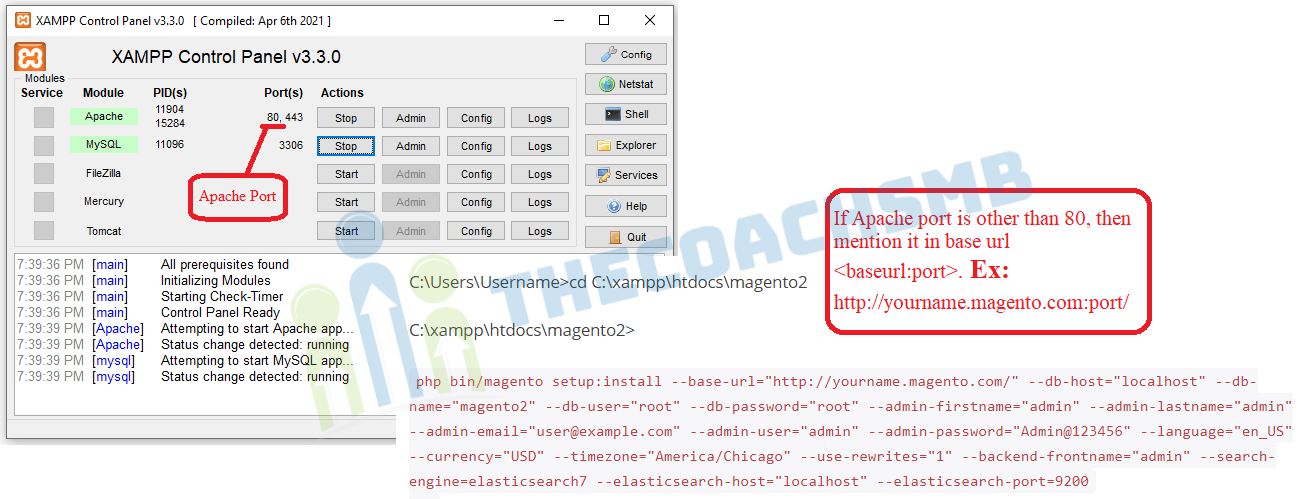
DocumentRoot "C:/xampp/htdocs/magento2/pub"=> location of the magento2 folder path
yourname.magento.com – this is the base url which you can set as per your wish. Ex: – sonal.magento.com
Now, Open notepad with “Run as administrator”.
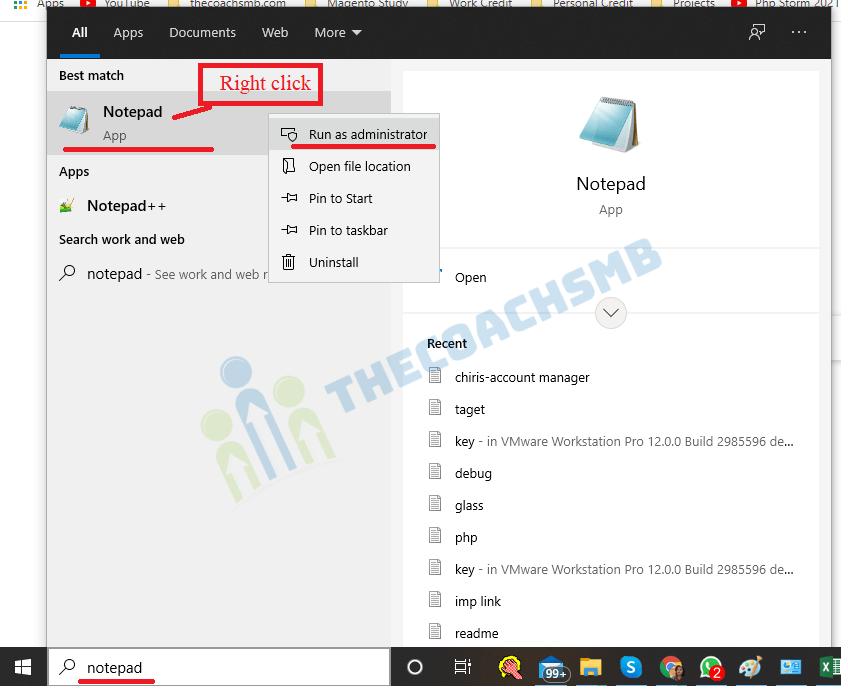
lets open C:\Windows\System32\drivers\etc\hosts file in notepad and add the below line at the bottom of the file.
127.0.0.1 yourname.magento.comRestart apache to apply php settings by click on apache Stop and Start button on XAMPP
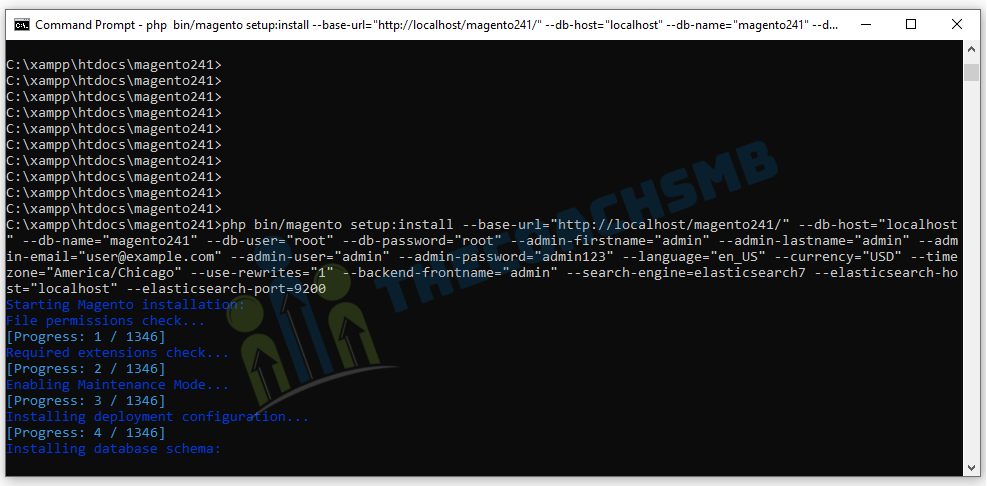
Now insert this command to start installing Magento 2 (make sure Elasticsearch, Apache, Mysql all are running before execute this command)
C:\Users\Username>cd C:\xampp\htdocs\magento2
C:\xampp\htdocs\magento2>
php bin/magento setup:install --base-url="http://yourname.magento.com/" --db-host="localhost" --db-name="magento2" --db-user="root" --db-password="root" --admin-firstname="admin" --admin-lastname="admin" --admin-email="user@example.com" --admin-user="admin" --admin-password="Admin@123456" --language="en_US" --currency="USD" --timezone="America/Chicago" --use-rewrites="1" --backend-frontname="admin" --search-engine=elasticsearch7 --elasticsearch-host="localhost" --elasticsearch-port=9200
- –base-url: your magento 2 installation folder
- –db-name: your database name in step 3
- –db-password: your database password in step 3
Other values are optional, we can change later.
Now if everything is done properly, Composer will start to install Magento 2.
In PatchApplier.php line 170:
Unable to apply data patch Magento\Theme\Setup\Patch\Data\RegisterThemes for module Magento_Theme. Original exception message: Wrong file
In Gd2.php line 64: Wrong file
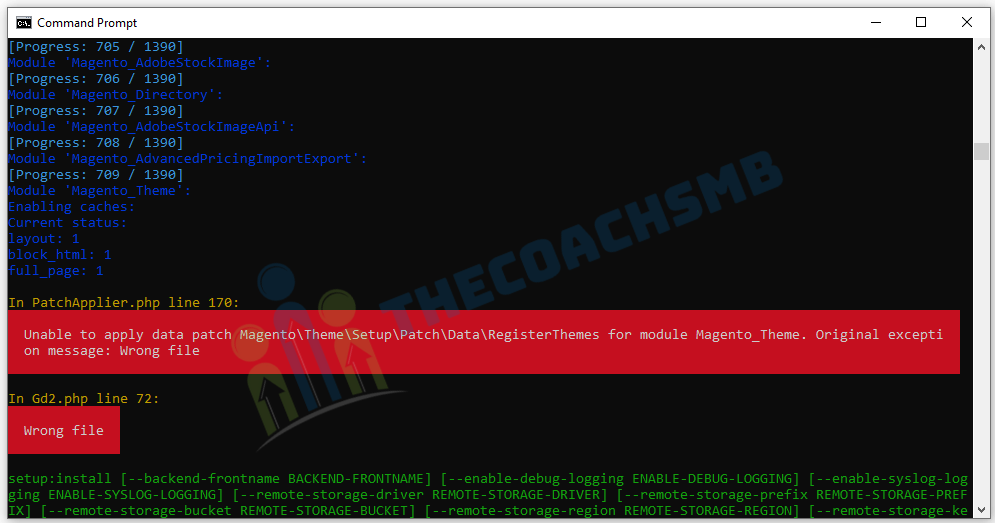
Solution: –
Here Image Adapter try opens to image files (‘open function in Gd2.php line 63). validateURLScheme function return false always because it checking ‘URL’ format but local files not valid for this format, so it returns false.
Find validateURLScheme function in vendor\magento\framework\Image\Adapter\Gd2.php file. at line 86. Replace function with this:
private function validateURLScheme(string $filename) : bool   {
          $allowed_schemes = ['ftp', 'ftps', 'http', 'https'];
          $url = parse_url($filename);
          if ($url && isset($url['scheme']) && !in_array($url['scheme'], $allowed_schemes) && !file_exists($filename)) {
              return false;
          }

          return true;
}
Now, do the following:-
- Remove semicolon from the beginning of the line ;extension=sodium from php.ini which enables it.
- Copy D:\xampp8.1\php\libsodium.dll to D:\xampp8.1\apache\bin\
- Restart Apache means stop and start Apache.
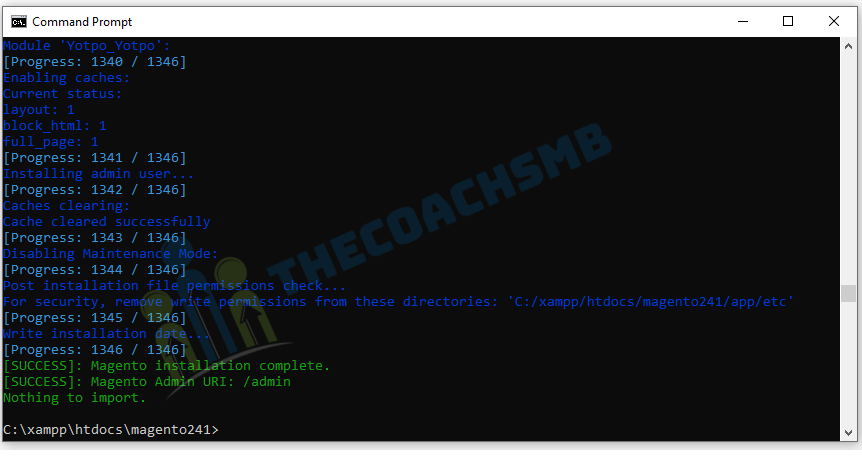
Congratulation, Magento 2.4 was successfully installed on localhost
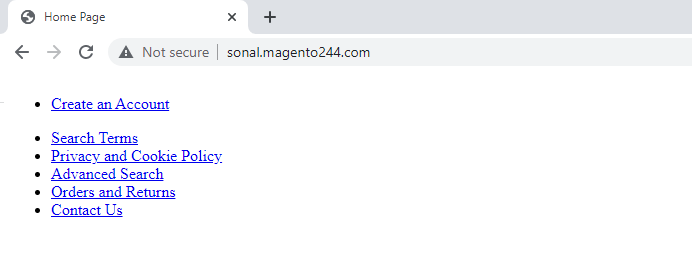
Now if you go to your browser with this URL to access Magento 2 store: http://localhost/magento241 .You will probably see a blank page like this
Save the file.
Next, you will need to run these command to upgrade the database and deploy static view files
C:\xampp\htdocs\magento241>
php bin/magento indexer:reindexphp bin/magento setup:upgradephp bin/magento setup:static-content:deploy -fphp bin/magento cache:flushNow reload your website and you will see the your new Magento 2 website on localhost.

If you haven’t installed magento 2 with sample data and now wants to do it follow below Step 5.
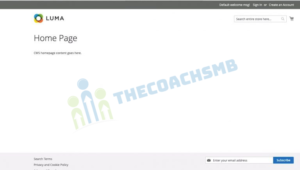
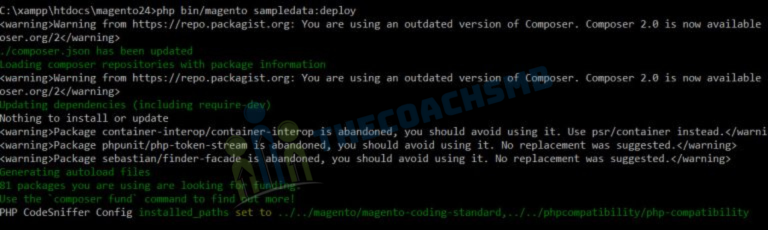
Step 6: Install sample data for Magento 2
Now we will deploy sample data for our new Magento 2 website on localhost. Sample data will fill your website with some products, categories and images so your website will look like this:

In command interface, issue this command to deploy sample data
php bin/magento sampledata:deploysample output
Next, reindex, deploy static view files and upgrade database
php bin/magento indexer:reindexphp bin/magento setup:upgradephp bin/magento setup:static-content:deploy -fFinally flush cache to apply changes
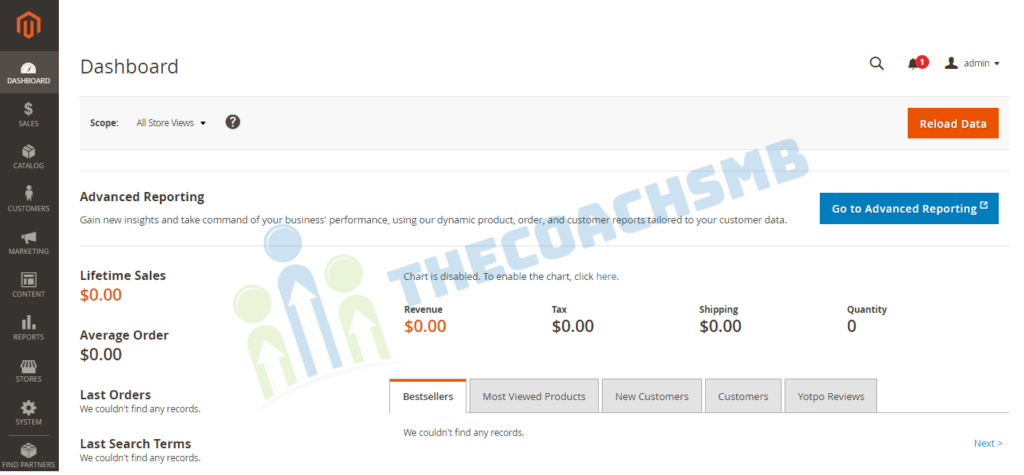
php bin/magento cache:flushWell done! refresh your website and enjoy your new Magento 2.4 installation with sample data

Troubleshoot admin login authentication error
Your Admin Url – http://yourname.magento.com/admin/
Ex.- Url – http://localhost/magento24/admin
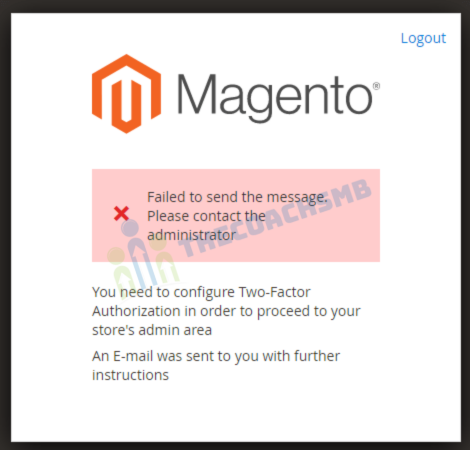
To fix this issue, open Magento 2 Command prompt and run this command
php bin/magento module:disable Magento_TwoFactorAuthThis command will disable Magento 2 Two-Factor Authorization so you won’t see the error message in admin panel
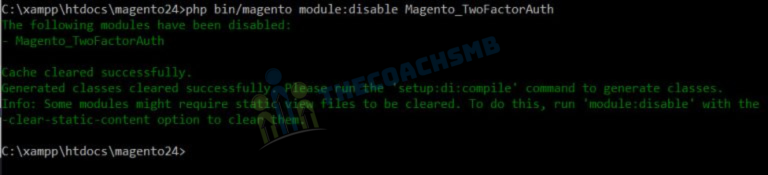
Now refresh admin page and you will be able to log in to admin dashboard normally.
Wrapping up
Installing Magento 2 on localhost is very frustrating and many users may give up because there’re too many issues during installation process. Just follow this tutorial step by step and drop a comment below if you need any help.
You can also reach out to this below video to install magento 2 on localhost Windows using Xampp, Composer.
🎉 Done reading? Or still stuck?
We offer fast, secure Magento 2.4.x installations on Ubuntu 22.04. Save time and avoid server headaches.
very nice and precise installion instructions . thanks a lot
Thanks raouf ahmad gul.
thank yoou so much 🙂
I am glad that it helped you bargan!
Hi, Thank you for your effort and time make such an awesome video on this Magento 2. I followed every step on this video for installation. yet, am getting *404 not found* error while trying to see the home page of Magento
the below lines are showing when am trying to see the home page:
***Not Found
The requested URL was not found on this server.
Apache/2.4.53 (Win64) OpenSSL/1.1.1n PHP/8.1.6 Server at localhost Port 80***
Any idea on how to solve this?
Thank you in advance
Please follow this article – https://www.thecoachsmb.com/solved-forbidden-you-dont-have-permission-to-access-this-resource/. also there is video attached to it.
Awesome article , everything is pinpoint and i really got through what i was struggling with for 1 whole week.
Very nice article, I appreciate your efforts, Keep it up. Thanks
Thank you ! good article. The install went well but go this error in admin screen
Your web server is set up incorrectly and allows unauthorized access to sensitive files.
What is the admin url? is it pointing to https? Is this error on your local machine?
hi first of all thank you so much for this wonderful blog. i did everything mentioned in this blog but still i am getting this message i know why whenever i am trying to run the below command
php bin/magento setup:install –base-url=”http://yoursitename.magento.com/” –db-host=”localhost” –db-name=”magento2″ –db-user=”root” –db-password=”root” –admin-firstname=”admin” –admin-lastname=”admin” –admin-email=”admin@gmail.com” –admin-user=”admin” –admin-password=”admin@123″ –language=”en_US” –currency=”USD” –timezone=”America/Chicago” –use-rewrites=”1″ –backend-frontname=”admin” –search-engine=elasticsearch7 –elasticsearch-host=”localhost” –elasticsearch-port=9200
i am getting this error
Class “Magento\Backend\App\Request\PathInfoProcessor\Proxy” does not exist
can you help me with this i am really worried from past few days but still i am getting the same message please do help.
Open bootstrap.php file present in the app folder.
#ini_set(‘display_errors’, 1);
Remove this “#” from the begging of the line. and refresh the browser. You will get the exact error you are facing.
In developer mode, Magento use symlink for static files, how can it run in Windows?
In development mode, symlinks are generated automatically when page load.
Now if files are generated in pub static folder, perform below steps to generate symlinks.
Remove files and folders present in the folder magento_root_directory/pub/static/frontend and adminhtml folder(Don’t delete .htaccess file)
Now load the page, symlinks will create in pub static folder on-demand in developer mode.
thanks for the article and video. I appreciate the step by step process. though some fixes still needed some research, majority of the installation fix was provided by the article. thanks!
Its awesome manual and hard work is appreciated.Magento is not simple to install but this manual make it look so simple.Thanks
Thank You So Much !! Thanks for giving feedback.
Thanks maam
You are welcome !! Thanks for giving feedback.
Hello, when I try to install Magento with php bin/magento setup:install…….. etc, I get the error ‘The “-b” option does not exist.’
Any ideas?
I have found the problem, when copying the line from your page the — characters are changed to a — character.
Try to copy complete setup:install command from the page and run in the command as explained. Do let us know if you face the same issue. Thank You !!
Hej. Min dotter har fått elgolvvärme installerat i sitt badrum, hon har haft det ett par år nu.
admin replied.adsdd