-
Apr, Sat, 2018

Magento 2 – How to Build a Complete Module
Table of Contents
Introduction
Modules together form the Magento2 platform. The whole Magento 2 system is built with different unique Magento system core modules and that’s the reason it is called as modular system.
This means all functionalities or business logic is designed and developed as modules. Every module can work pretty much as a standalone unit or with minimum dependencies with other modules.
Apart from default functionalities provided by the Magento 2, magento site owners and users require some of the custom functionalities to meet their business needs. Or sometimes it needs to override the default Magento functions as per the business requirements.
So in these cases, Magento developer needs to build up the module (called as custom module) and implement the logic based on the business/online store’s requirement.
💡 Need Expert Help?
Don’t want to install Magento manually? Let our team install Magento 2.4.x for you — fast, secure, and hassle-free.
Since Magento is an open source ecommerce platform, we can add/install our developed custom module on it.
Now, in order to create a Magento 2 Module, you need to first install Magento 2 either locally or on a development server, that you can add new files to. The version of Magento that you use doesn’t really matter, because we will be covering fundamental aspects that exist across all versions and editions: Community, Professional and Enterprise.
Here’s an easy-to-follow tutorial on How to Install Magento 2 on Windows or Install Magento2 on Linux/Ubuntu in case if you’ve not yet installed Magento 2.
The building of complete module is divided into 4 parts:
-
- PART 1 – This is the first part of the article
- PART 2 – Create Custom Module URL and Display Content in Magento2
- PART 3 – How to Create and Insert Data in Custom Database Table in Magento 2?
- PART 4 – Display Data From Database On Frontend in Magento2
Let’s discuss the first part here…
So are you ready to create our first Magento2 module !!!!
We are going to implement this in following steps:
- Step 1: Create Magento 2 Module Structure
- Step 2: Declaration of Module
- Step 3: Registration of Module
- Step 4: Activate the Module
- Step 5: Add functionality – Display module link in the footer
- Step 6: Enable/Disable Module depending on the admin setting`
Let’s start creating module by following below steps:-
Step 1: Create Magento 2 Module Structure
There are two locations where a module can be located in a Magento 2 application.
The first location is an app/code directory. This directory is used to add all custom and 3rd-party Magento 2 modules. This location is usually used by development agencies, internal or in-house developers in order to simplify a development process.
The second location is a vendor directory. All the Magento 2 core modules are located under vendor/magento. Example –
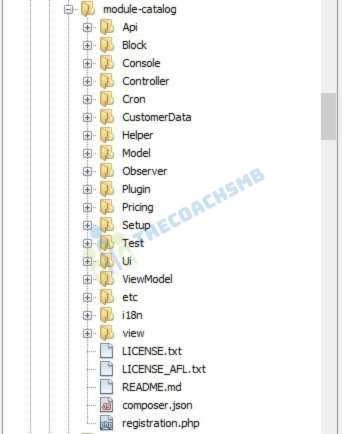
The above is a standard module folder structure. This is the folder structure of the Magento catalog module.
1. Create the following folders in the magento project root directory (ex. – C:\xampp\htdocs\magento2):
- app/code/Thecoachsmb
- app/code/Thecoachsmb/Mymodule
The Thecoachsmb folder is the module’s VendorName, and Mymodule is the ModuleName.
Note: If you don’t have the code folder in your app directory, create it manually.
Now, create app/code/Thecoachsmb/Mymodule/composer.json:
Contents would be:
{}
This file will be loaded by Composer every-time you run it even though we are not actually using Composer with our module.
Step 2: Declaration of Module
It is necessary to create etc folder and add the module.xml file in it
app/code/Thecoachsmb/Mymodule/etc/module.xml
Contents would be:
<?xml version="1.0"?>
<config xmlns:xsi="http://www.w3.org/2001/XMLSchema-instance" xsi:noNamespaceSchemaLocation="urn:magento:framework:Module/etc/module.xsd">
<module name="Thecoachsmb_Mymodule" >
     <sequence>
         <module name="Magento_Directory"/>
         <module name="Magento_Config"/>
     </sequence>
 </module>
</config>
Step 3: Registration of Module
To register the module, create a registration.php file in the app/code/Thecoachsmb/Mymodule/registration.php
Contents would be:
<?php
\Magento\Framework\Component\ComponentRegistrar::register(
	\Magento\Framework\Component\ComponentRegistrar::MODULE,
	'Thecoachsmb_Mymodule',
	__DIR__
);
Step 4: Activate the Module
Now its time to enable our moule. Lets check the status of our module by typing below command in the magento project root directory (ex. – C:\xampp\htdocs\magento2) as:
php bin/magento module:statusYou should see the module is disabled now:
List of disabled modules: Thecoachsmb_Mymodule
If you get the error “No connection could be made because the target machine actively refused it.” then follow this link.
So lets run the command to enable our module:
php bin/magento module:enable Thecoachsmb_Mymodule
Now that you have enabled the module first time, so you have to upgrade the database of the module by using this command line:
php bin/magento setup:upgrade && php bin/magento se:s:d -f
After successfully enabling the module, recheck the status of modules with the command line that was mentioned before.
Step 5: Add functionality – Display module link in the footer
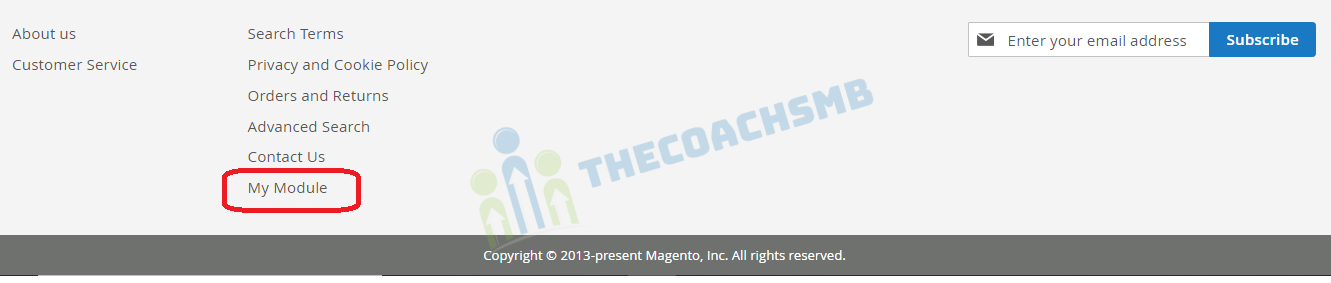
Now we will display our module link MyModule in the footer area.
For this, create default.xml file in path app\code\Thecoachsmb\Mymodule\view\frontend\layout\default.xml
and add below code in it:-
<?xml version="1.0"?>
<page xmlns:xsi="http://www.w3.org/2001/XMLSchema-instance" xsi:noNamespaceSchemaLocation="urn:magento:framework:View/Layout/etc/page_configuration.xsd">
    <body>
       <referenceBlock name="footer_links">
            <block class="Magento\Framework\View\Element\Html\Link\Current" name="mymodule-link">
            <arguments>
                 <argument name="label" xsi:type="string" translate="true">My Module</argument>
                 <argument name="path" xsi:type="string">mymodule</argument>
            </arguments>
        </block>
      </referenceBlock>
    </body>
</page>
and save the file. and check in the site, it will show our module link in the footer.
Step 6: Enable/Disable Module depending on the admin setting
Its time to add functionality of enabling and disabling our custom module from admin so that anyone who has admin access can do it. To do so, create system.xmlfile in app/code/Thecoachsmb/Mymodule/etc/adminhtml path
Content would be:-
<?xml version="1.0"?>
<config xmlns:xsi="http://www.w3.org/2001/XMLSchema-instance" xsi:noNamespaceSchemaLocation="urn:magento:module:Magento_Config:etc/system_file.xsd">
     <system>
        <tab id="thecoachsmb" translate="label" sortOrder="200">
           <label>Thecoachsmb</label>
        </tab>
        <section id="thecoachsmb" translate="label" sortOrder="150" showInDefault="1" showInWebsite="1" showInStore="1">
           <class>separator-top</class>
           <label>Mymodule</label>
           <tab>thecoachsmb</tab>
           <resource>Thecoachsmb_Mymodule::configuration</resource>
           <group id="general" translate="label" type="text" sortOrder="10" showInDefault="1" showInWebsite="0" showInStore="0">
                <label>General Configuration</label>
                <field id="enable" translate="label" type="select" sortOrder="1" showInDefault="1" showInWebsite="0" showInStore="0">
                     <label>Enable Module</label>
                     <source_model>Magento\Config\Model\Config\Source\Yesno</source_model>
                </field>
          </group>
       </section>
     </system>
</config>
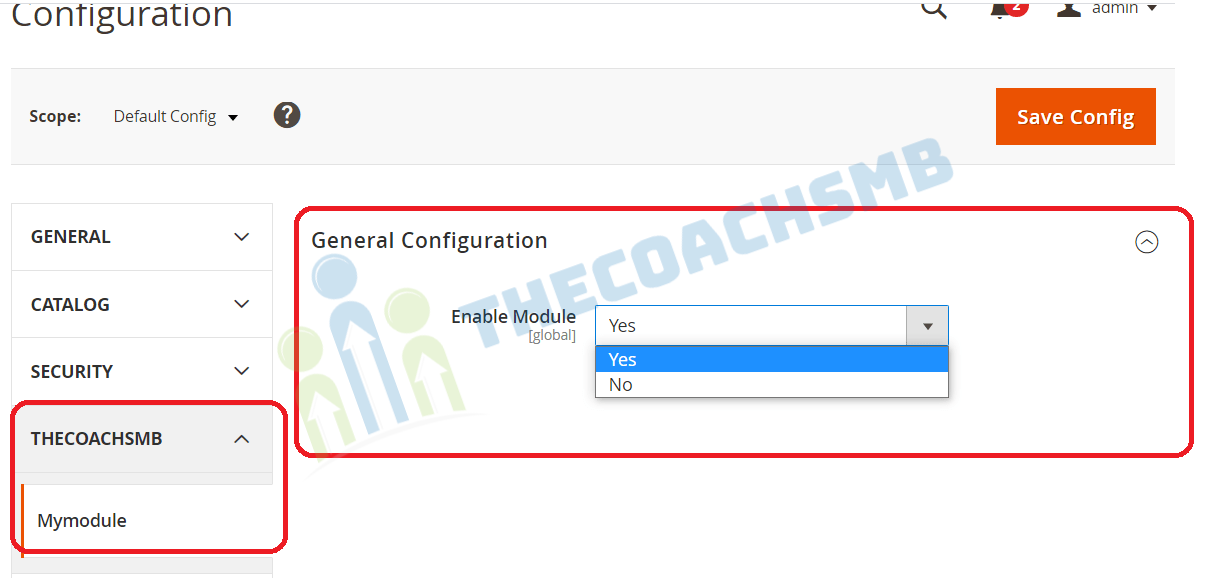
After adding this code, Flush the Cache. Then Go to admin panel->Stores->Configuration and check our module configuration.
Lets update “ifconfig=”section_id/group_id/field_id“” line in the block of the reference “footer_links” in file app\code\Thecoachsmb\Mymodule\view\frontend\layout\default.xmllike this
<block class="Magento\Framework\View\Element\Html\Link\Current" ifconfig="thecoachsmb/general/enable" name="mymodule-link"> What if we want to automatically enable this module when we will install this module, to do so create config.xml file in path app\code\Thecoachsmb\Mymodule\etc.
And content would be :-
<?xml version="1.0"?>
<config xmlns:xsi="http://www.w3.org/2001/XMLSchema-instance" xsi:noNamespaceSchemaLocation="urn:magento:module:Magento_Store:etc/config.xsd">
     <default>
        <thecoachsmb>
           <general>
                <enable>1</enable>
           </general>
         </thecoachsmb>
     </default>
</config>
Now, clear cache-
php bin/magento c:fYou can put the path to the field in the <default> element to set value default for it.
The belowis the format of config.xml file:
<default>
    <section_id>
        <group_id>
            <field_id>{value}</field_id>
        </group_id>
    </section_id>
</default>
Thats All.
Watch this video by clicking on below link.
Conclusion
In this way, we created the first module giving link in the footer and added functionality in the admin panel for enabling and disabling this.
Now its time to create Create Custom Module URL and Display Content in Magento2.
Hope you liked this article, Also please comment below giving your feedback. Your feedback is very important to us.
💡 Need Expert Help?
Don’t want to build the module in Magento? Let our team build it for you — fast, secure, and hassle-free.
I want to disable two column from sales order
In the layout file, change the layout=”” to something you want like, 1column, 2columns-left or 2columns-right, or 3columns
When i add system.xml into Magento 2 and then press configuration in backend, i receive error message. I have magento2 2.4.4, i have follow your instructions with no mistake. Please help, so i can finish your tutorial for custom modules. This don’t help
1.”Open up app/etc/di.xml in the editor
2..Find the path “Magento\Framework\App\View\Asset\MaterializationStrategy\Symlink”
3.and replace to “Magento\Framework\App\View\Asset\MaterializationStrategy\Copy”
Clear Cache”.
I crossed checked the code. It is working. Can you please check the proper
– file name and
– file location
– file content
Thanks,
Thank you so much. This is really easy
Hi Maam you video is very easy to learn, it would be good if you do a video for custom theme development for a html to magento2 theme creation
adminhtml/Magento/backend/en_US/requirejs/require.js” was blocked due to MIME type (“text/html”) mismatch (X-Content-Type-Options: nosniff) —–> Becaus of this error Magento frontend & backend UI are not loading properly. Could you please help me to fix this mam… Thanks in advance.
You can solve it by the following ways
– Remove all files from var/ folder by using this command sudo rm -rf var/* (For Ubuntu)
– Check for .htaccess in pub/static. If not exists, take a file from a fresh setup.
– Run the following commands
1. php bin/magento setup:static-content:deploy -f
2. php bin/magento indexer:reindex
3. php bin/magento cache:clean
– Now, please refresh your browser for frontend and backend pages.
Please feel free to comment if you need more details.
Thank you !!
Thank you so much
Your blogs are very helpful to us..!!!
Thank you Hemalata !!