
-
Apr, Mon, 2022

Full tutorial to Learn CSS Step By Step
Table of Contents
CSS Introduction
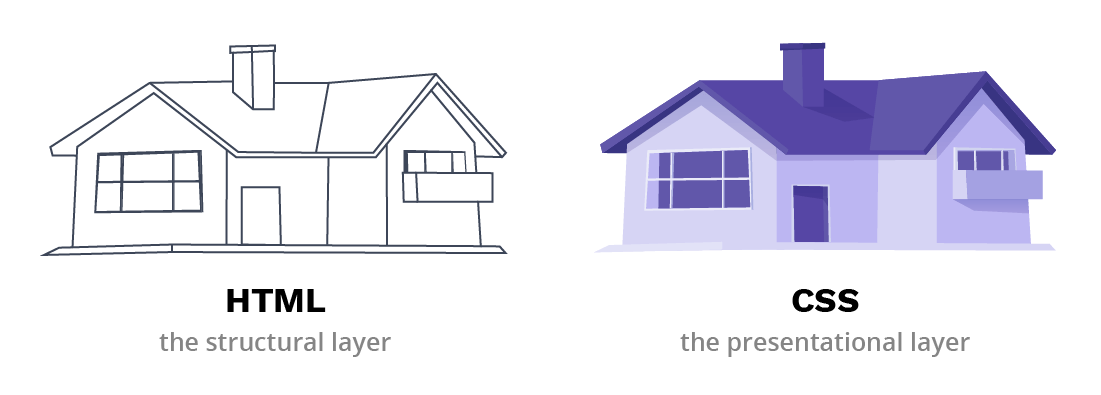
CSS is the language we use to style a Web page or the HTML document. CSS is used to define styles for your web pages, including the design, layout and variations in display for different devices and screen sizes.
What is CSS?
- CSS stands for “Cascading Style Sheet”.
- CSS describes how HTML elements are to be displayed on screen.
- It can control the layout of multiple web pages all at once
- External stylesheets are stored in CSS files
Learning CSS is so much fun. You can apply different CSS properties to change the webpage formatting.
What does CSS do
- You can completely change the look of your website with only a few changes in CSS code.
Why use CSS
These are the three major benefits of CSS:
1) Solves a big problem
HTML was NEVER intended to contain tags for formatting a web page! HTML was created to describe the content of a web page, like:
<h1>This is a heading</h1>
<p>This is a paragraph.</p>
When tags like <font>, and color attributes were added to the HTML 3.2 specification, it started a nightmare for web developers. Development of large websites, where fonts and color information were added to every single page, became a long and expensive process. To solve this problem, the World Wide Web Consortium (W3C) created CSS.
2) Saves a lot of time
CSS style definitions are saved in external CSS files so it is possible to change the entire website by changing just one file.
3) Provide more attributes
CSS provides more detailed attributes than plain HTML to define the look and feel of the website.
Example:-
Including CSS in HTML Documents
There are four methods to include CSS in your HTML Document.
- Inline CSS
- Embedded/Internal CSS
- External CSS
- Imported CSS
We mostly use External CSS methods.
Inline CSS:
We can define Inline CSS rules using the ‘style’ attribute of the HTML element. Inline style rules are applied to only HTML element where it is defined.
We can specify multiple CSS rules separated by semicolons. These rules are placed using the ‘style’ attribute having property name and value.
Inline CSS Example
Internal CSS (Embedded CSS)
Embedded or internal style sheets only affect the document they are embedded in.
Embedded style sheets are defined in the <head> section of an HTML document using the <style> element. You can define any number of <style> elements in an HTML document but they must appear between the <head> and </head> tags.
Internal CSS Example
External CSS
An external style sheet is ideal when the style is applied to many pages of the website. In External CSS, we use <link> element to include an external style sheet file in the HTML document.
First of all, we write style rules in a separate file with a .css extension. Then we include this CSS file inside the head element of HTML Document.
The external .css file should not contain any HTML code.
Before linking, we need to create a style sheet first. Let’s open your favorite code editor and create a new file. Now type the following CSS code inside this file and save it as “style.css”.
Example
body {
    background: lightyellow;
    font: 18px Arial, sans-serif;
}
h1 {
    color: orange;
}
This is the most common method CSS Inclusion method to the HTML document. Using this method, we can write CSS for multiple web pages into the single file and include the same CSS file on every page.
An external style sheet can be linked to an HTML document using the <link> tag. The <link> tag goes inside the <head> section, as you can see in the following example:
External CSS Example
Imported CSS
We can import one stylesheet into another stylesheet using @import rule.
We can use it in two ways. One way is to use within the header of your HTML document and another way is to include in CSS file.
Imported CSS Example inside HTML Head
We can include CSS file inside a style tag using @import rule. However, this is not very useful.
The best use of @import is to include some stylesheet from within another stylesheet. This not only helps us to manage large CSS code but also loads faster using browser caching. @imports must be defined before all other content in your CSS file.
In the above example, the main CSS file includes multiple CSS files.
The best method to Include CSS into HTML?
Different websites use different CSS inclusion methods depending on their requirements.
- If you have CSS that is common for multiple pages, you can put it into the external CSS file.
- You can use Internet CSS if your CSS applies to multiple HTML elements but on one or two pages.
- If you need to overwrite or add CSS to any particular HTML element, you can go for Inline CSS.
CSS Syntax
A CSS stylesheet consists of a set of rules that are interpreted by the web browser and then applied to the corresponding elements such as paragraphs, headings, etc. in the document.
The main rule of using CSS is setting values to styling properties. You need to include selectors which are the HTML elements that you want to style.
A CSS rule have two main parts, a selector and one or more declarations:
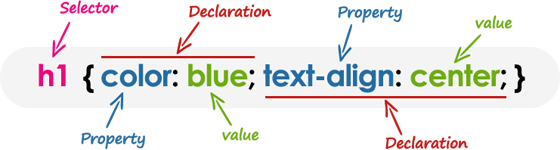
selector:- The selector specifies which element or elements in the HTML page the CSS rule applies to.
declarations:- Whereas, the declarations within the block determines how the elements are formatted on a webpage. Each declaration consists of a property and a value separated by a colon (:) and ending with a semicolon (;), and the declaration groups are surrounded by curly braces {}.
property: – The property is the style attribute you want to change; they could be font, color, background, etc.
value:- Each property has a value, for example color property can have value either blue or #0000FF etc.
h1 {color:blue; text-align:center;}
To make the CSS more readable, you can put one declaration on each line, like this:
Example
h1 {
    color: blue;
    text-align: center;
}
In the example above h1 is a selector, color and text-align are the CSS properties, and the given blue and center are the corresponding values of these properties.
Main Concepts of CSS Syntax
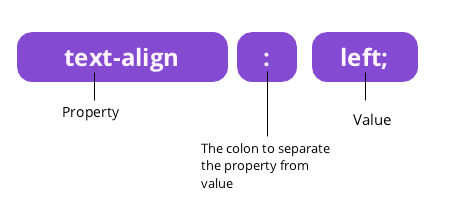
CSS is for assigning certain values to properties. In other words, CSS tells the browser which fonts, colors, decorations, or other features HTML elements use. The basic syntax of CSS represents this aim:
- It consists of a specific property to be applied. For instance, it could be a
background-colorproperty. - It also has a value which indicates how browsers display the property. For instance, we can set
background-colortopurple.
Take a look at this code example:
p {
    text-align: left;
    color: blue;
}
- CSS selector is the paragraph element <p>.
- Inside the declaration block, we separate two declarations by a semicolon.
- Both of them start with property. First one is text-align and the second one is color.
- Lastly, both properties have values assigned to them: leftand
blue.
Declaration Blocks
Standard CSS rules consist of a declaration block and a CSS selector:
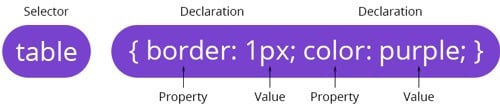
- The CSS selector indicates an HTML element that you want to style.
- Declarations describe how you want to style a particular element or a group of HTML elements.
- You separate declarations by semicolons, and they form the declaration block.
- CSS value and property names are in each declaration, and a semicolon separates them.
- A semicolon always ends a CSS declaration.
- Curly brackets surround a declaration block on both sides.
Writing Comments in CSS
Comments are usually added with the purpose of making the source code easier to understand. It may help other developer (or you in the future when you edit the source code) to understand what you were trying to do with the CSS. Comments are significant to programmers but ignored by browsers.
A CSS comment begins with /*, and ends with */, as shown in the example below:
Example
/* This is a CSS comment */
h1 {
    color: blue;
    text-align: center;
}
/* This is a multi-line CSS comment
that spans across more than one line */
p {
    font-size: 18px;
    text-transform: uppercase;
}
You can also comment out part of your CSS code for debugging purpose, as shown here:
Example
h1 {
    color: blue;
    text-align: center;
}
/*
p {
    font-size: 18px;
    text-transform: uppercase;
}
*/
Case Sensitivity in CSS
CSS property names and many values are not case-sensitive. Whereas, CSS selectors are usually case-sensitive, for instance, the class selector .maincontent is not the same as .mainContent.
Therefore, to be on safer side, you should assume that all components of CSS rules are case-sensitive.
CSS Selectors
What is Selector?
A CSS selector is a pattern to match the elements on a web page. The style rules associated with that selector will be applied to the elements that match the selector pattern. In other words, CSS Selectors are used to finding HTML elements to apply some style and formatting on them.
Selectors are one of the most important aspects of CSS as they allow you to target specific elements on your web page in various ways so that they can be styled.
Several types of selectors are available in CSS, let’s take a closer look at them:
Type of CSS Selectors
CSS Selectors can select HTML elements based on their tag name, class, id, and attribute.
Different Types of CSS Selectors are:
- CSS Element Selector
- CSS Id Selector
- CSS Class Selector
- CSS Universal Selector
- CSS Group Selector
Universal Selector
The universal selector, denoted by an asterisk (*), matches every single element on the page.
The universal selector may be omitted if other conditions exist on the element. This selector is often used to remove the default margins and paddings from the elements for quick testing purpose.
Let’s try out the following example to understand how it basically works:
Example
* {
    margin: 0;
    padding: 0;
}
The style rules inside the * selector will be applied to every element in a document.
Note: It is recommended not to use the universal selector (*) too often in a production environment, since this selector matches every element on a web page that puts too much of unnecessary pressure on the browsers. Use element type or class selector instead.
Element Type Selectors
The element selector finds elements based on the tag name. Sometimes we call it Tag or Type selector as well. This selector is used to apply some style formatting to particular tag types. An element type selector matches all instance of the element in the document with the corresponding element type name.
Let’s try out an example to see how it actually works:
Example
p {
    color: blue;
}
The style rules inside the p selector will be applied on every <p> element (or paragraph) in the document and color it blue, regardless of their position in the document tree.
Id Selectors
The ID selector will override styles applied by other selectors. ID selector finds an element with a unique ID attribute and applies CSS rules to it. The id selector is used to define style rules for a single or unique element.
Warning: IDs of elements must be unique. Therefore, you can use one ID only once in an HTML document.
The id selector is defined with a hash sign (#) immediately followed by the id value.
The Id Selector is used to select elements based on the id attribute of an HTML element. Id Selectors works in two-step:
- First Assign an id to HTML tag using id attribute: Example:
<p id="blue-text"> - To apply a style with id selector, write a hash (#) character, followed by the id of the element.
#blue-text { color : blue; }
In any HTML Page, id should be uniquely assigned to one element only. For example: if you have assigned id “blue-text” to any tag, do not use it with any other tag. An Id name cannot start with a number!
Example
Let us check a simple example to change text color under paragraph <p> tag. We will use “#blue-text” as an Id selector to apply the CSS Rule:
ID selector always has a hash character (#) in front, and the element’s ID attribute follows. In this example, #param1 is the ID selector. Hence, HTML’s ID attribute param1 will have style properties assigned to it.
Note: an ID name cannot start with a number.
Note: The value of an id attribute must be unique within a given document — meaning no two elements in your HTML document can share the same id value.
Example:
You can define style rules based on the id attribute of the elements. All the elements having that id will be formatted according to the defined rule.
#black {
   color: #000000;
}
This rule renders the content in black for every element with id attribute set to black in our document. You can make it a bit more particular. For example −
h1#black {
   color: #000000;
}
This rule renders the content in black for only <h1> elements with id attribute set to black.
The true power of id selectors is when they are used as the foundation for descendant selectors, For example −
#black h2 {
   color: #000000;
}
In this example all level 2 headings will be displayed in black color when those headings will lie with in tags having id attribute set to black.
Class Selectors
The class selectors can be used to select any HTML element that has a class attribute. All the elements having that class will be formatted according to the defined rule.
The class selector is defined with a period sign (.) immediately followed by the class value.
Example
.blue {
    color: blue;
}
The above style rules renders the text in blue of every element in the document that has class attribute set to blue. You can make it a bit more particular. For example:
Example
p.blue {
    color: blue;
}
The style rule inside the selector p.blue renders the text in blue of only those <p> elements that has class attribute set to blue, and has no effect on other paragraphs.
Descendant Selectors
You can use these selectors when you need to select an element that is the descendant of another element, for example, if you want to target only those anchors that are contained within an unordered list, rather than targeting all anchor elements. Let’s see how it works:
Example
ul.menu li a {
    text-decoration: none;
}
h1 em {
    color: green;
}
The style rules inside the selector ul.menu li a applied to only those <a> elements that contained inside an <ul> element having the class .menu, and has no effect on other links inside the document.
Similarly, the style rules inside the h1 em selector will be applied to only those <em> elements that contained inside the <h1> element and has not effect on other <em> elements.
Child Selectors
A child selector is used to select only those elements that are the direct children of some element.
A child selector is made up of two or more selectors separated by a greater than symbol (>). You can use this selector, for instance, to select the first level of list elements inside a nested list that has more than one level. Let’s check out an example to understand how it works:
Example
ul > li {
    list-style: square;
}
ul > li ol {
    list-style: none;
}
The style rule inside the selector ul > li applied to only those <li> elements that are direct children of the <ul> elements, and has no effect on other list elements.
Adjacent Sibling Selectors
The adjacent sibling selectors can be used to select sibling elements (i.e. elements at the same level). This selector has the syntax like: E1 + E2, where E2 is the target of the selector.
The selector h1 + p in the following example will select the <p> elements only if both the <h1> and <p> elements share the same parent in the document tree and <h1> is immediately precedes the <p> element. That means only those paragraphs that come immediately after each <h1> heading will have the associated style rules. Let’s see how this selector actually works:
Example
h1 + p {
    color: blue;
    font-size: 18px;
}
ul.task + p {
    color: #f0f;
    text-indent: 30px;
}
General Sibling Selectors
The general sibling selector is similar to the adjacent sibling selector (E1 + E2), but it is less strict. A general sibling selector is made up of two simple selectors separated by the tilde (∼) character. It can be written like: E1 ∼ E2, where E2 is the target of the selector.
The selector h1 ∼ p in the example below will select all the <p> elements that preceded by the <h1> element, where all the elements share the same parent in the document tree.
Example
h1 ∼ p {
    color: blue;
    font-size: 18px;
}
ul.task ∼ p {
    color: #f0f;
    text-indent: 30px;
}
Grouping Selectors
Often several selectors in a style sheet share the same style rules declarations. You can group them into a comma-separated list to minimize the code in your style sheet. It also prevents you from repeating the same style rules over and over again. Let’s take a look:
Example
h1 {
    font-size: 36px;
    font-weight: normal;
}
h2 {
    font-size: 28px;
    font-weight: normal;
}
h3 {
    font-size: 22px;
    font-weight: normal;
}
As you can see in the above example, the same style rule font-weight: normal; is shared by the selectors h1, h2 and h3, so it can be grouped in a comma-separated list, like this:
Example
h1, h2, h3 {
    font-weight: normal;
}
h1 {
    font-size: 36px;
}
h2 {
    font-size: 28px;
}
h3 {
    font-size: 22px;
}
CSS Colors
Colors are specified using predefined color names, or RGB, HEX, HSL, RGBA, HSLA values. The color property defines the text color (foreground color in general) of an element.
For instance, the color property specified in the body selector defines the default text color for the whole page. Let’s try out the following example to see how it works:
body {
    color: #ff5722;
}
Note: The color property normally inherits the color value from their parent element, except the case of anchor elements. For example, if you specify color for the body element it will automatically be passed down to the headings, paragraphs, etc.
Defining Color Values
Colors in CSS most often specified in the following formats:
- a color keyword – like “red”, “green”, “blue”, “transparent”, etc.
- a HEX value – like “#ff0000”, “#00ff00”, etc.
- an RGB value – like “rgb(255, 0, 0)”
For now, let’s stick to the basic methods of defining the color values:
CSS uses color values to specify a color. Typically, these are used to set a color either for the foreground of an element (i.e., its text) or else for the background of the element. They can also be used to affect the color of borders and other decorative effects.
You can specify your color values in various formats. Following table lists all the possible formats −
| Format | Syntax | Example |
|---|---|---|
| Hex Code | #RRGGBB | p{color:#FF0000;} |
| Short Hex Code | #RGB | p{color:#6A7;} |
| RGB % | rgb(rrr%,ggg%,bbb%) | p{color:rgb(50%,50%,50%);} |
| RGB Absolute | rgb(rrr,ggg,bbb) | p{color:rgb(0,0,255);} |
| keyword | aqua, black, etc. | p{color:teal;} |
CSS provides different options to define colors for HTML Page.
- CSS Color can be applied to text or fonts in HTML Tags
- CSS Color can be applied to background areas of HTML Tags & page.
- CSS Color can be applied to borders of various HTML Elements
These formats are explained in more detail in the following sections −
Color Keywords
CSS defines the few color keywords which lets you specify color values in an easy way.
These basic color keywords are: aqua, black, blue, fuchsia, gray, green, lime, maroon, navy, olive, purple, red, silver, teal, white, and yellow. The color names are case-insensitive.
h1 {
   color: red;
}

p {
    color: purple;
}
Modern web browsers however practically support many more color names than what are defined in the CSS standard, but to be on the safer side you should use hex color values instead.
CSS Colors – Hex Values
Hex (short for Hexadecimal) is by far the most commonly used method of defining color on the web.
Hex represent colors using a six-digit code, preceded by a hash character, like #rrggbb, in which rr, gg, and bb represents the red, green and blue component of the color respectively.
The value of each component can vary from 00 (no color) and FF (full color) in hexadecimal notation, or 0 and 255 in decimal equivalent notation. Thus #ffffff represents white color and #000000 represents black color.
Example:
h1 {
color: #ffa500;
}

p {
color: #00ff00;
}
Let’s take a look the following example:
| Color | Color HEX |
|---|---|
| #000000 | |
| #FF0000 | |
| #00FF00 | |
| #0000FF | |
| #FFFF00 | |
| #00FFFF | |
| #FF00FF | |
| #C0C0C0 | |
| #FFFFFF |
Note: Hexadecimal or Hex refers to a numbering scheme that uses 16 characters as its base. It uses the numbers 0 through 9 and the letters A, B, C, D, E and F which corresponds to the decimal numbers 10, 11, 12, 13, 14 and 15 respectively.
CSS Colors – RGB Values
This color value is specified using the rgb( ) property. This property takes three values, one each for red, green, and blue. The value can be an integer between 0 and 255 or a percentage.
NOTE − All the browsers does not support rgb() property of color so it is recommended not to use it.
Example:-
h1 {
 color: rgb(255, 165, 0);
 }

p {
color: rgb(0, 255, 0);
 }
Following is the example to show few colors using RGB values.
| Color | Color RGB |
|---|---|
| rgb(0,0,0) | |
| rgb(255,0,0) | |
| rgb(0,255,0) | |
| rgb(0,0,255) | |
| rgb(255,255,0) | |
| rgb(0,255,255) | |
| rgb(255,0,255) | |
| rgb(192,192,192) | |
| rgb(255,255,255) |
Note: You can also specify RGB values inside the rgb() function in percentage, where 100% represents full color, and 0% (not simply 0) represents no color. For example, you can specify the red color either as rgb(255, 0, 0) or rgb(100%, 0%, 0%).
Tip: If R, G, and B are all set to 255, i.e. rgb(255, 255, 255), the color would be white. Likewise, if all channels are set to 0, i.e. rgb(0, 0, 0), the color would be black. Play with the RGB values in the following demonstration to understand how it actually works.
Affect of Color Property on Borders
The color property is not just for text content, but for anything in the foreground that takes a color value. For instance, if border-color value hasn’t been defined explicitly for the element, the color value will be used instead. Let’s check out an example:
p.main{
    color: #0000ff;
    border: 2px solid;
}
Browser Safe Colors
Here is the list of 216 colors which are supposed to be most safe and computer independent colors. These colors vary from hexa code 000000 to FFFFFF. These colors are safe to use because they ensure that all computers would display the colors correctly when running a 256 color palette −
| 000000 | 000033 | 000066 | 000099 | 0000CC | 0000FF |
| 003300 | 003333 | 003366 | 003399 | 0033CC | 0033FF |
| 006600 | 006633 | 006666 | 006699 | 0066CC | 0066FF |
| 009900 | 009933 | 009966 | 009999 | 0099CC | 0099FF |
| 00CC00 | 00CC33 | 00CC66 | 00CC99 | 00CCCC | 00CCFF |
| 00FF00 | 00FF33 | 00FF66 | 00FF99 | 00FFCC | 00FFFF |
| 330000 | 330033 | 330066 | 330099 | 3300CC | 3300FF |
| 333300 | 333333 | 333366 | 333399 | 3333CC | 3333FF |
| 336600 | 336633 | 336666 | 336699 | 3366CC | 3366FF |
| 339900 | 339933 | 339966 | 339999 | 3399CC | 3399FF |
| 33CC00 | 33CC33 | 33CC66 | 33CC99 | 33CCCC | 33CCFF |
| 33FF00 | 33FF33 | 33FF66 | 33FF99 | 33FFCC | 33FFFF |
| 660000 | 660033 | 660066 | 660099 | 6600CC | 6600FF |
| 663300 | 663333 | 663366 | 663399 | 6633CC | 6633FF |
| 666600 | 666633 | 666666 | 666699 | 6666CC | 6666FF |
| 669900 | 669933 | 669966 | 669999 | 6699CC | 6699FF |
| 66CC00 | 66CC33 | 66CC66 | 66CC99 | 66CCCC | 66CCFF |
| 66FF00 | 66FF33 | 66FF66 | 66FF99 | 66FFCC | 66FFFF |
| 990000 | 990033 | 990066 | 990099 | 9900CC | 9900FF |
| 993300 | 993333 | 993366 | 993399 | 9933CC | 9933FF |
| 996600 | 996633 | 996666 | 996699 | 9966CC | 9966FF |
| 999900 | 999933 | 999966 | 999999 | 9999CC | 9999FF |
| 99CC00 | 99CC33 | 99CC66 | 99CC99 | 99CCCC | 99CCFF |
| 99FF00 | 99FF33 | 99FF66 | 99FF99 | 99FFCC | 99FFFF |
| CC0000 | CC0033 | CC0066 | CC0099 | CC00CC | CC00FF |
| CC3300 | CC3333 | CC3366 | CC3399 | CC33CC | CC33FF |
| CC6600 | CC6633 | CC6666 | CC6699 | CC66CC | CC66FF |
| CC9900 | CC9933 | CC9966 | CC9999 | CC99CC | CC99FF |
| CCCC00 | CCCC33 | CCCC66 | CCCC99 | CCCCCC | CCCCFF |
| CCFF00 | CCFF33 | CCFF66 | CCFF99 | CCFFCC | CCFFFF |
| FF0000 | FF0033 | FF0066 | FF0099 | FF00CC | FF00FF |
| FF3300 | FF3333 | FF3366 | FF3399 | FF33CC | FF33FF |
| FF6600 | FF6633 | FF6666 | FF6699 | FF66CC | FF66FF |
| FF9900 | FF9933 | FF9966 | FF9999 | FF99CC | FF99FF |
| FFCC00 | FFCC33 | FFCC66 | FFCC99 | FFCCCC | FFCCFF |
| FFFF00 | FFFF33 | FFFF66 | FFFF99 | FFFFCC | FFFFFF |
CSS Backgrounds
The CSS background properties are used to add background effects for elements.
The following CSS background properties:
background-colorbackground-imagebackground-repeatbackground-attachmentbackground-positionbackground(shorthand property)
You can set the background color for HTML elements:
CSS background-color
The background-color property specifies the background color of an element.
Example
The background color of a page is set like this:
body {
  background-color: lightblue;
}
Example
<h1 style=”background-color:DodgerBlue;”>Hello World</h1>
<p style=”background-color:Tomato;”>Lorem ipsum…</p>