-
Sep, Sat, 2021

How to create an Admin theme in Magento2
Table of Contents
In this article, lets understand the process of the creating and applying admin theme in the Magento2. To customize our website styles means look of the admin panel of the website, you need to create a custom design theme. In this Magento 2 theme development article, we are going to understand the process of theme creation.
If you are interested in frontend theme, I am sure you will love this theme frontend theme creation in Magento2.
Requirements for Theme Development
Before you begin work on developing your own theme for Magento 2-
- Make sure Magento 2 is installed on your localhost and running smoothly, and
- You have access to the frontend & backend.
If you haven’t installed Magento2, click here for
The following are the steps for theme development:-
Steps of Theme Development:
- Step 1: Create a Theme Directory
- Step 2: Declare Your Theme
- Step 3: Make Your Theme a Composer Package
- Step 4: Add Registration.php to Register Your Custom Theme
- Step 5: Create Module to declare Theme
- Step 6: Change Logo of the Admin Login Page
- Step 7: Change Logo of the Admin Dashboard
- Step 8: Run the commands to reflect changes
First enable the Magento application in developer mode.
php bin/magento deploy:mode:set developer
Step1: Create a Theme Directory
Start with creating your theme at the following location:
<your Magento installation dir>/app/design/adminhtml/<Vendor>/<theme>
vendor: Your Organization Name / Any Unique Name. (Used Thecoachsmbas vendor for this tutorial)
theme: Your Theme Name. (Used mythemeas theme name for this tutorial)
To create a directory for your Magento 2 theme, you need to go to: <your Magento 2 root directory>/app/design/adminhtml.
Under the frontend directory, create a new directory according to your theme vendor name: <your Magento 2 root directory>/app/design/adminhtml/Thecoachsmb.
Under your theme vendor directory, create a directory for your Magento 2 theme: <your Magento 2 root directory>/app/design/adminhtml/Thecoachsmb/mytheme.
After creating this structure, you need to declare your Magento 2 theme so that Magento knows it exists.
Step 2: Declare Your Theme
In the theme directory, add theme.xml containing at least the theme name and the parent theme name (if the theme inherits from one). We recommend you to inherit from the default Admin theme: Magento/backend.
So you need to create the theme.xml file under <your Magento 2 root directory>/app/design/adminhtml/Thecoachsmb/mytheme and
use the code below:
<theme xmlns:xsi="http://www.w3.org/2001/XMLSchema-instance" xsi:noNamespaceSchemaLocation="urn:magento:framework:Config/etc/theme.xsd">
     <title>Thecoachsmb Admin Mytheme</title> <!-- your theme's name -->
     <parent>Magento/backend</parent> <!-- the parent theme. Example: Magento/backend --> </theme>
Where,
<title> tag –> write the name of your theme.
<parent> tag –> you can specify the parent theme for fallback purposes. I am using the Magento/backend
We recommend you to inherit from the default Admin theme: Magento/backend.
Important Note:-
If you change the theme title or parent theme information in theme.xml after a theme was already registered, you need to open or reload any Admin page for your changes to be saved in the database.
Step3: Make Your Theme a Composer Package
Composer is a tool for dependency management in PHP. It allows you to declare the libraries your project depends on and it will manage (install/update) them for you.
To distribute your theme as a package, add a composer.json file to the theme directory <your Magento 2 root directory>/app/design/adminhtml/Thecoachsmb/mytheme/ and register the package on a packaging server.
composer.json example:
Use the following code:
{
    "name": "thecoachsmb/amytheme",
    "description": "Custom Theme TheCoachSMB Mytheme",
    "type": "magento2-theme",
    "license": [
         "OSL-3.0",
         "AFL-3.0"
    ],
    "config": {
        "sort-packages": true
    },
    "version": "100.4.2",
    "require": {
        "php": "~7.3.0||~7.4.0",
        "magento/framework": "103.0.*",
        "magento/theme-frontend-blank": "100.4.*"
    },
    "autoload": {
        "files": [
        "registration.php"
        ]
    }
}
Step 4: Add Registration.php to Register Your Custom Theme
To register your theme in the Magento system, you need to create a registration.php file in your theme directory: <your Magento 2 root directory>/app/design/adminhtml/Thecoachsmb/mytheme/registration.php and
content would be in your registration.php:
<?php
/**
 * Copyright © 2015 Magento. All rights reserved.
 * See COPYING.txt for license details.
 */
\Magento\Framework\Component\ComponentRegistrar::register(
    \Magento\Framework\Component\ComponentRegistrar::THEME,
    'adminhtml/Thecoachsmb/mytheme',
    __DIR__
);
Step 5: Create Module to declare Theme
- Create the registration.php file
In the app/code/Thecoachsmb/Backendtheme/registration.php, you should add the following code:
<?php
\Magento\Framework\Component\ComponentRegistrar::register(
	\Magento\Framework\Component\ComponentRegistrar::MODULE,
	'Thecoachsmb_Backendtheme',
	__DIR__
);
- Create module declare file
It is necessary to create etc folder and add the module.xml file in it
app/code/Thecoachsmb/Backendtheme/etc/module.xml
Contents would be:
<?xml version="1.0"?>
<config xmlns:xsi="http://www.w3.org/2001/XMLSchema-instance" xsi:noNamespaceSchemaLocation="urn:magento:framework:Module/etc/module.xsd">
<module name="Thecoachsmb_Backendtheme"  setup_version="0.0.1" >
     <sequence>
         <module name="Magento_Theme"/>
     </sequence>
 </module>
</config>- Specify the custom Admin theme in your module’s
di.xml
You need to specify the admin theme to be used in the app/code/Thecoachsmb/Backendtheme/etc/adminhtml/di.xml file. Add it, if the file does not yet exist in your module.
In app/code/Thecoachsmb/Backendtheme/etc/adminhtml/di.xml add the following (replace the placeholders with the vendor name and theme code of your Admin theme):
<?xml version="1.0"?>
<config xmlns:xsi="http://www.w3.org/2001/XMLSchema-instance" xsi:noNamespaceSchemaLocation="urn:magento:framework:ObjectManager/etc/config.xsd">
<!-- Admin theme. Start -->
<type name="Magento\Theme\Model\View\Design">
<arguments>
<argument name="themes" xsi:type="array">
<item name="adminhtml" xsi:type="string">Thecoachsmb/mytheme</item> <!-- Example: "Magento/backend" -->
</argument>
</arguments>
</type> <!-- Admin theme. End -->
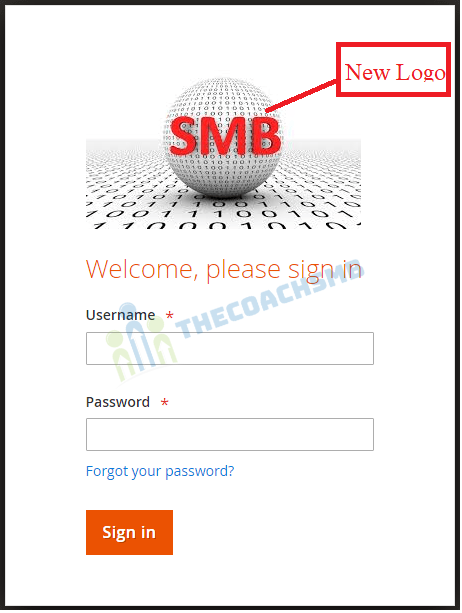
</config>Step 6: Change Logo in Admin Login Page
Let’s make some chages in the admin panel newly created theme. In the default Magento/backend theme lib/web/images/magento-logo.svg is used as theme logo. To override it, in your theme directory, create a web/images sub-directory, and add your custom file named magento-logo.svg. You can use different name and different format for the logo.
To customize the Admin theme logo:
In the app/code/Thecoachsmb/Backendtheme/view/adminhtml/layout/admin_login.xml add the following code:
<?xml version="1.0"?>
<page xmlns:xsi="http://www.w3.org/2001/XMLSchema-instance" layout="admin-login" xsi:noNamespaceSchemaLocation="urn:magento:framework:View/Layout/etc/page_configuration.xsd">
    <update handle="styles" />
    <body>
        <referenceBlock name="logo">
            <arguments>
                <argument name="logo_image_src" xsi:type="string">images/smb.jpg</argument>
            </arguments>
        </referenceBlock>
    </body>
</page>
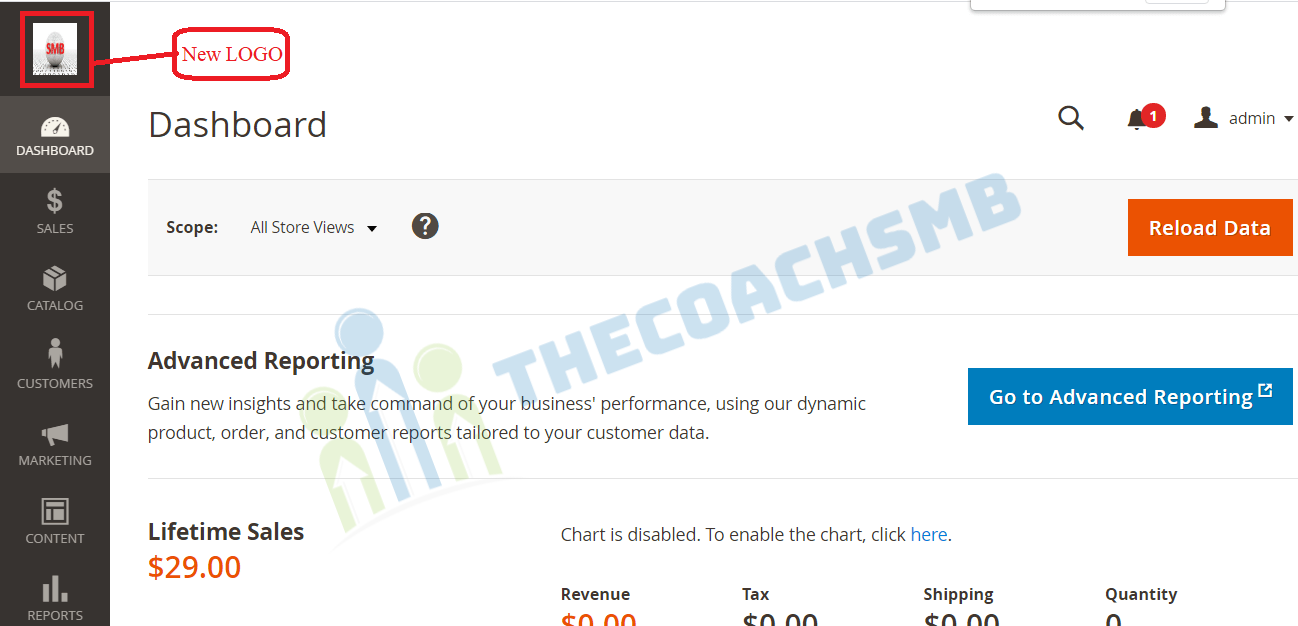
Step 7: Change Logo of the Admin Dashboard
In the app/code/Thecoachsmb/Backendtheme/view/adminhtml/layout/default.xml file, add the code:
<?xml version="1.0"?>
<page xmlns:xsi="http://www.w3.org/2001/XMLSchema-instance" layout="admin-1column" xsi:noNamespaceSchemaLocation="urn:magento:framework:View/Layout/etc/page_configuration.xsd">
    <body>
        <referenceContainer name="header">
            <block class="Magento\Backend\Block\Page\Header" name="logo" before="-">
                <arguments>
                    <argument name="show_part" xsi:type="string">logo</argument>
                    <argument name="edition" translate="true" xsi:type="string">Community Edition</argument>
                    <argument name="logo_image_src" xsi:type="string">images/smb.jpg</argument>
                </arguments>
            </block>
        </referenceContainer>
    </body>
</page>
Step 8: Run the commands to reflect changes
For your changes to take effect, you need to update Magento components. So after changes we need to remove directories contents present inside below directories
-
- pub/static/adminhtml – delete folders present inside this
- var/view_preprocessed – delete folders present inside this
- generated/code- delete folders present inside this
- generated/metadata – delete folders present inside this
Run the following commands-
php bin/magento module:enable Thecoachsmb_Backendtheme && php bin/magento setup:upgradeand also run below command:
php bin/magento setup:static-content:deploy -f && php bin/magento cache:cleanOn completing this commands, you can see the logo to be changed in the Admin Panel.
Now we are ready to see our new theme in the admin panel. Are you ready Let’s refresh the admin url.
Hurry !! Congratulations for your Magento2 admin new theme.
Conclusion:
In this way, we successfully created admin theme and also changed admin logo for admin login and admin dashboard page.
Please feel free to connect me for any queries on Magento2. Also make sure to drop comment in the comment box. I will love to hear back from you.
Happy Learning !!
Thank you !!