-
Sep, Mon, 2025

Magento 2.4.8 Installation on Windows [Step-by-Step Guide 2025]
💡 Need Expert Help?
Don’t want to install Magento manually? Let our team install Magento 2.4.x for you — fast, secure, and hassle-free.
Installing Magento 2.4.8 on Windows can feel challenging, especially with the latest requirements like PHP 8.3/8.4, Composer 2, and OpenSearch 3. But don’t worry — in this guide, I’ll show you a step-by-step process to set up Magento 2.4.8 successfully on your local Windows environment using XAMPP/WAMP.
This tutorial is designed for beginners as well as experienced developers who want a 100% working Magento installation on Windows. By the end of this article, you’ll have Magento fully running on your local system, complete with database setup, admin access, and troubleshooting tips for common errors.
If you’re looking for older versions, you can also check my guides for Magento 2.4.4, 2.4.5, 2.4.6, and more.
💡 Tip: Always install Magento locally first for testing, then move it to a live hosting server for production.
👉 Let’s dive into the installation process! 🚀
Table of Contents
Prerequisites for Installing Magento 2.4.8 on Windows
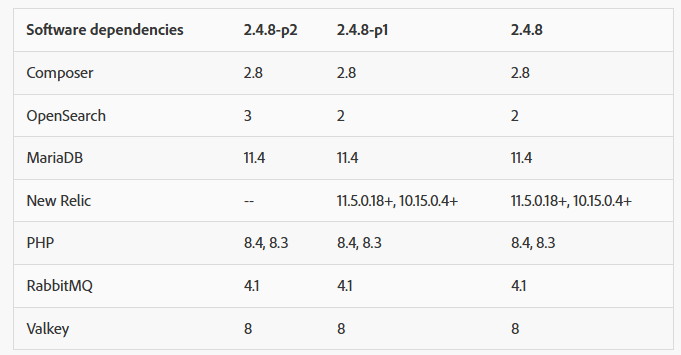
Before installing Magento 2.4.8 on your Windows system, make sure your local environment meets the minimum system requirements. Using the correct versions of PHP, MySQL, OpenSearch, and Composer is crucial for a smooth installation.
Minimum System Requirements
-
PHP: 8.3 / 8.4
-
Database: MariaDB 11.4
-
Search Engine: OpenSearch 3
-
Composer: 2.8
-
Web Server: Apache or Nginx (you can use XAMPP, WAMP, or configure manually)
📌 For the official and always-up-to-date list of supported versions, refer to Adobe’s documentation here:
👉 Magento 2 System Requirements (Adobe Commerce & Open Source)
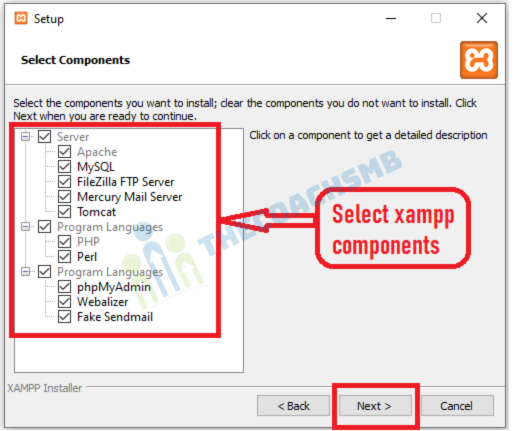
Step 1: Install XAMPP on Windows
The easiest way to set up Apache and MySQL on Windows is by using a local server stack such as XAMPP.
Download Links
Installation Steps
-
Download and install XAMPP for Windows.
-
During setup, ensure Apache and MySQL are selected.
-
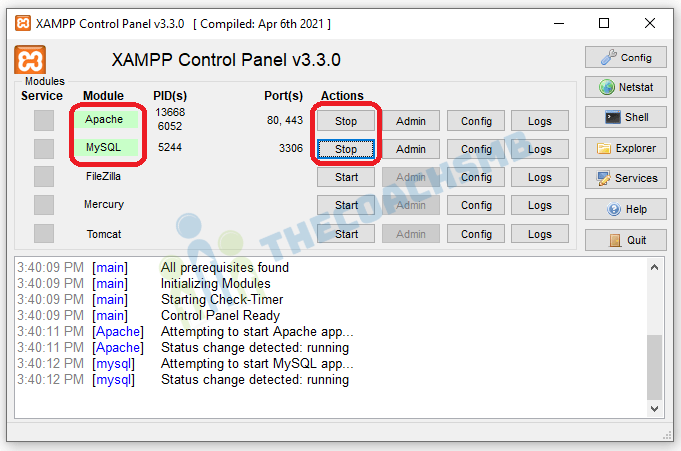
Once installed, open the Control Panel and start Apache & MySQL services.
Configure PHP Version
- Magento 2.4.8 requires PHP 8.3 or 8.4. However, XAMPP may not ship with these versions. Therefore, you must upgrade manually to avoid installation errors.
-
If you’re using XAMPP, check the PHP version by running:

-
If needed, you can manually upgrade PHP in XAMPP by replacing the
phpfolder with the latest PHP 8.4 build for Windows (from https://windows.php.net/download).
📌 Pro Tip: Stick to PHP 8.3 or 8.4 for Magento 2.4.8 — these are officially supported and stable.
XAMPP PHP Version vs Magento 2.4.8 Requirements
| XAMPP Version | Default PHP Version | Magento 2.4.8 Supported PHP | Action Needed |
|---|---|---|---|
| XAMPP 8.4.x | PHP 8.4.x | ✅ PHP 8.4 supported | Ready to use |
| XAMPP 8.3.x | PHP 8.3.x | ✅ PHP 8.3 supported | Ready to use |
| XAMPP 8.2.x | PHP 8.2.x | ❌ Not supported in 2.4.8 | Upgrade to 8.3/8.4 |
| XAMPP 8.1.x | PHP 8.1.x | ❌ Not supported in 2.4.8 | Upgrade to 8.3/8.4 |
| XAMPP 7.x | PHP 7.x | ❌ Not supported in 2.4.8 | Upgrade to 8.3/8.4 |
📌 Note:
-
Magento 2.4.8 requires PHP 8.3 or 8.4.
-
If your XAMPP ships with PHP 8.2 or lower, you must upgrade manually.
-
At the time of writing, XAMPP Windows builds may not yet include PHP 8.4, so you’ll likely need to use PHP 8.3 or manually replace the PHP folder with the 8.4 binaries.
How to Upgrade PHP in XAMPP to PHP 8.3 or 8.4
Magento 2.4.8 requires PHP 8.3 or PHP 8.4. If your XAMPP installation comes with an older version (like 8.2 or 7.x), you’ll need to upgrade manually.
Step 1: Download PHP 8.3 or 8.4 for Windows
-
Go to the official PHP Windows downloads: https://windows.php.net/download
-
Choose the Thread Safe ZIP package (VS16/x64 build or VS17/x64 build).
-
Example:
php-8.3.x-Win32-vs16-x64.ziporphp-8.4.x-Win32-vs17-x64.zip
-

Step 2: Extract PHP Files
-
Extract the ZIP into a new folder inside XAMPP, e.g.:
or
Step 3: Update XAMPP to Use the New PHP
-
Open XAMPP Control Panel → click Config → Apache (httpd-xampp.conf).
-
Find the PHP module load lines, for example:
-
Update paths to your new PHP folder, e.g.:
or
Step 4: Update Environment Path
-
-
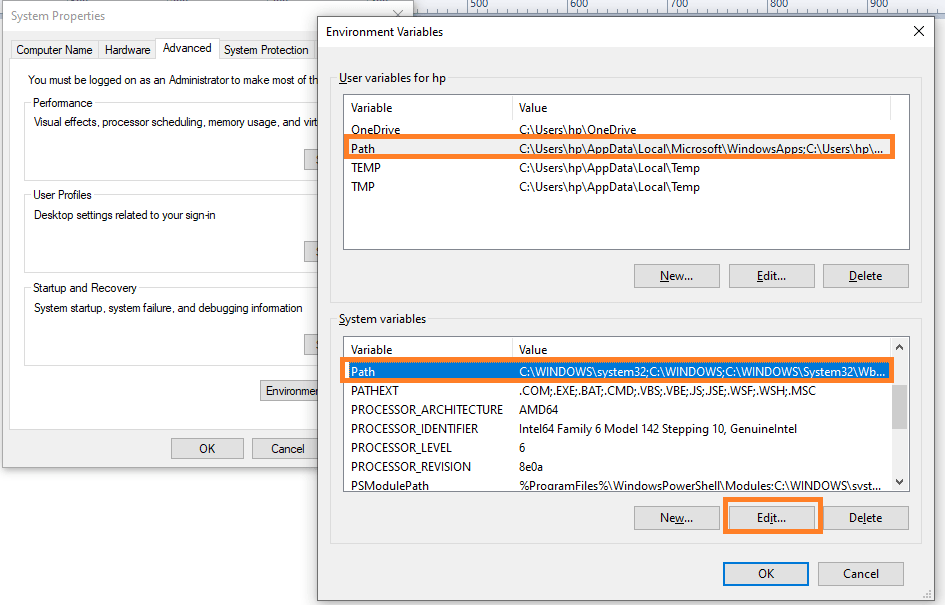
Open Environment Variables
-
Press Win + R, type
sysdm.cpl, and hit Enter. -
Go to Advanced tab → click Environment Variables.
-
-
Find Path Variable
-
Under System variables (not User variables), scroll and select Path.
-
Click Edit.
-
-
Replace Old PHP Path
-
Look for the old PHP folder (e.g.,
C:\xampp\php). -
Select it → click Edit.
-
Replace it with your new PHP path, for example:
-
C:\xampp\php8.3 -
or
C:\xampp\php8.4
-
-
-
Confirm
-
Click OK on all windows to save changes
-
-
Step 5: Verify PHP Version
-
Restart Apache in XAMPP Control Panel.
-
Run in Command Prompt or PowerShell:
php -v

-
It should now show PHP 8.3.x or PHP 8.4.x. 🎉
📌 Pro Tips:
-
Keep your old PHP folder as a backup in case something breaks.
-
Magento 2.4.8 works best with PHP 8.3 if XAMPP doesn’t yet provide a stable PHP 8.4 build.
- ⚠️ Tip: If you still see the old version, restart your computer or at least restart Command Prompt / PowerShell so the updated environment variables load.
⚠️ Important Warning: PHP Version Compatibility
🚨 Magento 2.4.8 will NOT run on PHP 8.2 or lower.
If your XAMPP comes with PHP 8.2, 8.1, or 7.x, you must upgrade to PHP 8.3 or PHP 8.4 before starting the installation.👉 Always confirm your PHP version with:
If you skip this step, Magento installation will fail with errors like:
“Your PHP version is not supported.”
“Required PHP extensions missing.”
✅ Safe choice: Use PHP 8.3 (most stable with XAMPP at the time of writing).
Step 2: Install Composer (Required for Magento)
Magento 2.4.8 is installed via Composer, which manages all core packages, modules, and dependencies. Without Composer, you won’t be able to download or update Magento.
Download Composer for Windows
-
Go to the official Composer website: Click Here To Download Composer
-
Download the Composer-Setup.exe (Windows Installer).
-
Run the installer → it will automatically detect your PHP path from XAMPP.
-
If it doesn’t, manually browse to your PHP executable (e.g.,
C:\xampp\php\php.exeorC:\xampp\php8.4\php.exe).
Verify Composer Installation
Once installed, open Command Prompt (CMD) or PowerShell and run:
If the installation is successful, it should display the Composer version, for example:
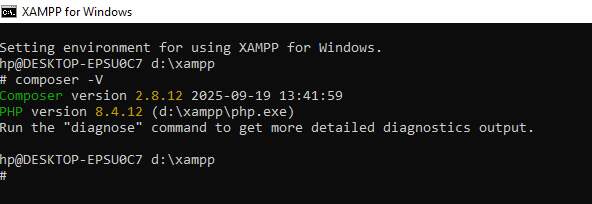
Composer version 2.8.12 2025-09-19 13:41:59
📌 Pro Tip: Magento 2.4.8 requires Composer 2.8. If you see Composer 1.x, uninstall and reinstall the latest version.
🔧 Troubleshooting Composer Installation on Windows
Even after installing Composer, you may run into a few issues. Here are the most common ones and how to fix them:
1.
composer is not recognized as an internal or external command
Cause: Composer’s installation path is not added to Windows Environment Variables.
Fix:
Go to Start → Search → Environment Variables.
Edit the
Pathvariable.Add the path where Composer was installed, usually:
Restart CMD/PowerShell and run:
2. Wrong PHP Version Detected
Cause: Composer linked to an older PHP version (e.g., PHP 8.2 instead of PHP 8.3/8.4).
Fix:
Re-run Composer-Setup.exe and point it to the correct PHP executable:
or
3. Composer Version is 1.x (Too Old)
Magento 2.4.8 requires Composer 2.x.
Fix: Update Composer by running:
Then check again with:
📌 Tip: Always run Composer from the project root (where
composer.jsonis located).
👨💻 Overwhelmed?
Let our certified Magento team handle the install so you don’t have to worry about setup, bugs, or configs.
Step 3: How to Install OpenSearch 3 on Windows (for Magento 2.4.8)
Step 1: Download OpenSearch 3
-
Go to the official download page:
👉 Click Here To Download
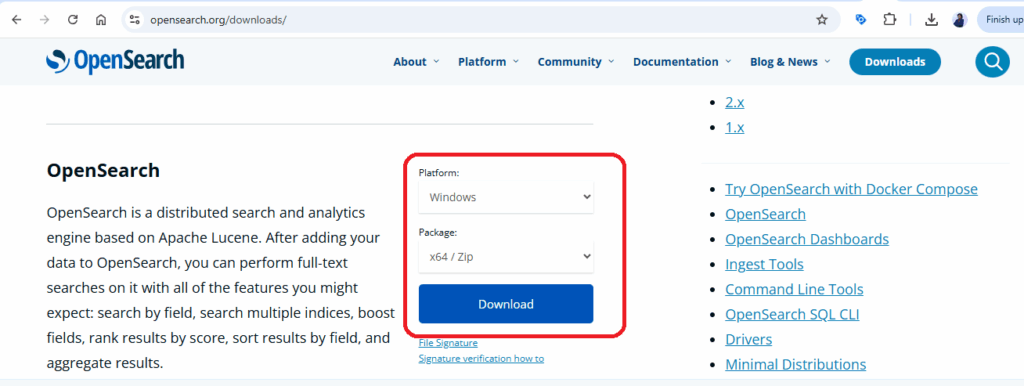
-
Under OpenSearch 3.x, download the Windows ZIP package.
-
Example file:
opensearch-3.2.0-windows-x64.zip
Step 2: Extract OpenSearch
-
Extract the ZIP file into a directory, e.g.:
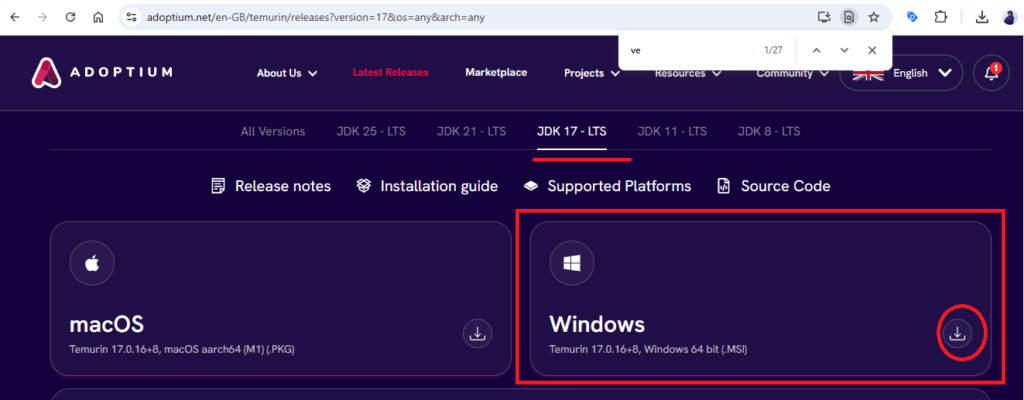
Step 3: Install Java 17 (Required)
-
OpenSearch 3 requires Java 17.
-
Download from: Adoptium Temurin
-
Choose:
-
Version: 17 (LTS)
-
OS: Windows
-
Architecture: x64
-
Installer (
.msi) is easiest.
-
-
Install and verify:
-
Run the installer.
-
During install → check “Set JAVA_HOME variable” if available.
Set Environment Variables (if not auto-If installer didn’t set it:
-
Press Win + R, type
sysdm.cpl, Enter. -
Go to Advanced → Environment Variables.
-
Under System variables, click New:
-
Variable name:
JAVA_HOME -
Variable value:
-
-
Edit Path → Add:
Verify Installation
Open Command Prompt and run:
✅ You should see something like:
-
Step 4: Start OpenSearch 3
-
Open Command Prompt (as Administrator).
-
Navigate to your OpenSearch folder:
-
Start OpenSearch:
You’ll see logs in the terminal. When you see started, OpenSearch is running.
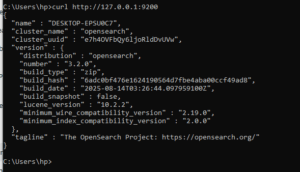
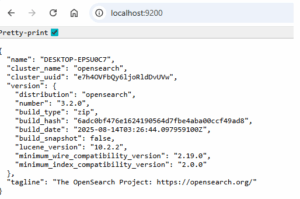
Step 5: Verify OpenSearch is Running
-
Open your browser and go to:
-
You should see a JSON response with cluster details like:
{

"name" : "DESKTOP-12345",

"cluster_name" : "opensearch",

"cluster_uuid" : "...",

"version" : {

"number" : "3.0.0"

}

}
Step 6: (Optional) Run OpenSearch as a Windows Service
-
OpenSearch doesn’t install as a Windows service by default.
-
Use NSSM (Non-Sucking Service Manager) → https://nssm.cc/download
-
Example command:
-
Then control it from Services in Windows.
🔧 Troubleshooting OpenSearch 3
Error: Java not found → Make sure Java 17 is installed and
JAVA_HOMEis set.Port 9200 already in use → Stop other services or change port in
config/opensearch.yml.Service stops immediately → Check logs inside
C:\opensearch-3\logs\
📌 Pro Tip: Always start OpenSearch before running Magento installation. If it’s not running, bin/magento setup:install will fail.
Step 4: Download Magento 2.4.8 via Composer
Quick tip: You can quickly open php.ini on Xampp interface with this button

The other extensions are enabled by default after we install Xampp, so we don’t need to include them here. Remember to save files before exiting.
Configure php settings
In php.ini file, search and change the following values as below
max_execution_time=18000
max_input_time=1800
memory_limit=4G
These values will keep the installation go properly without interruption.
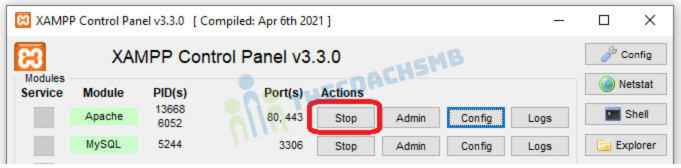
Finally, restart apache to apply php settings by click on apache Stop and Start button on XAMPP
Magento 2.4.8 is installed using Composer, which fetches all the core packages and dependencies directly from Adobe’s official repository.
Run the Composer Command
Open Command Prompt or PowerShell, navigate to your web root (e.g., C:\xampp\htdocs\) and run:
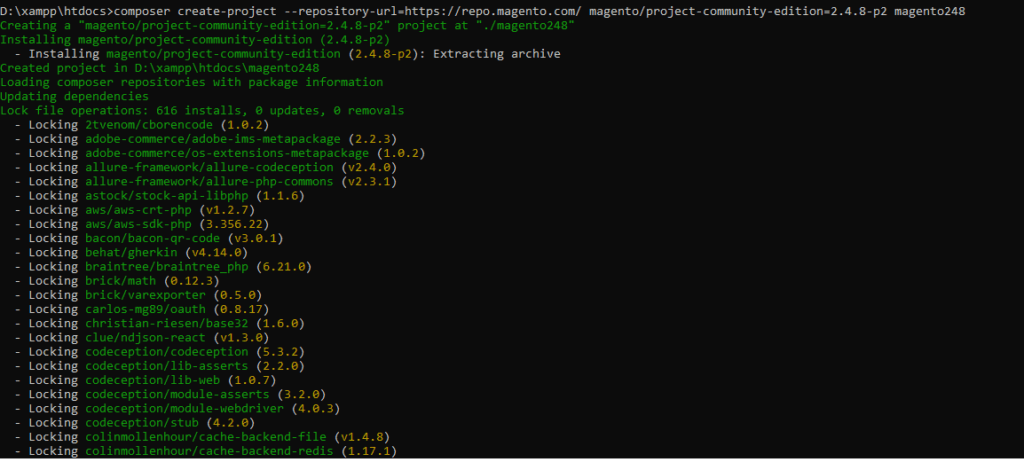
It will be successfully installed as shown below:
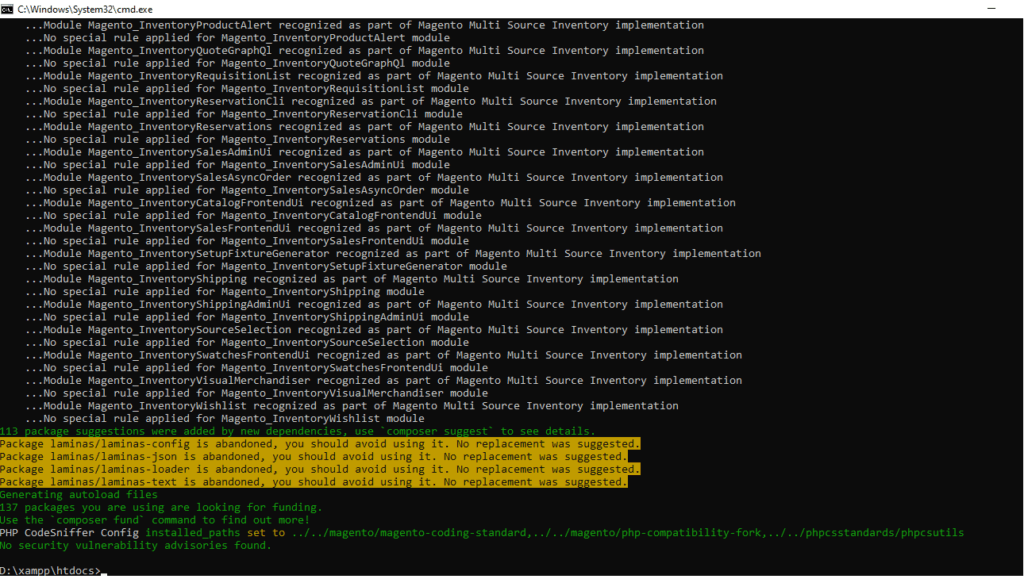
This will create a new folder named magento248 with the Magento 2.4.8 files.
Magento Marketplace Access Keys
When you run the above command, Composer will prompt for authentication because Magento packages are hosted on a private repository.
-
Username → Your Public Key
-
Password → Your Private Key
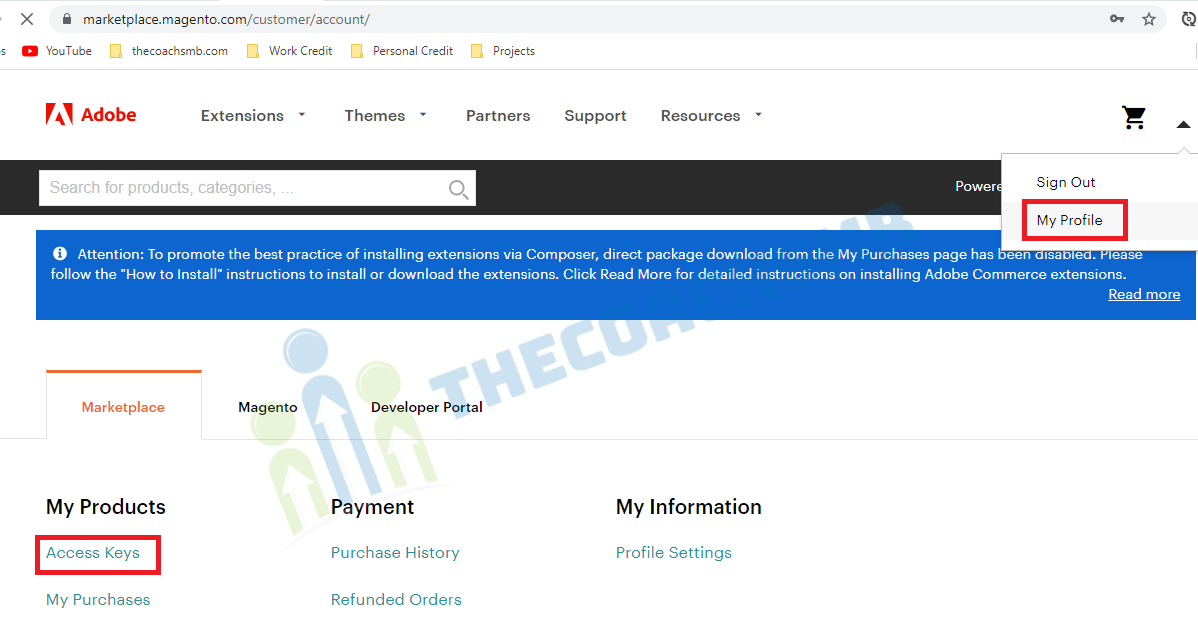
How to Get Magento Access Keys
-
Log in with your Adobe/Magento account.
-
Click your profile → My Profile → Access Keys.
-
Create a new access key (e.g., “Magento248”).
-
Copy the Public Key and Private Key.
Create an account on Magento marketplace and go to https://marketplace.magento.com/customer/accessKeys/ to get private and public access key,
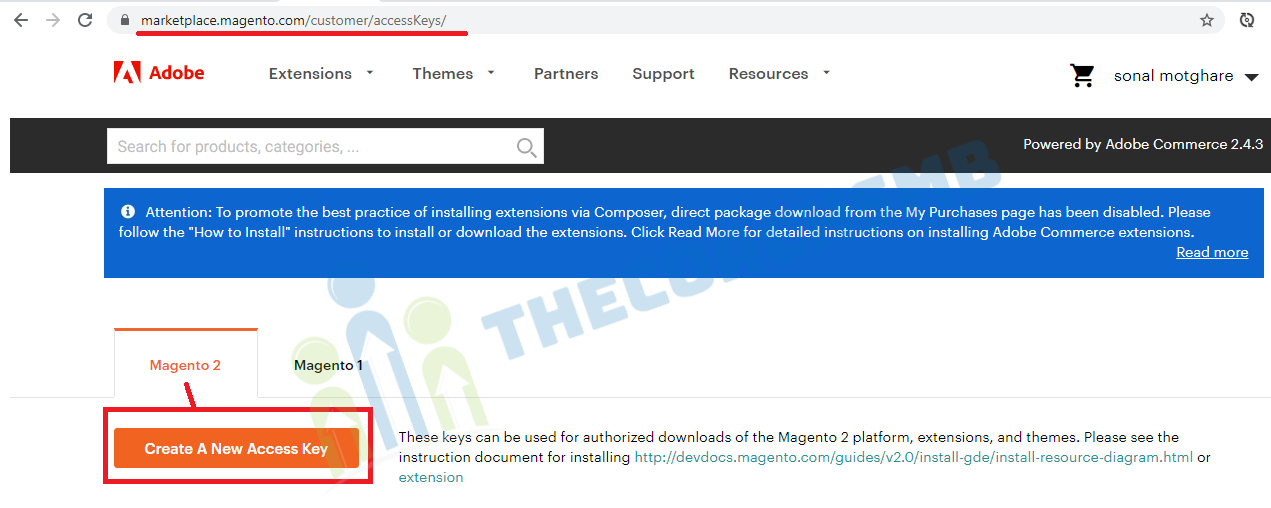
Create Access keys here. If you have access keys, you can use those. Or you can use below keys
Now enter Username and password to start downloading
- Username: Your public Key 2fc966a913d4e83b28041eeb3c3b72e5
- Password: Your private key. 48e05400d17ca1bcb4e693825c45416e
Configure Keys in Composer (Optional)
Instead of entering keys every time, you can store them globally:
Now you can run the create-project command without typing credentials again.
📌 Pro Tips
-
Always use the exact version (2.4.8) for stable installs.
-
If installation fails, delete the incomplete folder and re-run the command.
-
Ensure PHP, Composer, and OpenSearch are working before running this step.
Step 5: Create Database in MySQL
Magento needs a dedicated MySQL database where it will store all eCommerce data (products, customers, orders, settings, etc.). Before running the Magento installation command, create a fresh database.
Option 1: Create Database Using phpMyAdmin (Easy for Beginners)
-
Open http://localhost/phpmyadmin in your browser.
-
Log in with your MySQL credentials (default for XAMPP: user = root, password = empty).
-
Click Databases from the top menu.
-
Enter a name for your database, e.g.,
magento248. -
Choose utf8mb4_general_ci as collation.
-
Click Create.
✅ Your new database magento248 is ready.
Option 2: Create Database Using MySQL CLI
-
Open Command Prompt or PowerShell.
-
Log into MySQL:
(Press Enter if there’s no password.)
-
Create a new database:
-
Exit MySQL:
📌 Database Notes
-
Database name can be anything, but it must match the name you use later in the Magento install command (
--db-name). -
Default user in XAMPP/WAMP is
root. For production environments, always create a separate MySQL user with limited privileges. -
Collation
utf8mb4_general_ciis recommended for best Unicode support.
Step 6: Install Magento 2.4.8 Using CLI with OpenSearch 3
Now that you have PHP 8.3/8.4, Composer, MySQL, and OpenSearch 3 ready, you can run the Magento installer.
-
Open Command Prompt / PowerShell.
-
Navigate to your Magento project folder (where you ran composer):
-
Run the installation command:
🔑 Explanation of Key Flags
-
--base-url→ Your store URL (usehttp://localhost/...for local setup). -
--db-host→ Usually127.0.0.1for local MySQL. -
--db-name→ Database you created (magento248). -
--db-user/--db-password→ MySQL credentials (default root/empty in XAMPP). -
--admin-user/--admin-password→ Credentials for Magento admin panel. -
--backend-frontname→ Admin URL path (e.g.,http://localhost/magento248/admin). -
--search-engine→ Set to opensearch for Magento 2.4.8. -
--opensearch-host/--opensearch-port→ Defaults:127.0.0.1:9200.

In PatchApplier.php line 170:
Unable to apply data patch Magento\Theme\Setup\Patch\Data\RegisterThemes for module Magento_Theme. Original exception message: Wrong file
In Gd2.php line 72: Wrong file
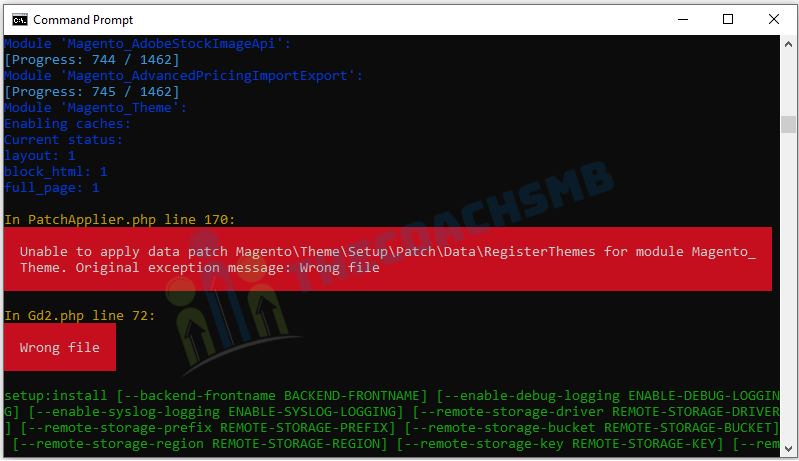
Solution: –
Here Image Adapter try opens to image files (‘open function in Gd2.php line 72). validateURLScheme function return false always because it checking ‘URL’ format but local files not valid for this format, so it returns false.
Find validateURLScheme function in vendor\magento\framework\Image\Adapter\Gd2.php file. at line 92. Replace function with this:
private function validateURLScheme(string $filename) : bool
{
          $allowed_schemes = ['ftp', 'ftps', 'http', 'https'];
          $url = parse_url($filename);
          if ($url && isset($url['scheme']) && !in_array($url['scheme'], $allowed_schemes) && !file_exists($filename)) {
              return false;
          }

          return true;
}
✅ After Successful Installation
-
Storefront: http://localhost/magento248/
-
Admin Panel: http://localhost/magento248/admin
🔧 Common Errors
OpenSearch connection error → Make sure OpenSearch 3 is running (
http://localhost:9200).PHP extension missing → Enable required extensions in
php.ini(intl,soap,xsl,sodium, etc.).Admin password error → Must include uppercase, lowercase, number, and special character.
Step 7: Configure Apache Virtual Host for Magento
By default, Magento is accessible at http://localhost/magento248/, but it’s better to create a custom domain (e.g., http://magento248.local) for easier access.
Step 1: Edit Apache Virtual Hosts
-
Open the file (in XAMPP):
-
Add a new VirtualHost entry:
📌 Important: Always point DocumentRoot to the pub folder (not root), for security.
Step 2: Update Windows Hosts File
-
Open Notepad as Administrator.
-
Edit file:
-
Add this line at the bottom:
Step 3: Restart Apache
-
Open XAMPP Control Panel → Stop & Start Apache.
-
Now visit:
👉 http://magento248.local/
✅ Result
-
Storefront →
http://magento248.local/ -
Admin Panel →
http://magento248.local/admin
🔧 Troubleshooting
-
Forbidden / 403 Error → Check that your
pubfolder has proper permissions and.htaccessis enabled (AllowOverride All). -
ServerName conflict → Make sure no other virtual host is using the same name.
-
Changes not applied → Run
ipconfig /flushdnsin CMD to clear DNS cache.
Step 8: Verify Installation & Common Errors Fixes
After completing the installation, it’s time to confirm everything is working properly.
✅ Verify Installation
-
Storefront
-
You should see the default Magento Luma homepage.
-
Admin Panel
-
Visit http://magento248.local/admin (or your custom
--backend-frontname). -
Log in with the admin credentials you set during installation (
admin / Admin123!).
-
-
Check System Status
-
Run in CMD/Powershell:
-
If these commands work without errors → your installation is successful. 🎉
-
🔧 Common Errors & Fixes
1. 404 Not Found on Frontend or Admin
-
Cause: Apache
.htaccessrules not applied. -
Fix: Ensure
AllowOverride Allis set in your VirtualHost config. Restart Apache.
2. Blank Page or 500 Error
-
Cause: File/folder permissions incorrect.
-
Fix: In project root, run:
(For Windows, ensure read/write permissions are allowed.)
3. “Your PHP version is not supported”
-
Cause: Running PHP 8.2 or lower.
-
Fix: Upgrade to PHP 8.3 or 8.4 (Magento 2.4.8 requirement).
4. OpenSearch Connection Failed
-
Cause: OpenSearch 3 not running.
-
Fix: Start OpenSearch:
-
Test: Visit http://localhost:9200.
5. CSS/JS Not Loading
-
Cause: Static content not deployed.
-
Fix: Run:
🎉 Final Checklist
-
Storefront loads at
http://magento248.local/ -
Admin panel accessible at
/admin -
OpenSearch 3 running on port 9200
-
PHP version = 8.3 / 8.4
-
Composer 2.x installed
-
No fatal errors on CLI commands
If all boxes are ticked → Congratulations! 🎉 You’ve successfully installed Magento 2.4.8 on Windows.
❓ Frequently Asked Questions (FAQ)
1. How do I install Magento 2.4.8 on Windows?
To install Magento 2.4.8 on Windows, set up XAMPP/WAMP with PHP 8.3 or 8.4, install Composer 2, configure MySQL, and run the Magento installation command with OpenSearch 3 enabled.
2. Which PHP versions are supported for Magento 2.4.8?
Magento 2.4.8 only supports PHP 8.3 and PHP 8.4. Older versions like PHP 8.2 or 7.x are not compatible.
3. Does Magento 2.4.8 support Elasticsearch?
No. Magento 2.4.8 no longer supports Elasticsearch. It requires OpenSearch 3 as the search engine.
4. Can I use XAMPP to install Magento 2.4.8?
Yes, you can use XAMPP with PHP 8.3/8.4 for a local Magento 2.4.8 installation. However, you may need to manually upgrade PHP in XAMPP to the supported version.
5. What are the system requirements for Magento 2.4.8?
Magento 2.4.8 requires:
-
PHP 8.3 or 8.4
-
MySQL 8.0 / MariaDB
-
OpenSearch 3
-
Composer 2.x
-
Apache/Nginx (via XAMPP/WAMP)
-
Node.js & npm (optional, for front-end build tasks)
6. Is Windows recommended for Magento 2.4.8?
Windows is fine for local development and learning. However, for production environments, Magento recommends Linux-based servers for better performance and stability.
Conclusion: You’re Ready to Build with Magento 2.4.8 🚀
Congratulations! 🎉 You’ve successfully installed Magento 2.4.8 on Windows with PHP 8.3/8.4, Composer 2, MySQL, and OpenSearch 3. Your storefront and admin panel should now be live, and you’re ready to start building your eCommerce store.
Remember, Magento is powerful but resource-intensive. Running it on Windows (via XAMPP/WAMP) is perfect for learning, development, and testing. For production environments, always switch to a Linux-based server for better performance and stability.
✅ What’s Next?
Now that Magento is up and running, here are some great next steps:
-
Install a custom theme and make your store look unique.
-
Add sample products and test the catalog.
-
Configure payment methods (PayPal, Razorpay, Stripe, etc.).
-
Optimize performance by enabling caching and indexing.
📌 Call-to-Action
👉 If this guide helped you, share it with fellow developers who are starting with Magento.
👉 Stay tuned for my upcoming tutorials on:
-
Magento Speed Optimization
-
Magento Theme Development
-
How to Upgrade Magento 2.4.x Safely
🔥 With Magento 2.4.8 running locally, you’ve taken the first big step into professional eCommerce development. Keep exploring, keep building, and soon you’ll master the Magento ecosystem!