
-
Dec, Tue, 2021

How to change favicon of Magento 2 website
Table of Contents
Favicon is a small image that appears on various location like the browser’s address bar or next to the page’s name in bookmark website icon, tab icon, URL icon, or bookmark icon.
Purpose of adding favicon
The main purpose of a favicon is to make your website easier to be recognized. When you open multiple tabs in the browser, by looking at the Favicon, you can easily recognize the website without reading the website title. In the bookmark section, favicon helps users easily distinguish where their website is in bookmarks.
More importantly, if a website lacks a Favicon, the attractiveness and appeal seem to be partially reduced compared to websites with Favicon.
In this tutorial, we will find out how to change the favicon of a Magento 2 website. There will be 2 methods to change favicon, you can choose the method that you feel most comfortable with.
- Change favicon using Magento 2 backend
- Change favicon using theme in Magento2
Prepare a favicon file
The standard sizes of Favicon on the website are: 16×16 pixels (most recommended); 32×32 or 48×48, 64×64.
You can also use larger or smaller Favicon sizes but it will consume more bandwidth and may cause a slow load of the Favicon. The size of the favicon.ico file should be less than 100kb.
Favico file type
Magento 2 supports the following file types for favicon: .ico, .png, .gif, .jpg, .jpeg, .apng, .svg. However, as not all browsers support all these file types, you’re recommended to prepare .ico file to use as a Magento 2 favicon because ico is the most widely supported file type.
How to create a favicon file
There are many ways to create a favicon file to use as Website’s favicon. You can use graphics editor programs like Microsoft Paint, Adobe Photoshop, Coreldraws… to create favicon file.
If you use photoshop or paint, when saving file, remember to set file extension as .ico
There are also several online tools to create favicon. By using these online tools, you can quickly generate a favicon file in proper format and download it to your computer.
- Online Converter
- ICO Converter
- ConvertICO
- Onlineconvertfree
Let’s see the two methods of implementing this.
Method 1: Change favicon using Magento 2 backend
Unline Magento 1, in Magento 2 we can directly change Favicon in admin section.
Go to Admin dashboard > Content > Design > Configuration, select the store view you want to change Favicon.
If you want to change default store view, go to Default store view row and select editin action column.
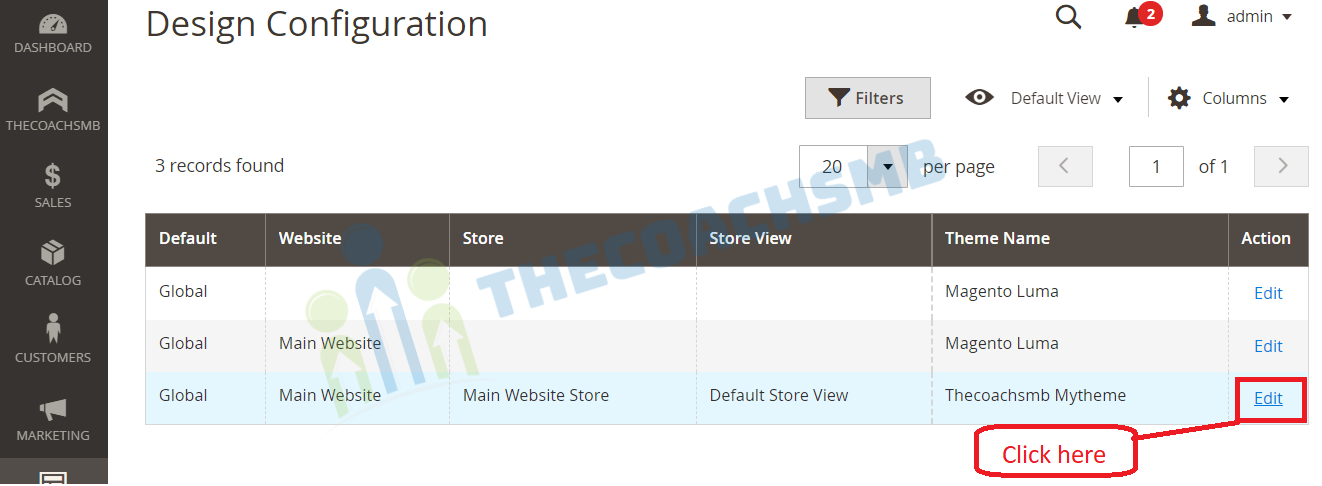
Now we will select theme to change favicon in . In thiApplied Theme sections example, I will change favicon for Thecoachsmb Mytheme so I choose Thecoachsmb Mytheme.
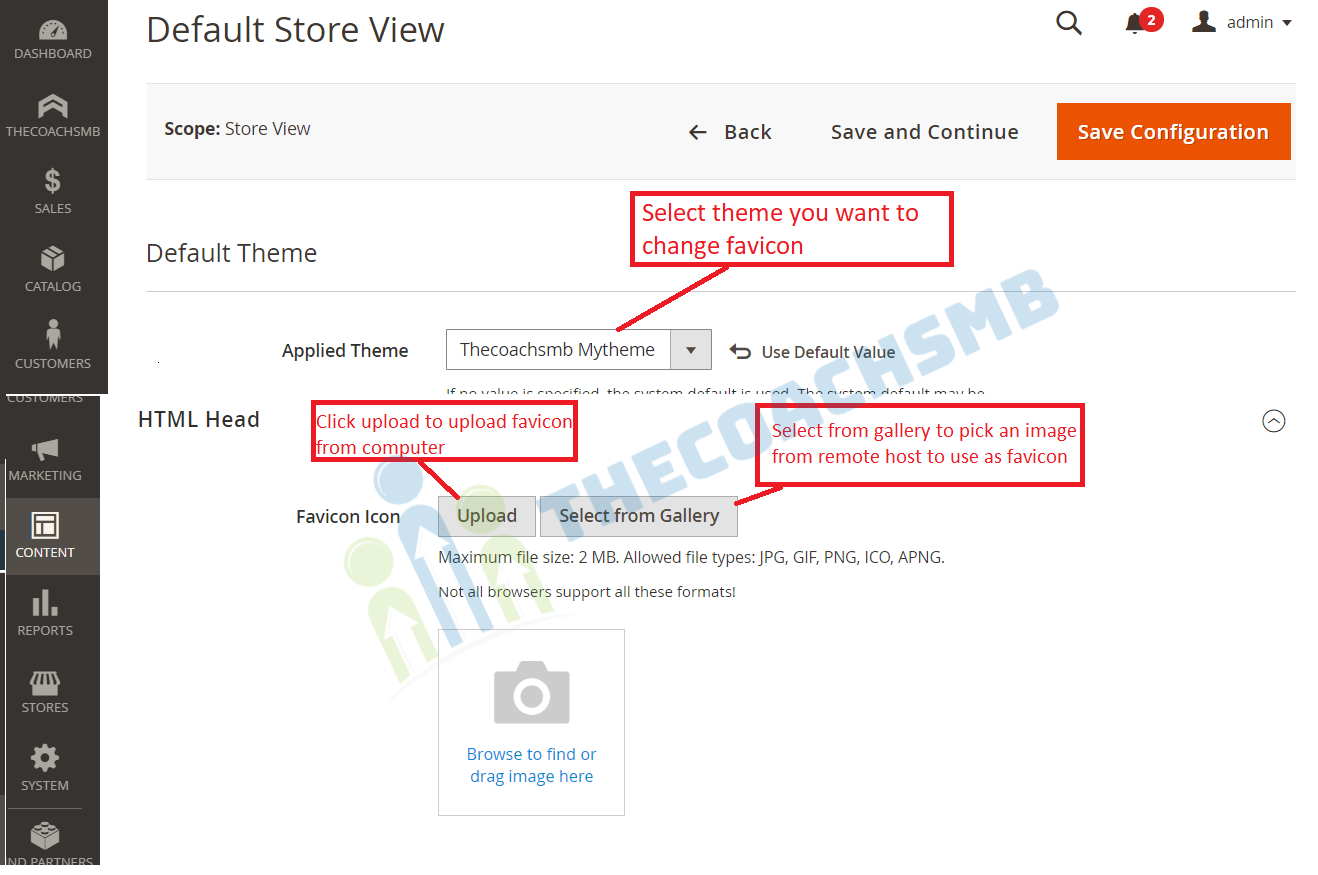
After selecting theme, go to HTML Head section. Here you will have 2 options to upload favicon.
Upload: You will upload a new image file from computer to use as website’s Favicon
Select from Gallery: You will pick an image from remote host’s folders to be used as Favicon.
After you choose an image as favicon, click on Save Configuration to apply changes.
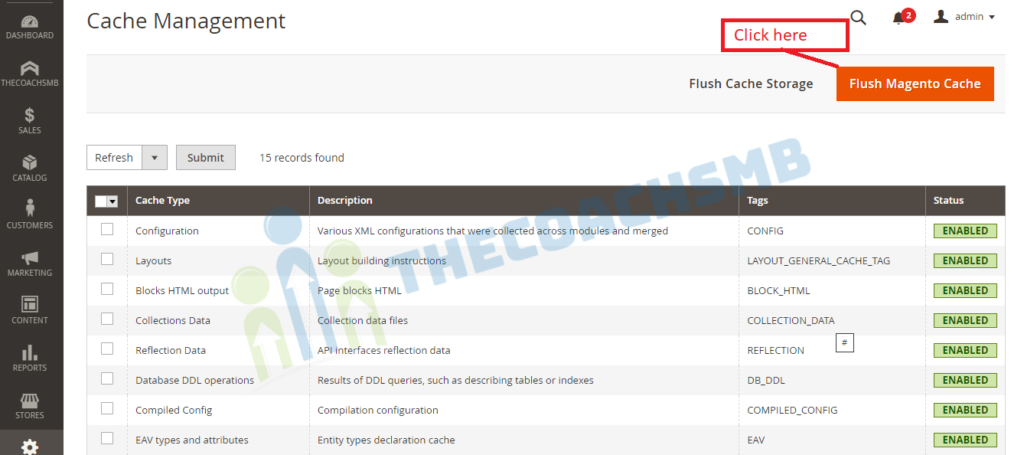
Finally flush cache to see the new Favicon on your website using flush cache command
php bin/magento cache:flush
Or Login in the Admin panel and then System > Tools > Cache Management and click Flush Magento Cache
Now your Magento 2 website should be showing a new favicon
Method 2: Change favicon using theme in Magento2
We can change the favicon through the theme. There are only 2 steps to achive this.
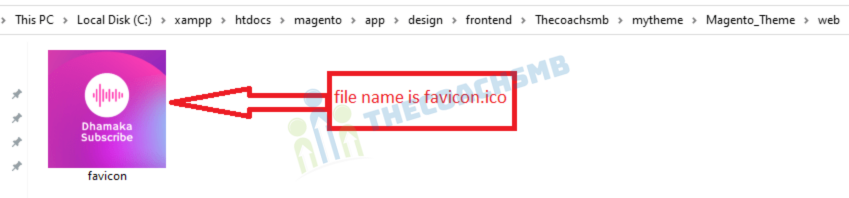
Step 1: Place the favicon
Put the favicon.ico image in the magento_root\app\design\frontend\<vendor>\<theme>\Magento_Theme\web .
Make sure to have favicon name as favicon.ico so that it can be automatically detected by the Magento2 system.
Step 2: Deploy the changes
Save changes and go to magento_root/pub/static/frontend , remove all files inside static folder (except .htaccess file). Also go to magento_root/var/view_preprocessed and delete everything (except .htaccess file)
php bin/magento se:s:d -f && php bin/magento cache:flushFinally flush cache to see changes.
Which Method take preference
Out of these two methods, Method 1 which is uploading favicon from Backend take preference while displaying favicon if it is pesent in the backend.
Conclusion
So now you know the methods to upload favicons in the Magento2. This we need to do in every website or project.
If you have any troubles while changing Magento 2 favicon, please drop a comment below describing your problem and I will be happy to help!