
-
Jul, Thu, 2021

Magento 2 Product Attributes
Table of Contents
Introduction
In this article, we are going to understand the purpose of the creation of the attribute. Before we create any type of the product, we should know details about the product attribute. So to understand how to use attribute, lets see the details below:-
Product Attributes
An attribute is a property or characteristic of a product, for example, the product color, the size, or the description. Magento 2 uses attributes to manage the information associated with products. Some attributes are built into the system by default, and others can be created to meet specific needs. You can add, modify, or remove product attributes in Magento 2 to customize your products.
Mostly, Magento 2 product attributes are used to for 4 different purposes:
- Define product information
- For filtering and searching of the product
- To compare products on the site
- Used for promotion settings up
Types Of Product Attributes Magento 2
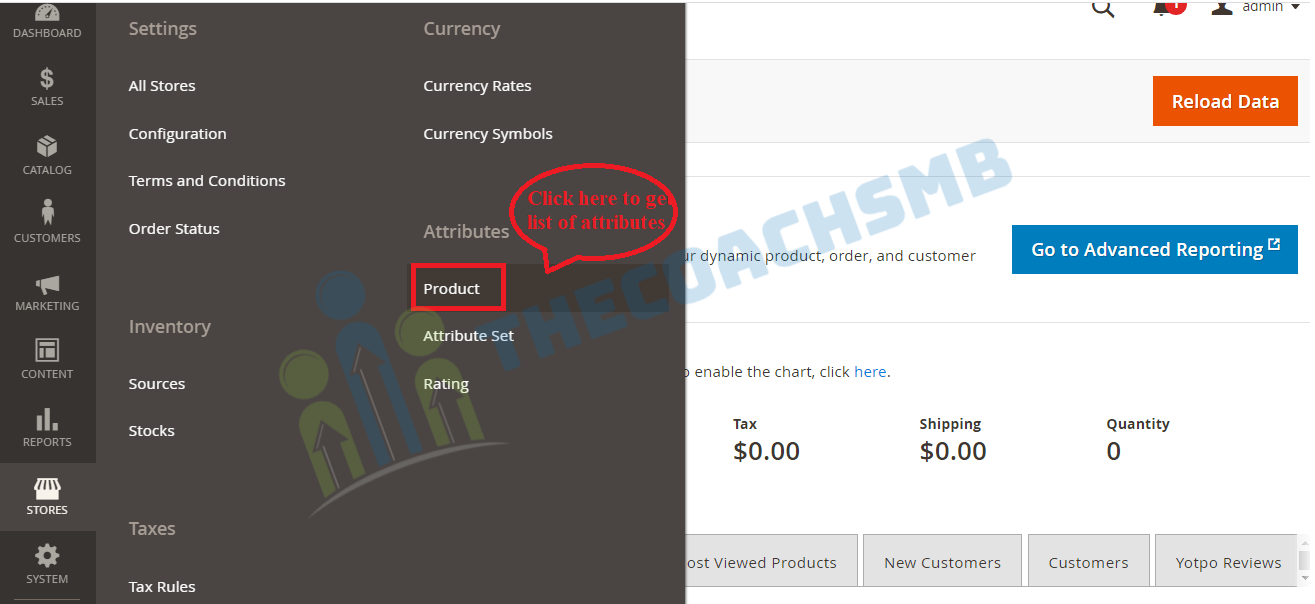
To understand these in more details, Please navigate to Admin Panel ⇒ Stores ⇒ Attributes ⇒ Product.
Here you will get the list of product attributes. All product attributes in Magento 2 are saved in one grid for easy management where you can search and edit any attributes at hand.
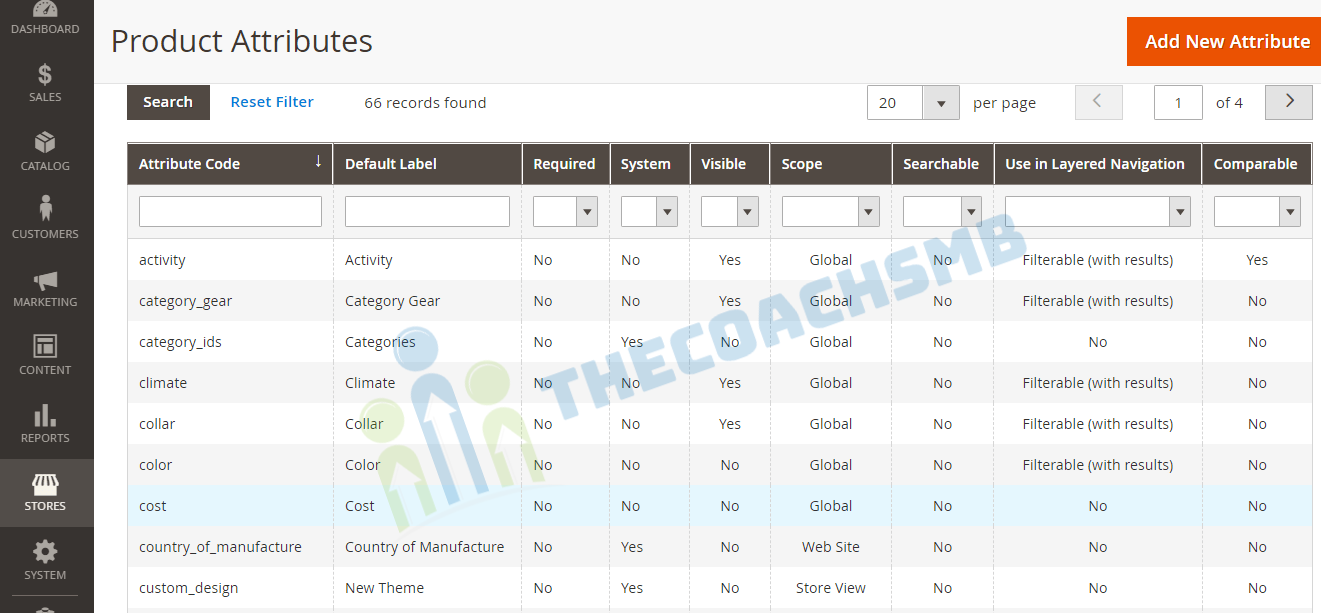
There are two types of product attributes in Magento2:-
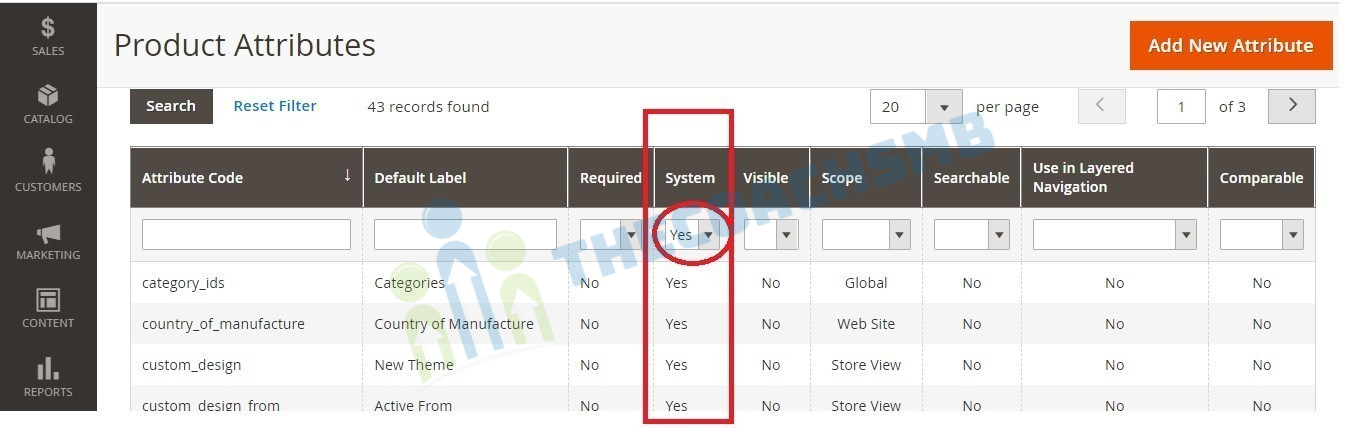
- System Attributes
- Custom Attributes
If you visit for the first time, you can see many built-in attributes. They are system attributes, which are unchangeable.
Besides, you can create new attributes, called Magento 2 custom attributes, according to your requirement.
Create A Custom Product Attributes in Magento2
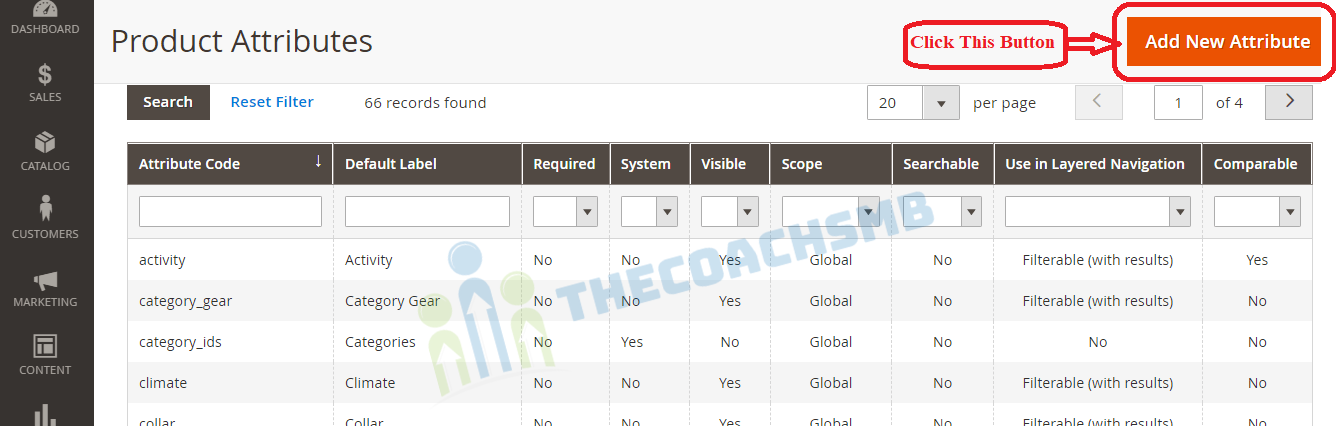
There are 2 ways to add new product attributes in Magento 2:
- When working on a specific product edit page
- From the Product Attributes page
Step 1: Click On “Add New Attribute” Button
- Log in to Admin Panel
- Navigate to Stores > Attributes > Product
- Click “Add New Attribute“
Step 2: Properties Tab
Under Attribute properties, describe basic information of the product attributes Magento 2.
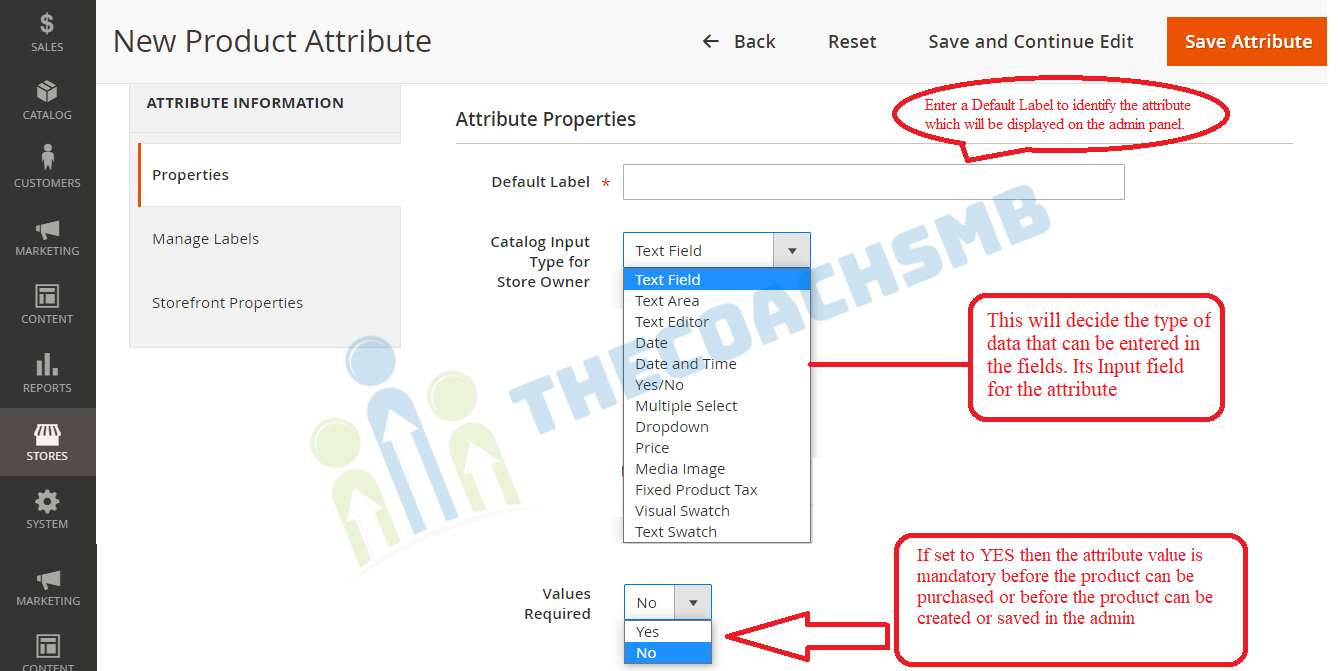
- Enter a Default Label to identify the attribute. It will be displayed on the admin panel.
- The Catalog Input Type For Store Owner will define the type of data that can be entered in the fields. There are 13 Catalog Input Types For Store Owner to define the product attributes Magento 2.
- Text Field: A single-line field to enter text
- Text Area: A multiple-line field to enter text directly or using WYSIWYG Editor
- Text Editor: Add WYSIWYG Editor to any custom field
- Date: Date can be picked from the calendar or typed directly into a field
- Date & Time: Date & Time can be picked from the calendar or typed directly into a field
- Yes/No: A “switch” button between two pre-defined options: Yes or No
- Dropdown: A drop-down list to choose one option at a time
- Multiple Select: Used to create price fields. The currency used is determined in the system configuration
- Media Image: A media image attribute becomes an additional image type, along with Base, Small, and Thumbnail
- Fixed Product Tax: Used to define FPT rates based on the locale requirements
- Visual Swatch: For configurable products, the corresponding image is shown per swatch on visual option (e.g color)
- Text Swatch: For configurable products, the corresponding image is shown per swatch on text option (e.g size)
- Set “Yes” to “Values Required” if you want to the customer to choose this option compulsorily before the product can be purchased or can be created or saved in the admin.
Expand Advanced Attribute Properties.
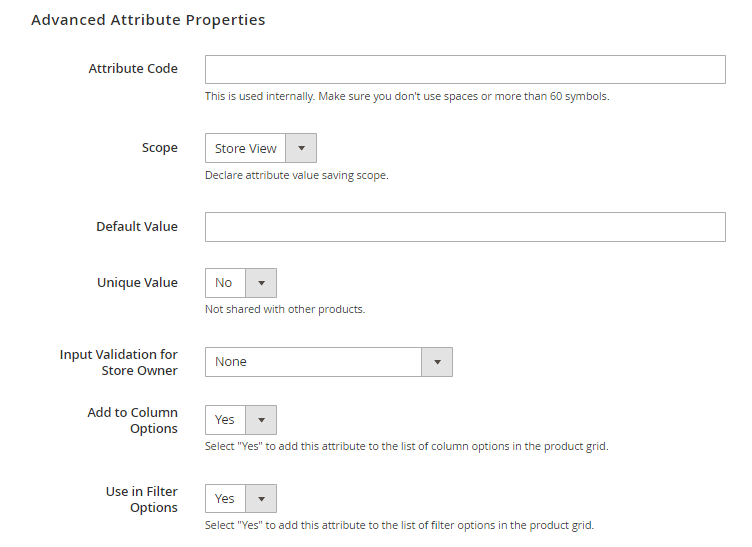
- Attribute code: the unique identifier to manage the attribute: search, import/export, get attribute ID/name/value, etc. It should be lowercase characters without any spaces. If you leave this field empty, the attribute code will automatically be generated from the default label.
- Scope: Decide how the attribute value is displayed and edited based on a specific level: Global ⇒ Website ⇒ Store View
⇒ Global: The value of the attribute is shared by all websites and store views.
⇒ Website: The value varies per website but stays the same for multiple store views under that website.
⇒ Store View: Tailor different values per store view, primarily based on the languages.
- Default Value: While creating product it will be there. But default value won’t be automatically set to all existing products. It will be added only after the re-saving of the product.
- Unique Value: Enable this field to “Yes” to avoid duplicate values. Ex:- ID-number fields like SKU.
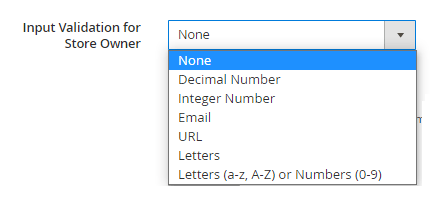
- Input Validation for Store Owner: Before saving a product, we need to validate an attribute value. There are following type of validation as shown below:-
- Add to Column Options: Set to Yes in the Add to Column Options field then this attribute will be available to the list of column options in the product grid.
- Use in Filter Options: Choose Yes in Use in Filter Options field if you want this attribute to be used while filtering products.
Note :- Attributes used for the configurable products must have Catalog Input Type to be drop-down and the Global scope.
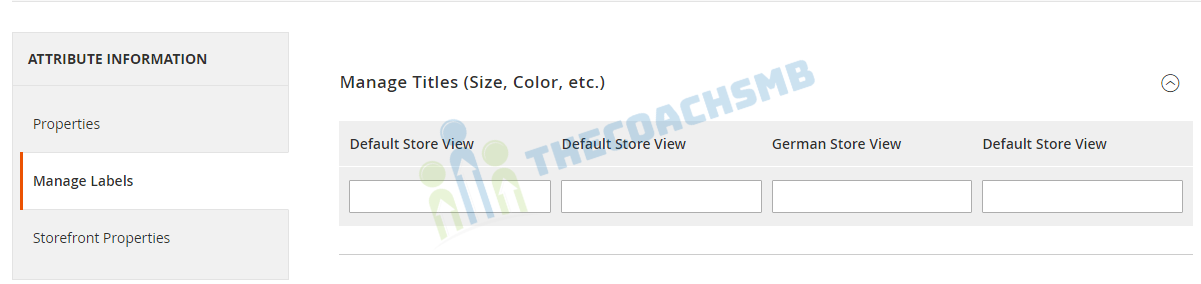
Step 3: Manage Labels Of Product Attributes Magento 2
The label is to identify the attribute in Admin and in the storefront of each store view. It makes sense if the scope of the attribute is “Store View”. If you have a multilingual site, you can set a label for each language.
Step 4: Set Up Storefront Properties
This properties of the attribute helps us to make the product searchable, filterable. We can apply promotions, etc.
Go to “Storefront Properties” under Attribute Information
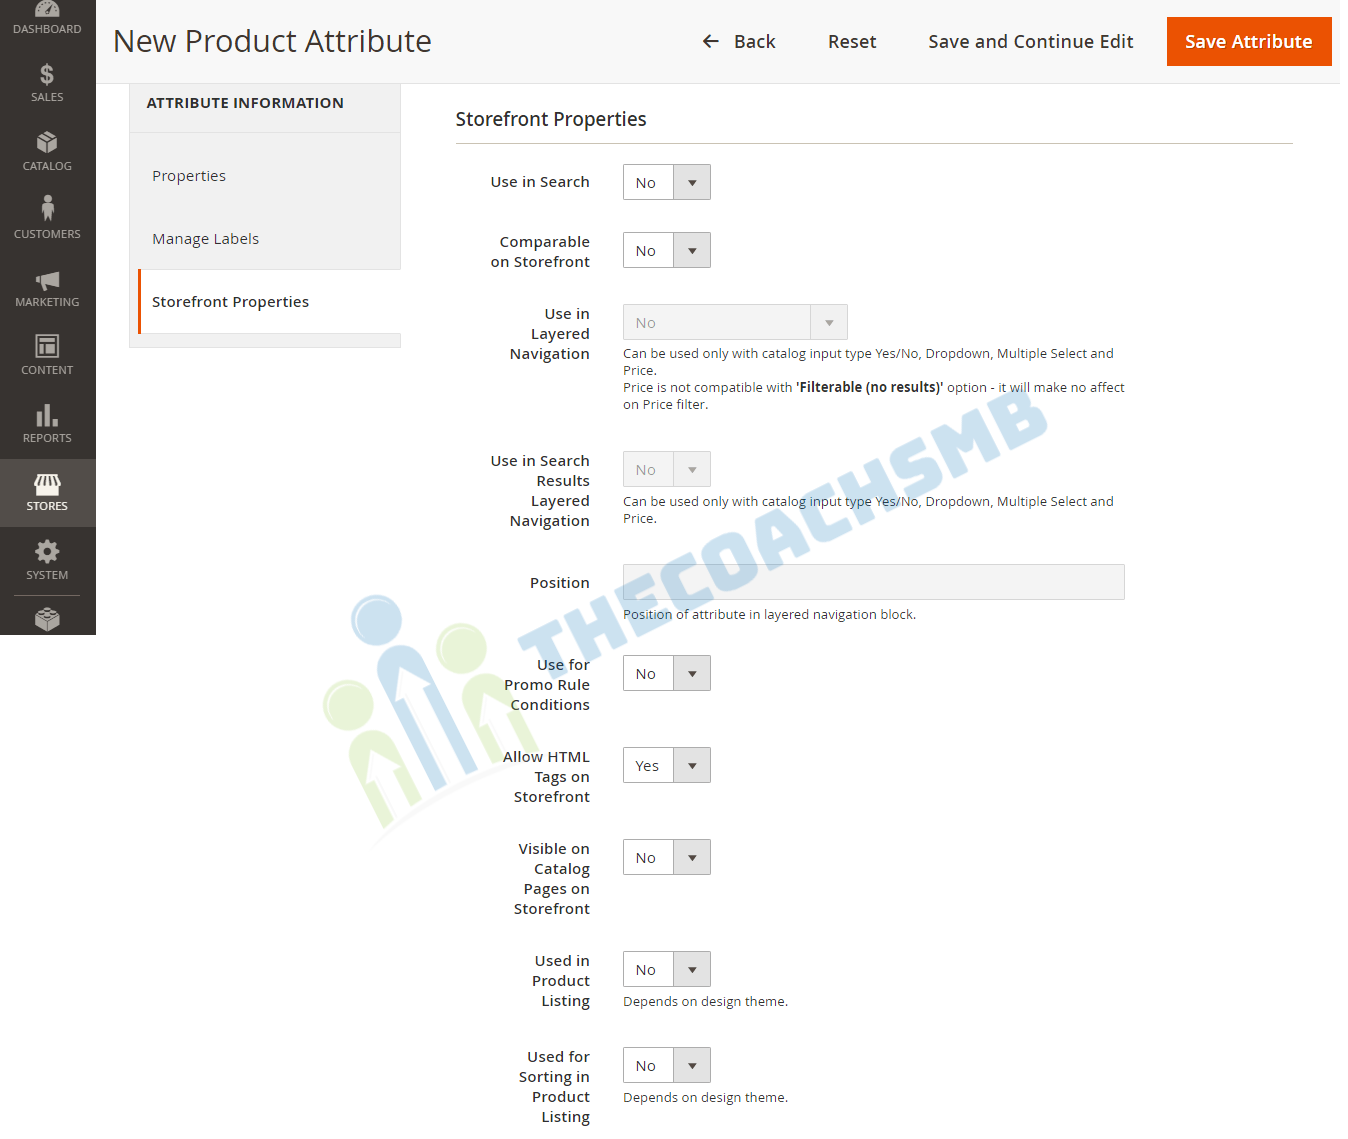
- “Use in Search”: If enabled, this will help us to make product searchable with this attribute value.
- “Comparable on Storefront”: If we enable this option, then we can see comparison of the product in product comparison with its value.
- For catalog input field to be drop down, multiple select or price:
- Set “Use in Layered Navigation” to “YES” to use the attribute as a filter in layered navigation.
- Set “Use in Search Results Layered Navigation” to “Yes” to use the attribute in layered navigation on search results pages.
- Set the relative position of the attribute in the layered navigation block in “Position“.

- Enable“Use for Promo Rule Conditions” field to use the attribute in promotion for marketing purpose.
- Enable “Allow HTML Tags on Storefront” field to allow the text to be formatted with HTML and use WYSIWYG editor
- Enable the “Visible on Catalog Pages on Storefront” field to make the attribute visible in catalog page listing.
- If Product Listing is supported with your theme, the attribute can be appeared and used as sort parameter by enabling “Used in Product Listing‘ and “Used for Sorting in Product Listing“
Step 5: Save Attribute
- Click the “Save Attribute” button to save the configuration.

Summary
This article helps you to understand the functionalities that can be possible to give to the product with the help of the attribute.
Hope you liked the article. Do comment below giving your feedback.
Happy Learning !!
Thank You !!