-
Dec, Fri, 2021

Delete Row from Grid in Magento2 Admin Module
Table of Contents
Sometimes, we will need actions for each row. For example, if we want to give permission to admin to edit the row then we will have to give an edit link in each row;
In this blog, we will create action column which will allow us to delete single row at a time.
There are 3 steps to achieve this.
- Add Action Column in the Grid
- Write DeleteAction
- Controller for Deleting Records
1. Add Action Column in the Grid
Since we are adding a column in the grid, at first we need to edit the ui-component file of the grid app/code/Vemdor/Module/view/adminhtml/ui_component/blog_listing.xml
<?xml version="1.0" encoding="UTF-8"?>
<listing xmlns:xsi="http://www.w3.org/2001/XMLSchema-instance" xsi:noNamespaceSchemaLocation="urn:magento:module:Magento_Ui:etc/ui_configuration.xsd">
    ............
       <columns name="unique_column_columns">
        <selectionsColumn name="ids">
            <argument name="data" xsi:type="array">
                <item name="config" xsi:type="array">
                    <item name="indexField" xsi:type="string">primary_id</item>
                </item>
            </argument>
        </selectionsColumn>
        <column name="primary_id">
            <settings>
                <filter>textRange</filter>
                <label translate="true">ID</label>
                <resizeDefaultWidth>25</resizeDefaultWidth>
            </settings>
        </column>
.................
        <actionsColumn name="delete_action" class="Vendor\Module\Ui\Component\Listing\Columns\DeleteAction">
            <argument name="data" xsi:type="array">
                <item name="config" xsi:type="array">
                    <item name="indexField" xsi:type="string">primary_id</item>
                    <item name="viewUrlPath" xsi:type="string">routeid/controllername/delete</item>
                    <item name="urlEntityParamName" xsi:type="string">id</item>
                    <item name="sortOrder" xsi:type="number">50</item>
                </item>
            </argument>
            <settings>
                <label translate="true">Delete</label>
            </settings>
        </actionsColumn>
    </columns>
</listing>
The bold content from the above code, you need to update as per your module.
Here, at the end I have added a new tag actionsColumn to add the action column which will let us delete a single row at a time. We have used a class Vendor\Module\Ui\Component\Listing\Columns\DeleteAction for this column. With that class we will be displaying the urls for each row.
With the argument tag we can pass some data to the class. It will get clear when we see the code for the DeleteAction class.
primary_id replace this text with your Primary Id of the table.
NOTE that here for the url we are using the route id instead of the front name. It’s because of some strange issue with magento. So please keep both the route id and the front name the same when you are developing any module.
2. Write DeleteAction
Now let’s create the class of the action column, app/code/Vendor/Module/Ui/Component/Listing/Columns/DeleteAction.php
<?php
namespace Vendor\Module\Ui\Component\Listing\Columns;

use Magento\Framework\UrlInterface;
use Magento\Framework\View\Element\UiComponent\ContextInterface;
use Magento\Framework\View\Element\UiComponentFactory;

class DeleteAction extends \Magento\Ui\Component\Listing\Columns\Column
{
    public $urlBuilder;

    public function __construct(
        ContextInterface $context,
        UiComponentFactory $uiComponentFactory,
        UrlInterface $urlBuilder,
        array $components = [],
        array $data = []
    ) {
        $this->urlBuilder = $urlBuilder;
        parent::__construct($context, $uiComponentFactory, $components, $data);
    }

    public function prepareDataSource(array $dataSource)
    {
        if (isset($dataSource['data']['items'])) {
            foreach ($dataSource['data']['items'] as &$item) {
                if (isset($item['primary_id'])) {
                    $viewUrlPath = $this->getData('config/viewUrlPath');
                    $urlEntityParamName = $this->getData('config/urlEntityParamName');
                    $item[$this->getData('name')] = [
                        'view' => [
                            'href' => $this->urlBuilder->getUrl(
                                $viewUrlPath,
                                [
                                    $urlEntityParamName => $item['primary_id'],
                                ]
                            ),
                            'label' => __('Delete'),
                        ],
                    ];
                }
            }
        }

        return $dataSource;
    }
}
The bold content from the above code, you need to update as per your module.
We used prepareDataSource to loop through each row and set the data for each row. We have looped over $dataSource['data']['items'] and we are setting url data for each row as [ ‘view’ => [ ‘href’ => ‘#’ , ‘label’ => ‘Link’ ] ]; format.
Here you can notice that we have used getData function. So what it does is that it allows us to get the values that we passed from the ui component in the argument tag.
3. Controller for Deleting Records
Now let’s create the controller which will handle the delete action Ui/Component/Listing/Columns/DeleteAction.php
<?php
namespace Vendor\Module\Controller\Adminhtml\Manage;

use Magento\Backend\App\Action;
use Magento\Backend\App\Action\Context;

class Delete extends Action
{
    public $blogFactory;

    public function __construct(
        Context $context,
        \Vendor\Module\Model\BlogFactory $blogFactory
    ) {
        $this->blogFactory = $blogFactory;
        parent::__construct($context);
    }

    public function execute()
    {
        $resultRedirect = $this->resultRedirectFactory->create();
        $id = $this->getRequest()->getParam('id');
        try {
            $blogModel = $this->blogFactory->create();
            $blogModel->load($id);
            $blogModel->delete();
            $this->messageManager->addSuccessMessage(__('You deleted the blog.'));
        } catch (\Exception $e) {
            $this->messageManager->addErrorMessage($e->getMessage());
        }
        return $resultRedirect->setPath('*/*/');
    }

    public function _isAllowed()
    {
        return $this->_authorization->isAllowed('Vendor_Module::delete');
    }
}
Here we have got the id from the param and loaded the model based on the id. Then we have deleted that blog. After deleting we have redirected back to the grid listing page. And we have also used the message manager to show the success message or error message in case some exception occurs.
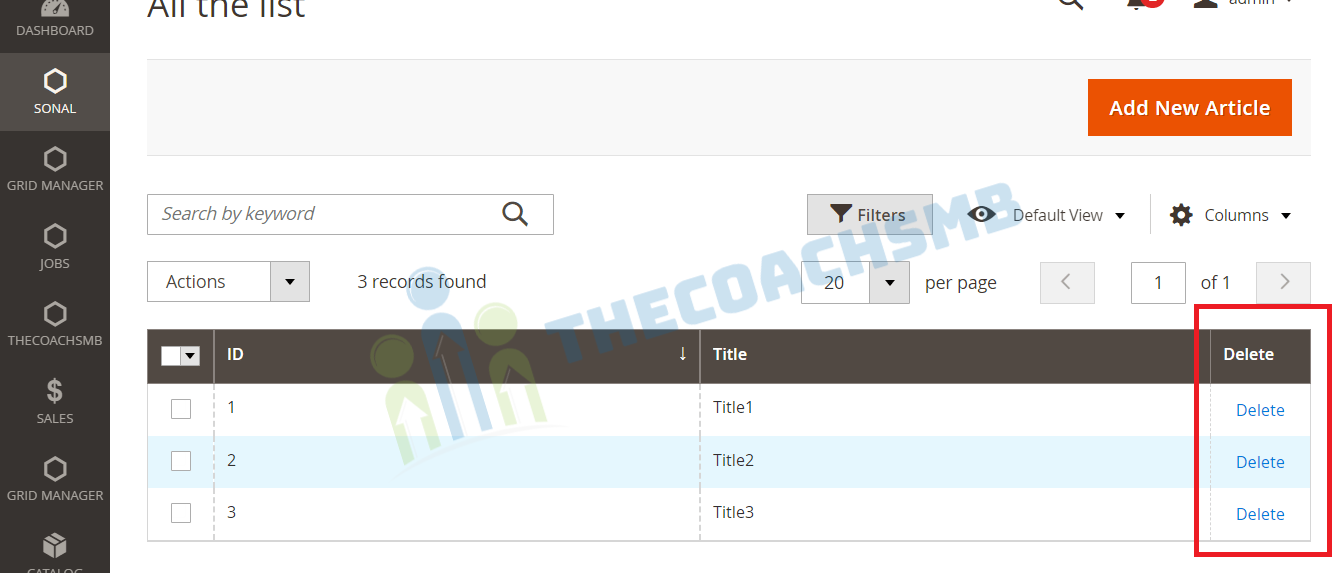
Now when you view the grid, you should be able to see the delete column and perform delete action using that.
Watch this below video for step by step explaination
Conclusion
With the help of three files Controller, Action and grid we are able to delete row from the grid. In this way, we can perform delete operations on the individual row from the grid of the Admin Module in Magento2.